|
|
The features on this page require a GENESIS64 Advanced license and are not available with GENESIS64 Basic SCADA . |

![]()
|
|
The features on this page require a GENESIS64 Advanced license and are not available with GENESIS64 Basic SCADA . |
![]()
In Hyper Historian, you can archive by automatically detaching older data from the system, and moving the detached data to a specified location (folder). You can enable archiving for each logger, each Disk or Memory Persistent Logger (as described in The Data Logger topic), and universally for all Memory Persistent Loggers (as described below in this topic). Once it is archived, data is no longer available to be reviewed online, but it can be restored at any time.
This topic describes the following archiving topics:
It also includes:
Also see the following topics:
Using Hyper Historian’s Archive Settings, you can enable Hyper Historian to automatically detach older data from the system and move them to a specified location (folder). Once archiving is enabled and Hyper Historian is creating archive files, you can back up the archive files to CD, DVD, tape, or some other “permanent” storage media for long-term storage.
In addition to enabling archiving in the Archive Settings, you can also specify whether Hyper Historian will generate “Metadata” for the archive files. An archive metadata file contains detailed information about the archive file including a list of the tags whose data is stored in the archive file. Metadata information, when available, is displayed on the Archive Management screen, which is also the screen you can use to re-attach archived data files to the Hyper Historian system.
Open Workbench and select the Hyper Historian provider.
Expand Loggers and select a logger with a Storage Mode type of “Disk Logger”.
Archiving Section for Disk Loggers
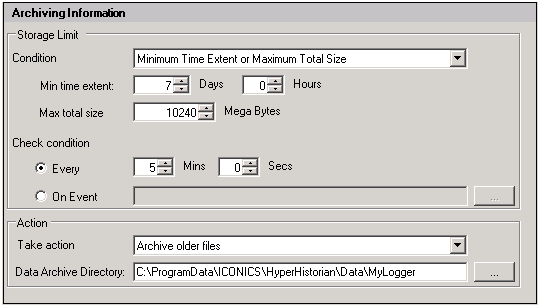
Under the Archiving Information section, define the Storage Limit settings, which is the amount of data that will be kept attached to the running system. When the storage limit is exceeded, the archive will occur. You can set the limit based on time, on total size, or both. (When limiting on both, either one limit or the other needs to be exceeded – they do not need to both be met at the same time.)
Define the Check condition, which is how often the system will check the storage conditions to see if an archive is needed.
Under Action, select Archive older files, and specify a data archive directory, if needed. If no data archive directory is specified, this default location is used:
C:\ProgramData\ICONICS\HyperHistorian\Data\<LoggerName>
Only entire logging files will be archived. The entire file must fall outside of the minimum time extent or the maximum total size for it to be archived. This means that the exact archiving schedule is partially dependent on the settings in the File Storage Information section.
Example: File Storage Information is set to create a new file every 1 day at midnight. Archiving Information is configured with the Minimum Time Extent setting, and the Min Time Extent is set to 7 days. The system is started on the morning of January 1st. Hyper Historian will create one log file per day, and for the first seven days no archiving will be done. As soon as all of the data in the oldest log file becomes older than 7 days (which will be morning on January 9th) the next archiving check will cause that oldest file to be archived.
Note that for best results the logger should be creating new log files at a smaller interval than the storage limit. If, for example, the File Storage Information section was configured to create a new file only once every 30 days and the archiving was set to archive with a minimum time extent of 7 days, the archive would not actually happen until 37 days later – 30 days to fill up the file, then 7 days for all of it to become old enough to archive.
Once the Hyper Historian’s logged data is archived, the data is no longer immediately available for playback on a trend display or available through the SQL Query Engine. However, previously archived data can easily be reattached to the system so that it is once again made viewable on trend displays and accessible via the SQL Query Engine. This is done using the Hyper Historian Archiving Management screen.
In the Hyper Historian provider, go to System Administration à Archiving Management.
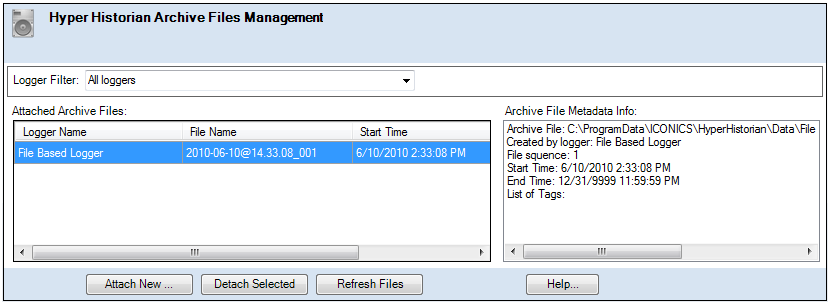
You can reattach previously archived files by clicking on the “Attach New…” button and browsing to the folder containing the archive files to be reattached. (You can select more than one file using the Shift or Control keys.) The reattached archive files will be listed in the Attached Archive Files window. If “Generate Metadata for Archiving Files” was selected in the System Settings, the metadata will appear in the window to the right.
Attaching Archive Files
As soon as a file has been attached it should be available for viewing or reporting as if it had never been archived.
Once you are done reviewing the data, detach it from the system by selecting the attached data and clicking the Detach Selected button. The archive file will stay in the Archive folder even after detaching so that you can reattach the file whenever necessary to view data again.
It is not recommended to leave archived data attached for extended periods of time, as this will slow down the performance of your system – this is why the data was archived in the first place!
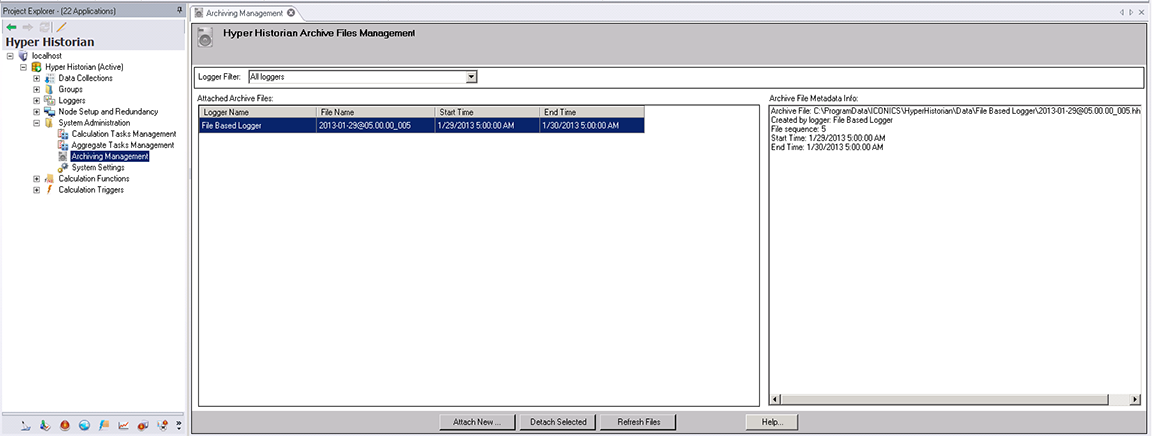
Once the Hyper Historian’s logged data is archived (detached from the system), the data is no longer available for playback on the trend display nor available through the SQL Query interface. However, previously archived data can easily be reattached to the system and again made viewable on trend displays and accessible via the SQL Query interface. This is done via the Hyper Historian Archiving Management screen.
To access Archiving Management, double-click Archiving Management located under the System Administration node in the Project Explorer. The Archiving Configuration is pre-filled from the information added in the System Settings.
You can then re-attach previously-archived files by clicking on the Attach New button and browsing to the folder containing the archive files to be reattached. You can multi-select files (by holding down the Shift or Control key while selecting files).
|
|
Note: The following naming convention is used for the Archive files: <Logger Name>_<Start Date>_<Start Time>_<End Date>_<End Time> where the format for the Date is yyyymmdd and the format for the Time is hhmmss. |
The re-attached archive files are listed in the Attached Archive Files window. If the Generate Metadata for Archiving Files option is selected in the System Settings, that metadata appears in the window to the right. For more information, refer to Reattaching Archived Files in Hyper Historian.
Archive Management
The Hyper Historian Logger cache is used when the logger stores incoming values to the disk or reads stored data from the disk. The disk blocks are cached to improve operational performance. The total cache space is divided into 2 regions:
Memory Persistent Logger cache - Used for memory-based loggers (persistent trends)
File Based Logger cache - Used for file-based loggers
The regions are functionally equal. Configuring them individually allows for better allocation between memory and disk-based loggers (i.e. it is possible to reserve a certain region for memory-only data). Each region has two sub-areas, for index and for data.
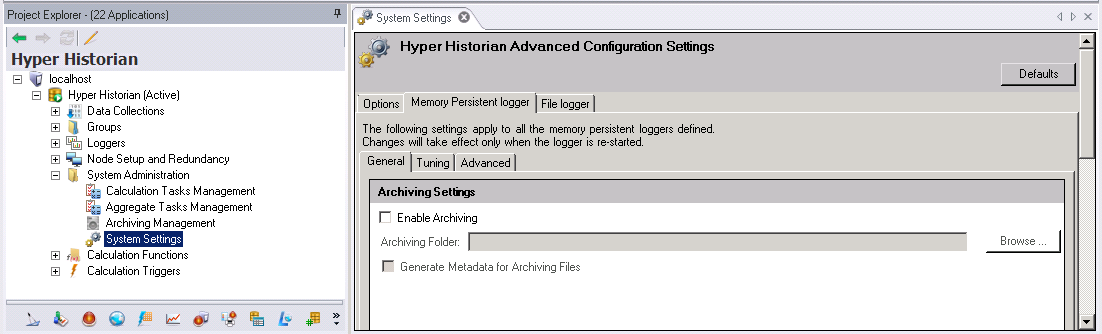
To adjust these settings, under System Administration, double-click System Settings.
For memory-persistent loggers, go to the Memory Persistent Logger tab and use the Tuning sub-tab.
For file-based loggers, go to the File Logger tab and use the Cache sub-tab.
The Hyper Historian logger stores data into disk blocks and prefers to store the data of a single tag into a continuous stream of blocks (that is, so the data of multiple tags in the same file don’t interleave). In addition, if the amount of data belonging to individual tags is small, the logger puts the data of multiple tags into the same block (so the space is not needlessly wasted). The actual disk file evolves over time to meet both goals. It can start with all tags having data in a small number of blocks and end up with each tag having data in a dedicated set of blocks.
A data block with values of a particular tag is needed when the given tag is being written or read, where reading is in general far less frequent and more effective operation (when block is fetched, usually its entire content is read). Therefore, write operations are far more important with respect to overall performance. The following rules are observed:
If a file covers a long period of data with frequent changes, it is likely that, at the end of file ‘open time’ (period in which incoming values are stored to that file), each tag may have its own set of data blocks.
Individual data blocks can house about 300-700 values, depending on data type.
For logger performance, it is best if each frequently changing tag (i.e. one that would likely end up having a set of dedicated data blocks) has its own slot in the cache. There is no significant difference in the actual change rate of such a tag ~ whether it is estimated that 2,000 or 200,000 values of a tag should be stored in the file.
When decoded in memory, the data block size cap is estimated to 25 KB, so having e.g. 10,000 frequently changing tags would ask at least for 250 MB of cache space dedicated to data blocks.
Similar formula for slowly changing tags can be created: when it is estimated that e.g. value comes once in an hour and the file covers whole day, it could be expected that 15-25 tags could be stored to single block.
In such case, having 20,000 such tags would yield need at least for 1,000 cache blocks ~ 25 MB of cache space.
Index blocks follow different patterns than data blocks. For each data file, the size of the index file is usually 10-100 times less than the size of the data file. On the other hand, having indices in memory is important as well, so it is necessary to dedicate some memory to index blocks. Use the following guidelines in your configuration:
Recommended space for index blocks is 1/5 of the space recommended for data blocks.
If the memory space is below recommended values, the following holds: the more memory cache has, the better is its relative performance with respect to the number of tags (100 MB for 8,000 tags is worse than 200 MB for 16,000 tags etc.).
The cache size changes do not propagate on-the-fly. It is necessary to restart core to put them into effect.
The logger will use all of the available cache space eventually (unless it is bigger than the total amount of data stored by the logger). This means you should avoid setting cache size very high (e.g. anywhere near your total system memory) unless you know what are you doing (e.g. you’ve been running Hyper Historian for some time and have its allocation pattern verified locally).
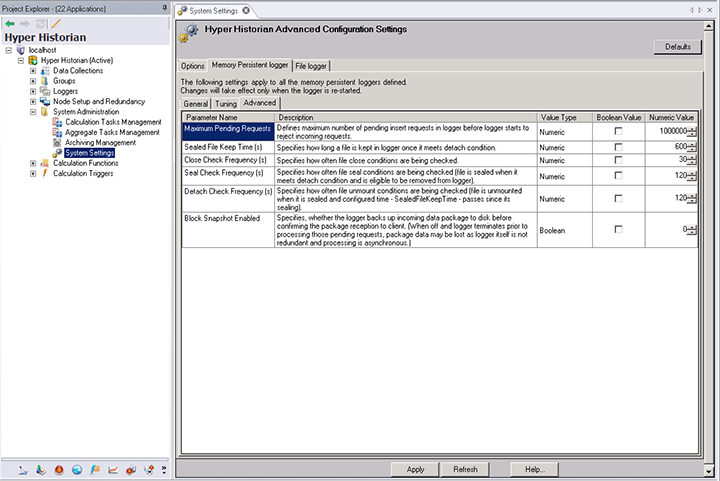
Hyper Historian’s Advanced Configuration Settings are used on logger startup only. If some parameter is modified, the logger will have to be re-started to apply the changes. Among the possible parameters to modify are Maximum Pending Requests, Sealed File Keep Time, Close Check Frequency, Seal Check Frequency, Detach Check Frequency and Block Snapshot Enabled. See the System Settings Advanced tab for full description of each parameter, Value Type, Boolean Value Setting and Numeric Value. You can also click on a Defaults button to reset all parameters back to their original settings. For more information, refer to Advanced Configuration Settings in Hyper Historian.
Advanced Settings in Hyper Historian