![]()
![]()
A local alias is variable that is defined in and used in a GraphWorX display. Its use doesn't extend beyond the confines of the display. GraphWorX64 is the only ICONICS product that uses local aliases.
Typically, using local aliases is necessary if you are using symbols in your GraphWorX displays. (For more about symbols, refer to Symbol Library.) Local aliases can be used in GraphWorX64 expressions, data source tags, object descriptions, and anywhere else that the Data Browser can be accessed in GraphWorX64 . For example, a Process Point object's Description property can be expressed using local aliases. Its Text property and dynamic Description and DataSource properties (on its Dynamics tab) can all be expressed using local aliases, too.
This topic provides the following discussions:
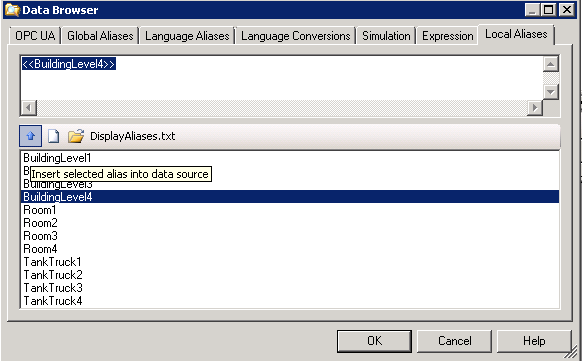
When you browse for data in GraphWorX, the Data Browser displays the Local Aliases tab, where you can select a local alias from a file. For more information, refer to Local Aliases Tab on the Data Browser.
You can assign the value of a local alias at two levels in a display:
Display-level. This is typically used for opening a pop-up menu and assigning local aliases for the window that will open.
Object-level. This is typically used when an object is used multiple times in one display.
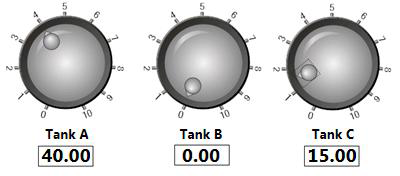
When you use a symbol more than once in a display, it's often necessary for you to use object-level values for local aliases so that you can give the local alias a different value for each object in the display. The following illustration shows a click knob that is reused on a console. In this example, the click knob symbol uses a local alias as its Data Source; when the click knob is added to a display, the value of the local alias is set to the OPC tag that the click knob represents. A description of how to set this up is provided below in Setting the Alias Value at the Object Level.
A Use for Object-Level Local Aliases
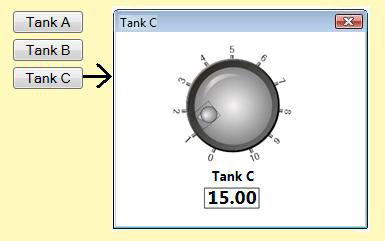
In a different example, the click knob is added to a display that is used as a pop-up dialog at runtime. On the main display, there are three buttons (one for Tank A, one for Tank B, and one for Tank C). By clicking one of the Tank buttons, the runtime user pops up a dialog box that shows information about that tank, including the a click knob. In this case, you would set the data source value of click knob at the display level. The value would be passed to the display by the button that the user clicks. A description of how to set this up is provided below in Setting the Alias Value at the Display Level and Passing Multiple Local Aliases for an Object.
A Use for Display-Level Local Aliases
Typically, you will want to use local aliases in the properties of symbols and other objects that you reuse in your GraphWorX displays. A typical use would be to insert a local alias as the property of a Data Source or Text property, so that when you add the symbol or object to a display, all you need to do is assign the value of the local variable (which is described below in Setting the Value of a Local Alias). For a symbol, you would insert the local alias into the symbol that gets saved in the Symbols Library.
To use a local alias for an object's property:
Make sure the object is displayed on the GraphWorX work surface.
Select the object and go to the property in which you want to use the alias. (For example, if you are using the alias for a button's text, go to the button's Text property on the Properties tab. Or if you are using it as the data source, go to the Dynamics tab and go to the dynamic's Data Source property.)
In the property, type the alias or select it from a file of local aliases.
To type the alias, use this format: {{"<<localAliasName>>"}}
To select the alias from a file of local aliases:
Click the ellipsis button [...] to open the Data Browser.
In the Data Browser, go to the Local Aliases tab.
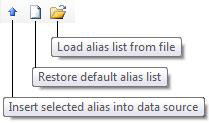
Load or reload the file of local aliases if it is not already loaded. (For help doing this, refer to Local Aliases Tab on the Data Browser.) Click here to see an example.
Select an alias from the bottom of the tab, then click the Insert Selected Alias icon on the toolbar.
Click OK to close the Data Browser.
The local alias appears in the property's field, as shown in the example below.
A Local Alias Used as the Text Property of an Object
![]()
Save the object.
To insert a local alias into an OPC tag or other string, type the alias into that segment where you want to use it, formatted in the following syntax:
<<localAliasName>>
In the following example, the local alias is tank:
[opcserver].<<tank>>.out
You can modify the value of a local alias for the display or for individual objects in the display.
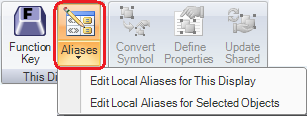
One way you can do this using the Aliases button on the Dynamics ribbon. To set the value of a local alias at the display level:
Go to the Dynamics ribbon and click the Aliases button.
Select Edit Local Aliases for This Display. This opens the Edit Local Aliases dialog box. The dialog box contains local aliases for the display. You can modify the value of any alias.
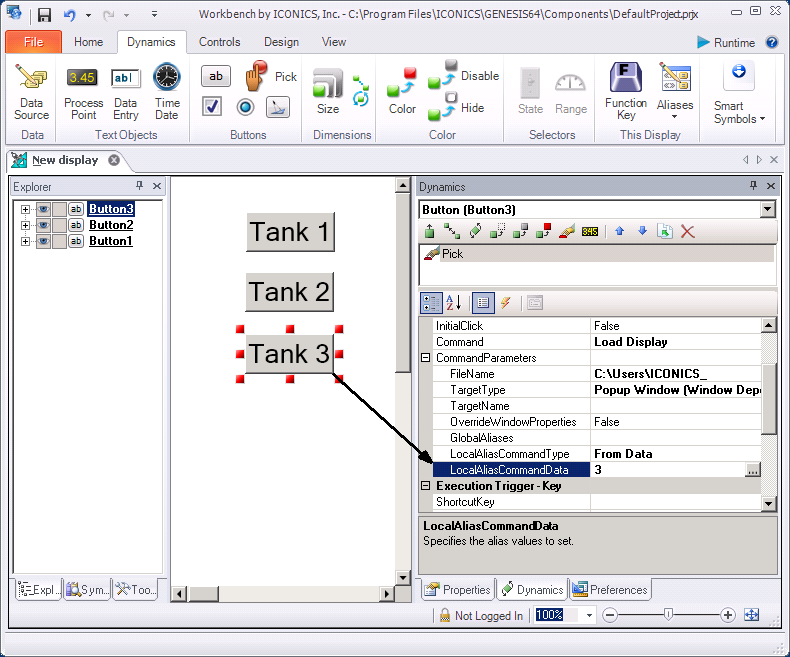
Alternatively, in the display-level example above, the value is set by the button's Pick dynamic, when the main display passes the value to the pop-up window. The following illustration shows how a button's Pick dynamic is set using the properties called LocalAliasCommandType and LocalAliasCommandData. (Click here to see the illustration.) In this illustration, these two properties indicate that the value is populated directly from data (the number 3) typed in the LocalAliasCommandData property. However, if you have to pass multiple values for multiple aliases to the popup window, you can create a file in which all of the local aliases are passed for the object. For information on how to create that file, refer to Passing Multiple Local Aliases for an Object, below.
In a GraphWorX display, when you are opening a window using a script or dynamic in GraphWorX (as described above in Setting the Value at the Display Level), you may need to pass values for several local aliases. You can do this by creating a file of the local aliases and their values and then passing the file. Passing the values sets the values at the display level of the window that is being opened.
To create the file of local aliases and their values:
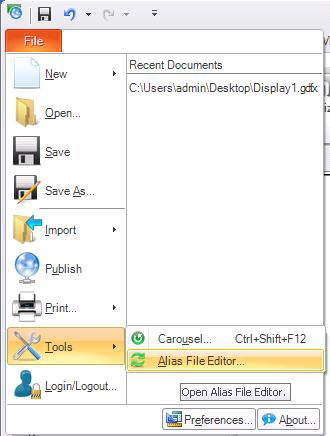
From the GraphWorX File menu, select Tools, then Alias File Editor. This opens the Edit Local Aliases dialog box.
In the Alias Name column, list all of the local aliases whose values you are passing to the window.
In the Alias Value column, enter the value to be passed for each local alias. You can type the alias value or click the ellipsis button ![]() to open the Data Browser and select the value, such as an OPC tag, to be assigned.
to open the Data Browser and select the value, such as an OPC tag, to be assigned.
Click the Save icon ![]() and save it to a folder where local alias values are stored. Give the file a name that makes it easy to find and accurately identifies its content and use. The file must be stored in a location where it can be accessed when the displays in which it is used are packaged.
and save it to a folder where local alias values are stored. Give the file a name that makes it easy to find and accurately identifies its content and use. The file must be stored in a location where it can be accessed when the displays in which it is used are packaged.
To modify an existing file, click the Load From File icon ![]() , navigate to the file and select it. Then repeat steps 2 through 4.
, navigate to the file and select it. Then repeat steps 2 through 4.
To create a new file, click the Clear Alias Table icon ![]() , and repeat steps 2 through 4.
, and repeat steps 2 through 4.
To pass the file to the Load Display command in a Pick dynamic:
Make sure the Pick dynamic is selected. The Pick dynamic must be assigned to the object that runtime users will click to open the window that you are passing local alias values to.
Set the Command property to Load Display and set the required properties which are:
For the FileName property, select the display that the local alias values are to be passed to, which is the file to be opened when the Pick dynamic executes.
Set the TargetType property to the type of window to be opened.
For the LocalAliasCommandType select From File.
For the LocalAliasCommandData, select Browse Files. Then navigate to the file, select it, and click Open. This loads the file name (and its path) as the LocalAliasCommandData property.
For more about Pick dynamic, refer to Pick Actions.
To set the value of a local alias for an individual object in a display:
Select the object whose local alias value you are setting. You can right-click the object and select Edit Local Aliases
Go to the Dynamics ribbon.
Click the Aliases button.
Select Edit Local Aliases for Selected Objects. This opens the Edit Local Aliases dialog box. The dialog box contains local aliases for the selected objects.
For the local alias you are modifying, click in the Alias Value column.
Type the alias value or click the ellipsis button ![]() to open the Data Browser and select the value to be assigned. Its value can be an OPC tag, a global alias, a language alias, a language conversion, a simulation variable, an expression, or another local alias.
to open the Data Browser and select the value to be assigned. Its value can be an OPC tag, a global alias, a language alias, a language conversion, a simulation variable, an expression, or another local alias.
If you're setting the value for one object, it is likely there are other objects, too. Repeat these steps for each object.
Save when you are done.