![]()
![]()
Three separate agents are included under the Telephony folder of the AlarmWorX Multimedia Configurator tree control:
The Call-out Agent calls a defined number and gives a message with options to respond.
The Call-In Agent enables callers to dial in by phone to get alarm information and browse for OPC Data Access tags.
The PA Agent uses a public address (PA) system device to announce alarms and events over a loudspeaker.
To set the default settings for the Telephony Agents, click the Telephony folder in the Multimedia Configurator. (If you do not see the General Settings, make sure that Dialog View is checked on the View menu.) The General Settings tab, shown in the figure below, is described following the figure.
Telephony Agent General Settings

The following prerequisites must be in place before you can configure a telephony agent:
TAPI Compliant Voice and Dialogic Modems are supported with the Telephony call-out agents.
The following TAPI modem models have been tested for use with the Telephony agent:
Multi-Tech Systems MT9234ZPX-PCIE and Multi-Tech Systems MT9234ZPX-UPCI.
You must have a Telephone card installed on the computer on which you are running the Telephony Agents if you wish to run Call-In. This card also supports Call-out. AlarmWorX Multimedia supports Dialogic® boards. Dialogic boards do not work for Windows 98, so neither the Call-In Agent nor the Call-out Agent will work on Windows 98. You also need to have an analog phone line connected to the board. You must have a telephone card installed.
|
|
Note: Digital lines are not supported. Only Dialogic boards are supported for the current version of AlarmWorX Multimedia. For information about purchasing and installing Dialogic boards, visit the web site: http://www.dialogic.com/contact/default.htm. For Dialogic configuration settings, refer to Dialogic Configuration Settings. |
|
|
Note: ICONICS does not provide support for installation and configuration of Dialogic cards. Please contact your Dialogic vendor for support. |
|
|
Note: It is a good idea to test the Dialogic card has been installed and configured. Dialogic provides several sample applications that can be used for this purpose. The Voice Horoscope program is a good starting application. To launch it, select Start > Programs > Dialogic System Software > Dialogic Sample Programs > Voice Horoscope. Once the program is launched, select Channels > Open. The program is now ready to receive phone calls. If the Dialogic card is correctly installed, you should hear a response to a call. |
Once prerequisites are in place, you can configure telephony agents beginning on the Telephony tab shown in the figure above. Options on the Telephony tab and Advanced Phone Lines Reservation dialog box are described below.
Phone Lines Reservation: This section is where you set aside phone lines for a specific use.
Phone Lines: For the first five phone lines, you can check the phone lines that will be used by the Telephony Agents for Incoming, Outgoing, and PA (public address) Calls. Select only those phone lines that have physical support (i.e., the phone line is actually plugged into the Telephone card in the computer). For additional phone lines, click the Advanced button.
Incoming Calls: Select the phone lines reserved for incoming calls.
Outgoing Calls: Select the phone lines reserved for outgoing calls.
PA Calls: Select the phone lines reserved for public address calls.
Advanced button: If you are using more than five phone lines or lease lines, or your are using a MAPI modem, click the Advanced button to open the Advanced Phone Lines Reservation dialog box, described at the bottom of this topic. Click here to scroll down to the Advanced Phone Lines Reservation dialog box topic now.
|
|
Note: Any phone lines that are not reserved will be used as general purpose lines (i.e. for either incoming or outgoing calls). The first time you set up the Telephony agent, it is recommended that you use a single phone line to test the configuration. Only after you have successfully tested a single phone line should you experiment with adding multiple phone lines to your configuration. |
|
|
Note: The number of phone lines specified must be less than or equal to the actual number of phone lines that will be used. If the number of lines specified in the Configurator is greater than the actual number of lines in use, the Call-In Server will work under the assumption that additional phone lines are available even though the lines do not actually exist. Although up to 20 lines are supported, the number of lines that can be used may be limited by the type of Dialogic board. |
|
|
Note: The Telephony agents currently support up to 20 phone lines. However, the agent has been tested with a maximum of four phone lines. |
Menus Security: This section is where you specify security restrictions for Call-In Agents.
Call-In PIN Protect: Specify a numeric password or PIN that users must enter prior to each menu in order to progress through the phone menus in a Call-In Agent.
|
|
Note: This is different from the general security settings used for logging into the phone system. (The login settings are configured in the Call-In Agent tree control.) |
Restrict same menu visits to: Limits the number of times a user can access the same menu through a Call-In Agent. This limits the overall time users can remain in the phone system to prevent users from tying up the phone lines.
Password Retries: Sets the number of times a user will be allowed to enter an incorrect password on the phone keypad.
Menus Timeouts (Seconds): This section is where you specify time-out restrictions on callers using Telephony agents.
Initial Key Timeout: Sets the number of seconds the phone will wait for a key press before retry.
Inter-Key Timeout: Sets the number of seconds allowed between key presses on the phone keypad before ending caller input.
Total Time: Sets the total consecutive time (in seconds) that a caller may spend in the same menu before time out. This includes the time the system uses to process and deliver the text-to-speech messages to the caller.
Clicking the Advanced button opens the Advanced Phone Lines Reservation dialog box, shown below. You must access this dialog box to configure Telephony Agents if you are: using more than five phone lines, using lease lines, or using a MAPI modem. Other options are also available on the dialog box.
Advanced Phone Lines Reservation Dialog Box
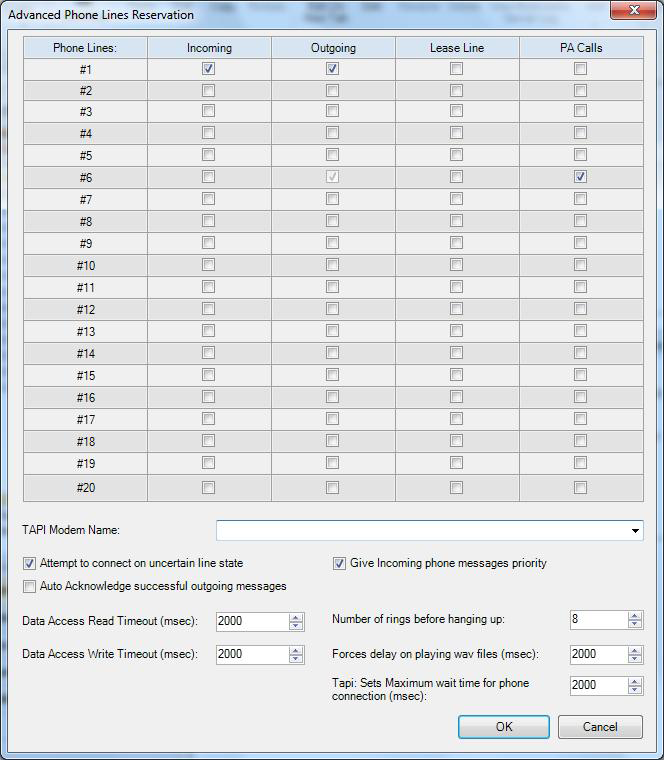
In the Advanced Phone Lines Reservation dialog box, you can provide the following settings:
Phone Lines: Check the phone lines that will be used by the Telephony Agents for Incoming, Outgoing, Lease Line, and PA (public address) Calls. Check only the phone lines that have physical support (i.e., the phone line is actually plugged into the Telephone card in the computer).
TAPI Modem Name: If you are using a TAPI modem, select the name and model of the modem you are using. The model that was registered when AlarmWorX Multimedia was installed appears in the drop-down list. If the TAPI modem you registered does not appear in the drop-down list, type the name and model here. For example, type: Multi-Tech Systems MT9234ZPX-PCIE.
If you don't know the name and model of the TAPI modem installed on the machine, click here for further instructions.
Attempt to Connect to Uncertain List State: Check this option if you want outgoing calls to be attempted regardless of the state of the phone line in use.
Auto Acknowledge Successful Outgoing Messages: Check this option if you want outgoing messages to be acknowledged automatically. This option pertains to all phone lines.
Data Access Read Timeout: Specify the amount of time (in milliseconds) you want to wait when attempting to read data before timing out. This option pertains to all phone lines.
Data Access Write Timeout: Specify the amount of time (in milliseconds) you want to wait when attempting to write data before timing out. This option pertains to all phone lines.
Give Incoming Phone Messages Priority: Check this box to give incoming phone messages a priority on all phone lines.
Number of Rings before Hanging Up: Specify the number of rings to wait before attempting an outgoing call.
Forces Delay on Playing Wav Files: Specify the amount of time (in milliseconds) to wait before playing a .wav file on an outgoing call. For example, use this option to allow the receiver to answer and hear a recorded message.
Tapi: Sets Maximum Wait Time for Phone Connection: If you are using a TAPI modem, specify the amount of time to wait for a phone connection before abandoning the call.
Back to Telephony Agents or Telephony Agents: General Settings
Related topics: