|
|
The features on this page require an add-on to work with GENESIS64 Basic SCADA. |
|
|
The features on this page require an add-on to work with GENESIS64 Basic SCADA. |
To Add a Device to a Network
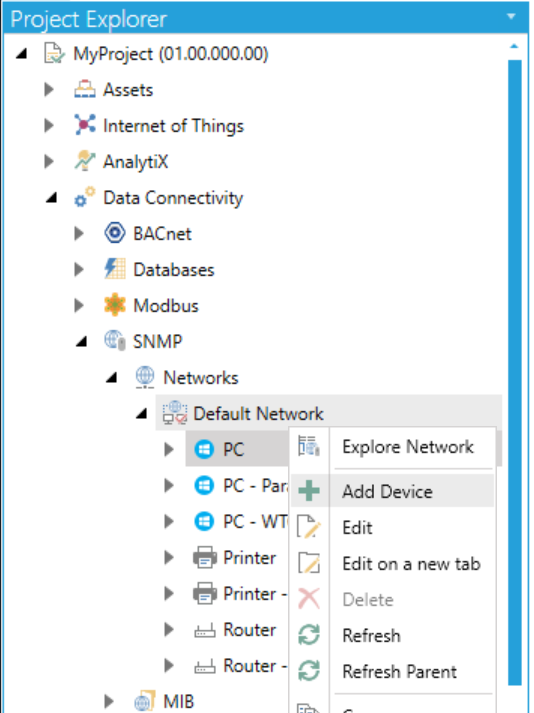
Open the Workbench and expand your project within the Project Explorer. Expand the SNMP provider node. Right-click on a Network, then click on Add Device, as shown below.
Add Device from Project Explorer

OR
Select a Network in the Project Explorer then click on the Add Device button, shown below, in the Edit section of the Home ribbon in the Workbench.
Add Device Button

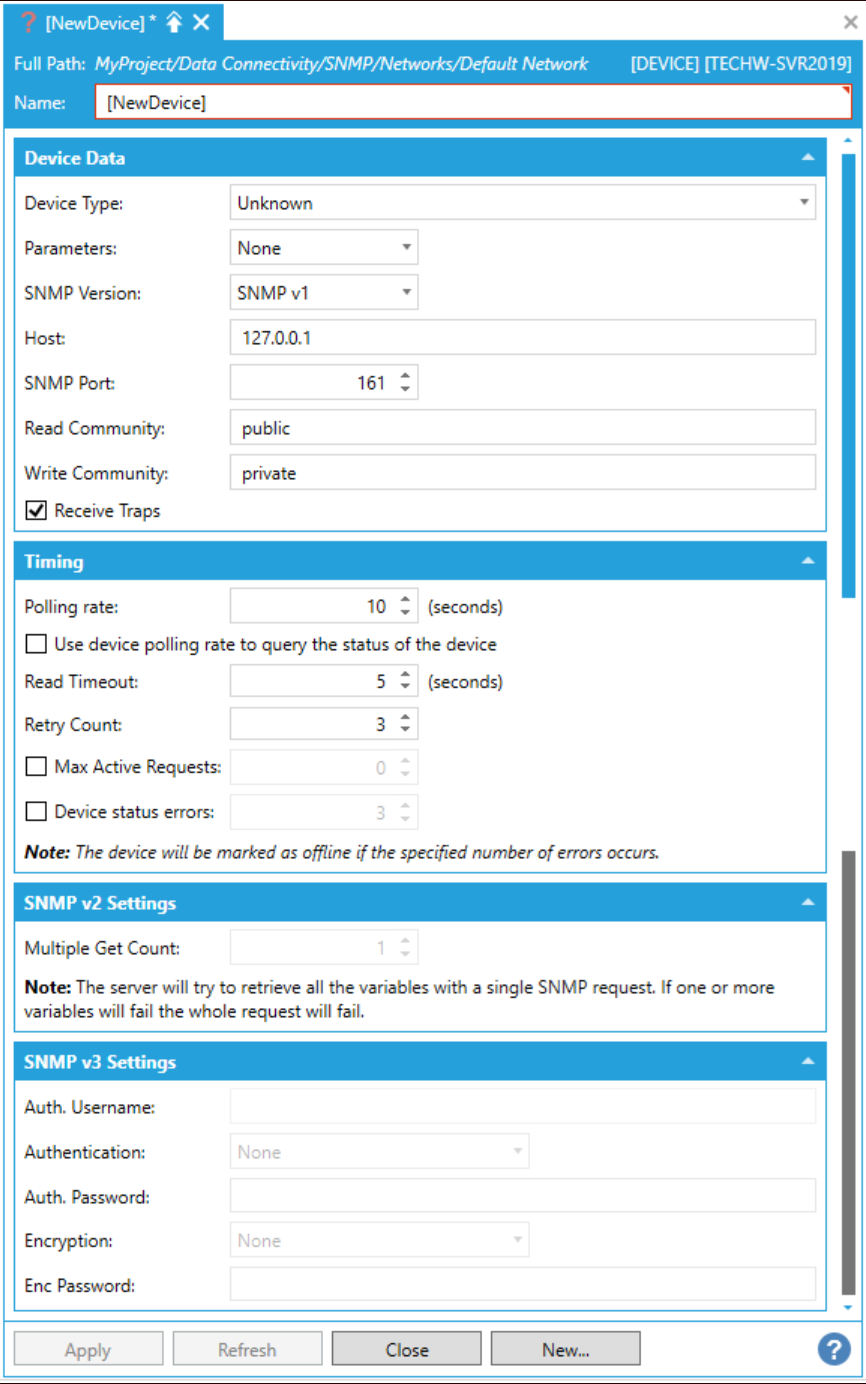
This opens the Device properties, shown below, in the middle section of the Workbench. Enter a name for the Device in the Name text entry field.
Device Properties

Device Data
Device Type - Use the pulldown menu to select from Apple, AS 400, Bridge, Firewall, Handheld, HP Printer, HUB, Linux, No SNMP, Phone, PLC, Printer, Router, Switch, Unknown, UPS, Webcam, Windows, Windows (Old Versions), or Wireless.
Parameters -Use the pulldown menu to select from None, Host, or Host and Port.
SNMP Version -Use the pulldown menu to select from SNMP v1, SNMP v2, or SNMP v3.
Host -Enter a host IP in the text entry field.
SNMP Port -Enter a port number in the text entry field or use the up/down arrow buttons.
Read Community -Enter a read community for the device in the text entry field. Default is public.
Write Community -Enter a writer community for the device. Default is private.
Receive Traps -Click this checkbox in order to receive Traps from this device. Default is set to true.
Timing
Polling rate -Enter a polling rate (in seconds) in the text entry field, or use the up/down arrow buttons.
Use device polling rate to query the status of the device -True to use the polling rate to determine device status.
Read Timeout -Enter a time, in seconds, in the text entry field (or use the up/down arrows) after which a read attempt should timeout.
Retry Count -Enter a number of retry attempts in the text entry field (or use the up/down arrows).
Max Active Requests - Click the nearby checkbox to activate this setting. If active, you can enter a maximum number of active requests in the text entry field (or use the up/down arrow buttons).
Device status errors - Click the nearby checkbox to activate this setting. If active, you can enter a number of device status errors in the text entry field (or use the up/down arrow buttons).
Note: The device will be marked as offline is the specified number of errors occurs.
SNMP v2 Settings
Multiple Get Count - Once activated, enter a number in the text entry field, or use the up/down arrow buttons.
Note: The server will try to retrieve all the variables with a single SNMP request. If one or more variables will fail, the whole request will fail.
SNMP v3 Settings
Auth. Username - If you have selected an Authentication protocol, enter a User Name in this text entry field.
Authentication - SNMP v3 allows you to set an Authentication protocol. Use the pulldown menu to select from MD5, SHA or None.
Auth. Password -If you have selected an Authentication protocol, enter a Password in this text entry field.
Encryption -SNMP v3 allows you to set an Encryption protocol. Use the pulldown menu to select from AES 128, AES 192, AES 256, DES, Triple DES or None.
Enc Password - If you have selected an Encryption protocol, enter a Password in this text entry field.
Once you have completed making your changes to the Device properties, click Apply then Close to return to the Workbench.
See Also: