![]()
![]()
Time synchronization is very important for OPC UA communication. You may encounter problems when two computers want to communicate together over OPC UA and each computer has different time/date. In this case, the communication cannot be established and we need to somehow synchronize the time between these computers.
There are different ways to synchronize the time and the way to do it depends on some of the following factors:
If the computers are joined to the same domain, you can use the following steps to make sure the time on each machine is synchronized.
Go to Start -> All Programs -> Accessories, and click Command Prompt.
Type in w32tm /resync, and press ENTER (this will synchronize the time to your domain controller).
You should see a message saying “Sending resync command to local computer” and after a few seconds, another message should show saying “The command completed successfully”. When you receive this message, it means that the local time was successfully synchronized with the domain controller.
If the case you want to synchronize the other computer in the domain from your local computer, type w32tm /resync /computer:<DNSNameOrIP> in the command prompt where the DNSNameOrIP is the name of the computer name or IP address in which you want to use to synchronize the time.
When you want to check the synchronization (and time difference) with the other node, type w32tm /monitor/computers:<DNSNameOrIP>.
When you want to check the Domain Controller for time synchronization details (e.g. NTP server or time difference between your computer and DC). Type w32tm /monitor /domain:<DomainName>.
NOTE: If you want to learn more about w32tm tool, see Microsoft Technet for “Windows Time Service Tools and Settings”.
If the computers are not joined to the same domain, but are in a LAN with internet access, you can use a time server to synchronize the time on each of the machines. Follow the steps below.
Right-click the Windows clock in the task tray, and then choose Adjust Date/Time from the menu.
Click the Internet Time tab and click the Change Settings button.
Figure 1 - Data and Time: Internet Time
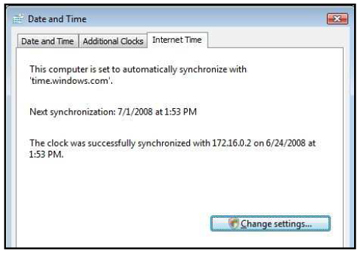
Now if you want to synchronize time by the defined server (by default “time.windows.com”) click the “Update Now” button. A message should come up telling you if the synchronization was successful or not.
To change the default time server, you can either expand the drop down server list and select another server (time.nist.gov) or define the desired internet time server manually (ns.arc.nasa.gov).
Figure 2 - Internet Time Settings

NOTE: You can find more internet time servers at http://tf.nist.gov/service/time-servers.html.
Enable the internet synchronization by checking the “Synchronize with an Internet time server” checkbox if it’s not already checked.
The default automatic synchronization period is one week. This period cannot be changed directly from the dialog, but you can change it in the registry.
NOTE: Before you make any changes in the registry, please make a backup of it. Inadvertent changes in the registry could cause the computer to stop functioning.
Open regedit.exe through the start menu search box, and go to HKEY_LOCAL_MACHINE\SYSTEM\CurrentControlSet\Services\w32time\TimeProviders\NtpClient.
Double-click SpecialPollInterval and switch the value to Decimal. The number is in seconds. If you want to change this to update every day, you would use 86400 (60 seconds * 60 minutes * 24 hours).
NOTE: All users should ensure that their software NEVER queries a time server more frequently than once every 4 seconds.
If the computers are not in a domain or connected to the internet and is part of a Local Area Network (LAN), you must use third party tools to synchronize the time on these computers.
Because the Windows synchronization tool inside Time Settings can be used only with Internet time servers or InsideDomain time servers, two different third party tools must be used to synchronize the time. The first tool will run as a NTP server and the second will synchronize the other computers with the remote NTP server. For the synchronization you can use for example, Mainberg NTP server as a time server and AboutTime as a synchronization tool.
NOTE: Although we will be describing how to use these two tools in this document, neither of these application are owned by ICONICS. If you have more questions regarding these products, please refer to application’s help documentation or contact the vendor.
Consider the situation where you have PC1 and PC2. PC1 should serve as a time server and PC2 should be synchronized with this server. The two computers are connected via LAN, in different buildings. They cannot access the internet and they are not members of any domain. We need to synchronize the time on the machines so that the time difference will not exceed one second.
First you need to install Mainberg NTP server on PC1. It supports Windows 2000, XP, Server 2003, and 7. Before installation, check all components to be installed as shown in Figure 3.
Figure 3 - Mainberg NTP Server Installation: Choose Components

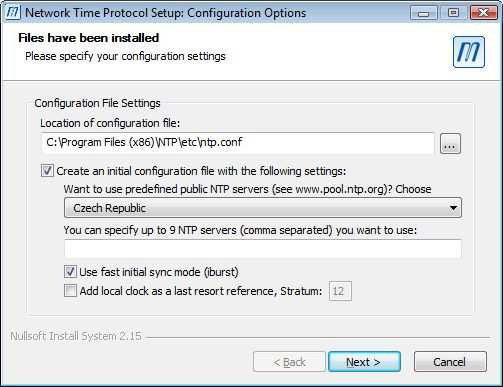
Then select the path where you want to place the installation. Check the Create an initial configuration file … checkbox and select your country.
Figure 4 - Mainberg NTP Server Installation: Configuration Settings
Choose the Use existing account option and check the service settings that you would like (all checked by default).
Figure 5 - Mainberg NTP Server Installation: Setting up NTP Service
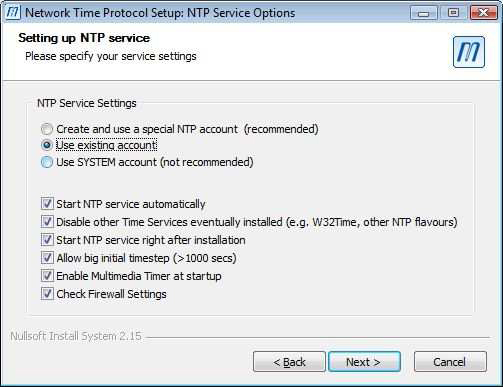
Fill the proper account Name and Password so that the service can be launched after installation. If you click “Next”, the application tries to launch the NTP server service under your defined account.
If the account was correct, the time server is now running and you don’t have to restart PC1.
Install AboutTime on PC2. The installation is very simple.
Figure 6 - AboutTime Started
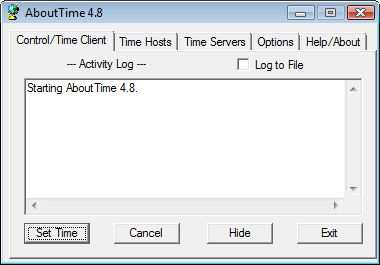
Now start AboutTime and go to the Time Hosts tab. Here you can see the predefined internet Time servers.
Figure 7 - AboutTime: Hosts Tab
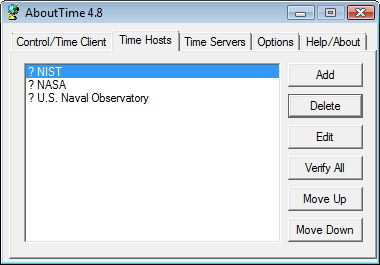
NOTE: The question mark means that servers have not been verified yet. Once you verify the server availability, the question mark disappears.
Click the “Add” button to add the newly created time server. Figure 8 shows an example of a time server configuration.
Figure 8 - AboutTime: Add/Edit Time Host
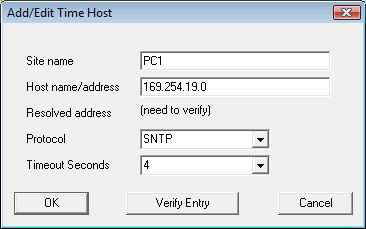
NOTE: You can verify the new server availability by clicking “Verify Entry” button. Once you verified the server, the Resolved address should show the same IP address as the field above.
Switch to Control/Time Client tab and click the “Set Time” button. If everything went fine, you should see the successful synchronization messages:
Connecting to PC1 using SNTP
Resolved address for PC1 (169.254.19.0)
Received time (ping 0 ms). Error 0 ms
New Time: Thursday, April 1, 2010 17:55:25