|
|
The features on this page require a GENESIS64 Advanced license and are not available with GENESIS64 Basic SCADA . |

![]()
|
|
The features on this page require a GENESIS64 Advanced license and are not available with GENESIS64 Basic SCADA . |
![]()
The concept of the project is one of the foundations of the Workbench Classic. It is designed for concurrent configuration by multiple development team members over the internet. A project is a set of applications and related resources that execute inside the Workbench Classic. Tools, applications, and settings are all saved to the project file; when you open and restore project at a later time, your entire Workbench Classic of tools is available to you. This lets you work with multiple displays individually in an environment that is custom fitted to the type of data and data handling that you need.
Projects can store the following data:
Applications that you want to use. You can browse and open application files from within the Project Explorer.
Database configuration systems. The Global Aliasing, Language Aliasing, and other SQL databases are configurable within the Workbench Classic.
Network Services. A number of tools such as GenTray, SNMP, the FrameWorX Server, and the Security Server are all configurable within the Workbench Classic.
Workbench Classic Configuration. Settings that you apply to the Workbench Classic window position, styles, modifications made to the design surface, layouts and templates are saved within a project.
Connections. A project is normally stored on the system where the servers are running. However, there may be several servers that need to be accessed in order to run a display. As long as you have defined connection details to the servers, those connection details are saved, too.
This topic contains a number of topics that describe a wide variety of options for creating, opening, saving, editing, packing and unpacking, compressing, encrypting, and deploying projects created in the classic Workbench Classic for GENESIS64. Scroll down to read more about working with projects.
To Create a New Project from Scratch:
The best way to understand a project is to create one. The Workbench Classic opens with the default project, which includes all GENESIS64 components and sample files. You can create a new project using the default project or from scratch.
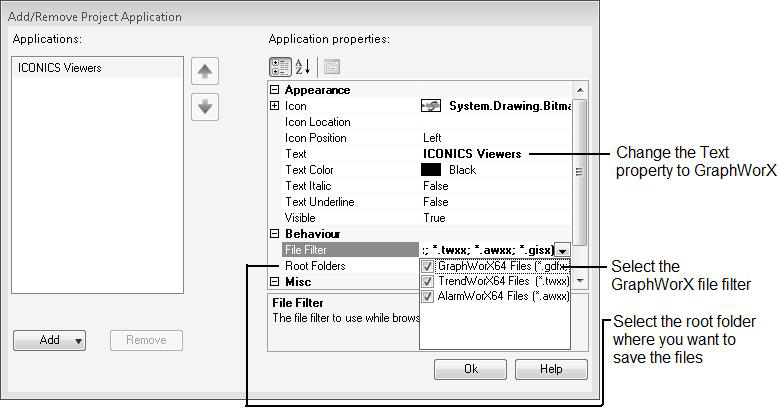
Click the File menu, then select New, then Empty Project. The Add/Remove Project Application dialog box appears.
This is where you add ICONICS tools and applications to the project. Click the Add button and select the applications to be added to the project. You can add additional ones at any time later on. The most popular selection is ICONICS Viewers, which is a composite of the GraphWorX64, AlarmWorX64, and TrendWorX64 Viewers.
For each application you added to the Applications box on the left, select the application to see its properties on the right side of the dialog box. You can modify the application's properties as you like.
|
|
Tip. You can separate the ICONICS viewers into their own individual application buttons. Simply add ICONICS Viewers, then configure its properties to reflect only one of the viewers. Repeat this for each viewer you want to add. Click here to see an example changes the ICONICS Viewers application to the GraphWorX application. |
When you are done, click the OK button.
Once the project's applications are listed in the Project Explorer, you can start working on your project. You can add or remove applications or change their properties at any time by reopening the Add/Remove Project Application dialog box by clicking either of the edit project buttons. See Project Explorer for more information.
While in the Workbench Classic you can work on multiple files at one time. You can use a template (from the Arrange ribbon) to arrange your files, and a layout (from the Layout ribbon) to save those files in a specific arrangement. The template populates your work area in a way that gives you compartments in which to open your files; but a layout is the arrangement of specific files inside a template. Opening a layout opens the files inside the compartments in which you have arranged them. See Layouts and Templates for more information.
Click the File menu and select Save or Save As for a new project.
In the Save As dialog box navigate to the folder you want to save the project file in.
Enter the name of your project file in the File Name text box; project files have a . PRJX file extension.
Click the Save button.
The Workbench Classic saves a project under the name DefaultProject, but you can save additional projects under different names and in more convenient locations to suit your purpose.
Click the File menu and select Open.
Navigate to and select the project from the Open file dialog box, then click OK.
Or, select the project file directly from the Recent Projects menu that appears in the Workbench Classic menu.
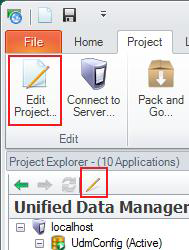
To Edit a Project Stored on a Remote System:
From the ribbon's Project tab, click the Connect to Server button to set up access to the remote system.
Open the remote project and edit it as necessary.
Alternatively, copy the project using the tools described below in Packing and Encryption.
The Connect to Server button works with deployed projects, too. If you are supporting a customer project remotely, and the customer gives you access to its server, you can connect and edit the customer's deployed project without having to make an onsite visit.
A project is normally stored on the system where the servers are running, but there may be several servers that need to be accessed in order to run the different displays that an enterprise might require. The Workbench Classic has a system of project management that allows the user to open and use one or more projects at a time, and to edit or modify projects going forward. The first step in working with multiple project files found on other servers is to make those servers known to Workbench Classic by specifying their connection details. The procedure is described below.
To Add or Edit a Project Server:
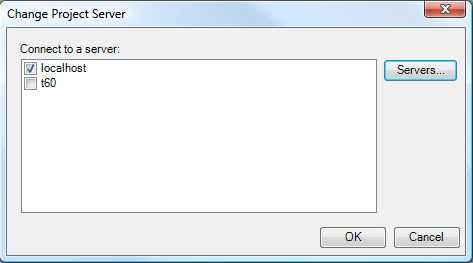
From the ribbon's Project tab, click the Connect to Server button. The Change Server dialog box displays.
Click the Servers... button to display the Add/Remove Project Server dialog box.
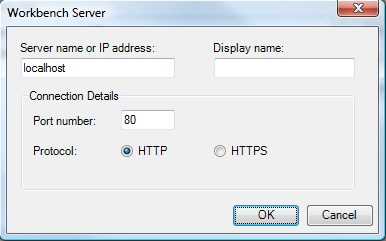
Click the Add button to add a server, or to edit a server select a Server from the list to edit and click the Edit button. Either way action will display the Server dialog box.
Enter the server name, port number, and select the protocol type in the Workbench Classic Server dialog box. The Workbench Classic validates the connection to the new project server and then lists the server in the Add/Remove Project Server.
Click the OK button in each dialog box to save the settings.
When a connection exists to a project server any server that appears in the Workbench Classic Project Explorer you will see that server's settings, files, and configuration in a separate group or node for each system. The Workbench Classic Project Explorer allows you to display your projects so you are able to work on any project at any given time.
As you work, you may be adding and removing applications, servers, or utilities; changing configuration parameters; creating, adding, or modifying display files; and performing the actions that your work requires. Save your project from time to time in order that you can restore your work at a later time. If you plan on deploying projects from a design or test environment to a production system you can copy the project file to the new location. You can also choose to compress the project file with or without encryption to a . PKGX file; a . PKGX file is a zip file renamed so that it is more easily recognized by Workbench Classic operators. A valid project file stored in a .ZIP file can be unpacked successfully.
To Compress or Pack a Project:
From the ribbon's Project tab, click the Pack and Go button.
Click the Next button on the Welcome screen.
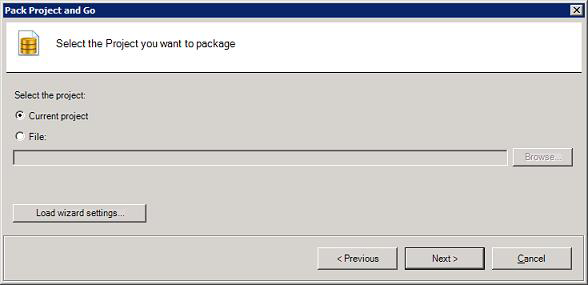
Specify the project you want to pack in the Select the Project you want to package dialog box. You can choose from either the current project or you can click the radio button next to File, then browse for your selected project. You also have the option of clicking on the Load Wizard Settings button to use a saved file of pack wizard settings (.pkgtempl files) if such a file exists; after clicking the button, browse to the file, select it, and click Open to return to the wizard and put the file's settings to use. You can override any of the settings, if you like. Click the Next button to proceed.
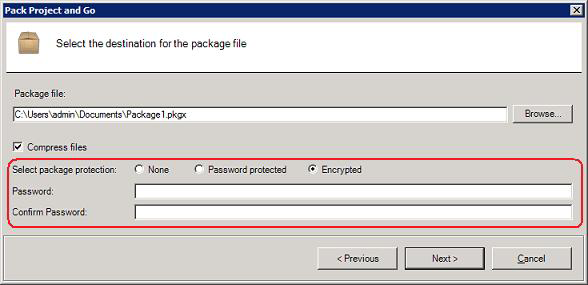
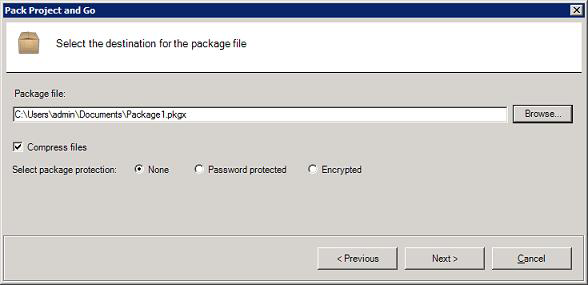
Enter the name and path of your new package in the Package File text box or click on the Browse button to determine a file location in the Select the destination for the package file dialog box. If you use the Browse method, click on the Save button and your path will appear in the text entry field. If you want to reduce the size of the package, select Compress files. To password protect your project, select the Password Protected option; to encrypt and password protect your project, select the Encrypted option. Selecting password protection or encryption enables the Password and Confirm Password fields. Enter a password and then reenter it to confirm it. Click the Next button to proceed.
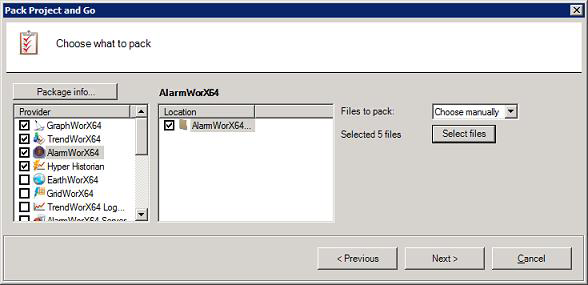
You now have the option to Choose what to pack.
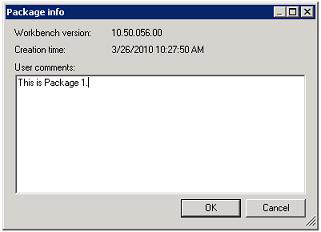
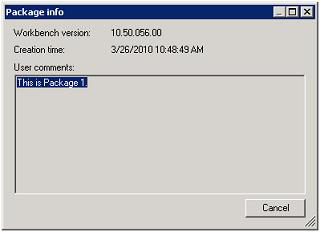
Clicking the Package info button opens an additional window that allows you to verify the Workbench Classic version and Creation time, as well as enter any user comments concerning the specific package. Click OK to return to the main window.
In the Provider box on the left side of the window, place a checkmark next to the Providers you wish to include entirely.
For server configurations (like AlarmWorX64 Logger, TrendWorX64 Logger, and Hyper Historian), you can use the box to the right of the Provider box to choose which databases or objects in the databases to pack.
For human-machine interface (HMI) configurations (like GraphWorX64, TrendWorX64, AlarmWorX64, and EarthWorX), you can choose which locations or individual files to pack. You can add All files (the default), or you can manually choose the files to be packed. If you want to choose the files, click on the provider in the Provider box; if the Files to Pack option becomes available, then you can manually choose the files to be packed. This means that, from the Files to Pack drop-down list, you can select Choose Manually; this enables the Select Files button. Click Select Files, which opens the Edit File List dialog box. This dialog box offers a number of options for finding and selecting files, including choosing folders or file types. For a complete description of how to select files, refer to the Edit File List Dialog Box topic. Click OK when you have selected the files you want to add; this returns you to the wizard.
Once you have finished making your Choose What to Pack selections, click Next to proceed.
Next, you can optionally Enable Find & Replace in your packed project. Both in packing and unpacking replace values with aliases. If you click on the check box, you will then be able to enter values and the aliases to replace them in the packed project. For each value to be replaced, enter an Original Value and Alias, and then specify properties where replacements are to be made by selecting from All, Text, Dynamic Data Source, Title, Share Keyword, Description and/or Custom Data; these properties are described in the table below. Once you start to edit one row, a new row will appear beneath it. The log file that is created after packing and unpacking will show you what strings got replaced. Once you have finished making your entries, click Next.
Properties Where Replacements Are to Be Made
|
Option: |
Replaces the Original Value in the following properties: |
|
All |
All of the properties listed below |
|
Text |
Text property of objects |
|
Dynamic Data Source |
OPC tags used as data sources in objects' DataSource property |
|
Name |
Name property of objects |
|
Title |
Title property of objects such as AlarmWorX and TrendWorX objects |
|
Description |
Description property of objects |
|
Share Keyword |
ShareKeyword property of objects |
|
Custom Data |
CustomData property of objects |
|
File Name |
Names of referenced files |
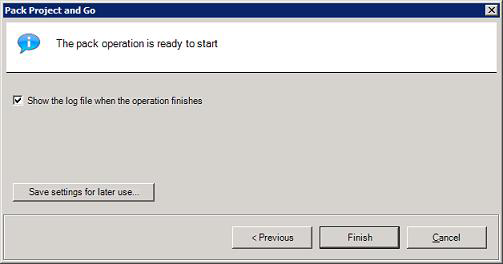
The next screen notifies you that "The pack operation is ready to start". To see a log file report of the pack operation, click on the Show the log file when the wizard is closed checkbox.
You can save the settings from this packed project for use again later on. If you want to save them, click the Save settings for later use button. This opens a Save As dialog box where you can specify the location and name of the file. Note that the settings are saved in a file with an extension of .PKGTEMPL. Click Save to save and close the dialog box.
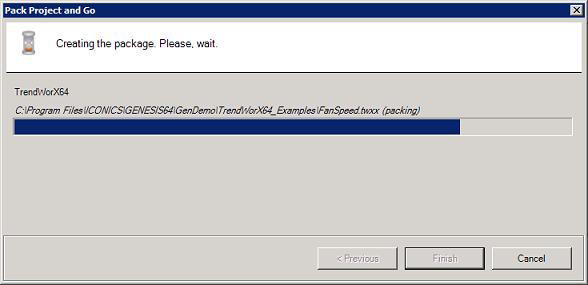
Click the Finish button. It will take a while depending on how you set up the project package. You will see the status of the packing in progress.
If you have selected the option, a Pack Report is displayed upon completion. Supporting files (a PKGX package file, an XML report file, an XML file and icon files) are placed in a new folder called PackageLog Files. Alternatively, you can open the pack report by clicking the Open Log button on the ribbon's Project tab.
To Unpack (Deploy) a Package File:
From the ribbon's Project tab, click the Unpack Project ![]() button. The Welcome to the Unpack Wizard window displays.
button. The Welcome to the Unpack Wizard window displays.
Click the Next button. The Select the package you want to extract dialog box displays.
Click the Browse button and locate and select the file you want to unpack. Instead of setting all of the options for unpacking, you can on the Load Wizard Settings button to use a saved file of unpack wizard settings (.unpkgtempl files) if such a file exists; after clicking the button, browse to the file, select it, and click Open to return to the wizard and put the file's settings to use. You can override any of the settings, if you like. Click the Next button to proceed.
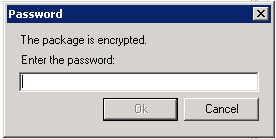
If you had originally included encryption on your selected package, the Password entry box appears. Enter the packed file's unpack password, then click Ok.
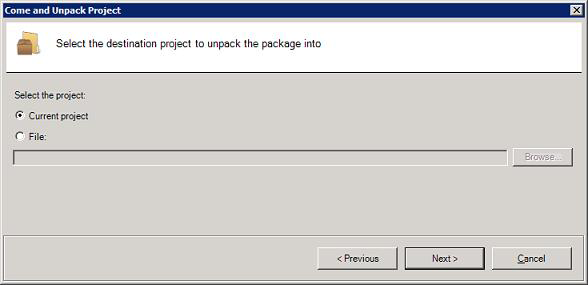
The Select the destination for the extracted files dialog box displays. Select whether you will unpack into the current project or into another project's file. If you select the latter, click on the Browse button to select the desired file. Click Next to proceed.
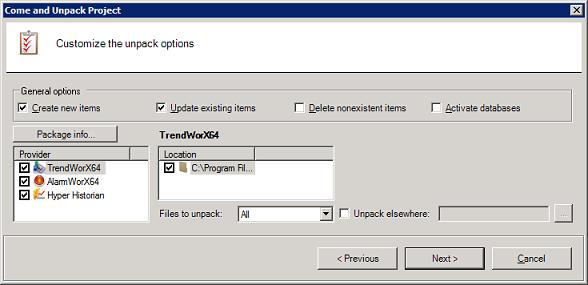
The Customize the unpack options dialog box displays.
Click the Package info button, which will bring up an additional window to verify the Workbench Classic version and Creation time, as well as to read any user comments connected with the package. Click Cancel once you have reviewed this information.
In the General Options section, specify whether to Create new items, Update existing items, and/or Delete nonexistent items in the destination project as part of the unpack process.
The Activate databases feature will activate each database that is was selected to be unpacked and which was active at the time of packing. If a database was active at the time of packing, it’s icon will have an active database button on it in the box to the right of the Providers box.
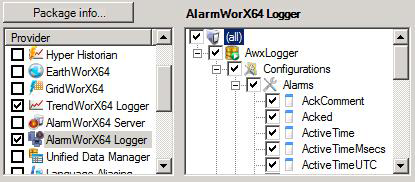
Next, you can select which Providers you wish to unpack by placing a check mark to the left of the desired providers on the left side of the window, or, if you wish to unpack sub-branch elements, click directly on a Provider name and its tree control will be reproduced in the right-side section of the window where you can make further selections using check marks.
For HMI configurations (like GraphWorX64), you can choose to unpack into a different location, choose manually which files to unpack, and choose to unpack only files that are newer than files already on the file system. The HMI configurations do not delete files on the file system, even when the option Delete nonexistent items is selected.
For server configurations (like AlarmWorX64 Logger), you can manually choose which of the databases or items in each databases to unpack. Also, you can change the database options to unpack into a different database than specified by the package. Items which were not fully packed (that is they did not have a check box next to them in the tree in the pack wizard), appear in gray color in the tree of the unpack wizard. The immediate children of these gray items are not deleted from the target database, even when you unpack with the option Delete nonexistent items selected.
Once you have completed your selections, click the Next button.
The next screen notifies you that "The pack operation is ready to start". Click on the check box if you wish to Show the log file when the operation finishes. Click the Save settings for later use button to create a saved the settings that are currently in place for reuse later; the unpack wizard settings are saved in an (.unpkgtempl) file.
Click the Finish button. You will see a window showing the unpacking status. The file is unpacked and placed in the destination folder.
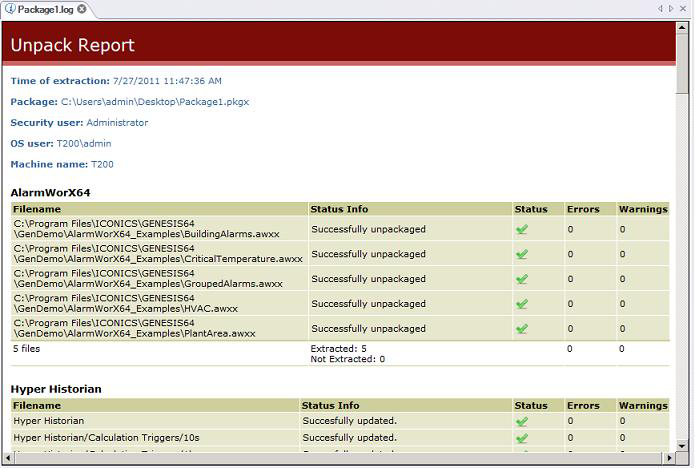
Once the file has finished unpacking, you can view the Unpack Report, if you previously selected that option. Alternatively, you can open the unpack report by clicking the Open Log button on the ribbon's Project tab. Review the log for a summary of the unpack process.
You have just deployed your packed project, and can now run it on the deployed machine.
Command Line Interface for Packing and Unpacking
You can use the following command to pack or unpack from a command line. Before you begin, you must have a template of settings that you created using either the pack or unpack wizard's Save settings for later use button (which is available on the wizard's last dialog box).
To pack, use this syntax:
Workbench ClassicApp.exe /pack ProjectFile.prjx PackageFile.pkgx TemplateFile.pkgtempl [/u securityUserName /p password] [/c cipherpassword]
To unpack, use this syntax:
Workbench ClassicApp.exe /unpack ProjectFile.prjx PackageFile.pkgx TemplateFile.pkgtempl [/u securityUserName /p password] [/c cipherpassword]
Explanation of the syntax:
To View the Contents of a Package:
From the ribbon's Project tab, click the Explore Package button  . An Open dialog box appears.
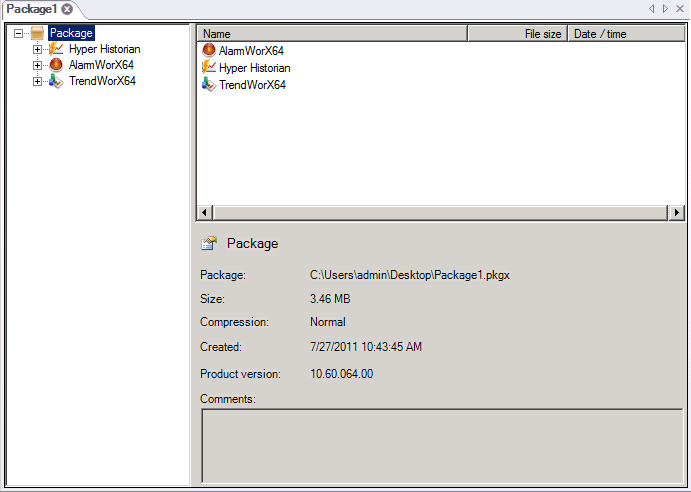
Specify the package file to be examined and click Open. An Explorer type window opens (like the one shown below), which shows the package name, dependent files, and package properties.
Use the navigation tree to navigate through the files that are in the package. Select folders and files to learn more about them.
To Encrypt or Password Protect a Package, either:
Enable encryption and/or password protection when you pack the project, as was described above in the Pack and Go wizard.
Or, click the Encrypt Package button  of the ribbon's Project tab. In the window that opens, navigate to and select the package, and click Open, which opens the Protect Package dialog shown below. To password protect the project, select the Password Protected option; to encrypt and password protect your project, select the Encrypted option. Then enter the password that will unlock the password protected or encrypted file when it is unpacked.
Encryption Password Dialog Box

|
|
Warning. Passwords are case sensitive, and cannot be recovered by ICONICS if forgotten or lost. Please pay special attention to retaining your password or you could lose access to the package file. |
To View a Package Log, either:
View the Pack or Unpack Log at the end of the packing/unpacking process, as described above for the Packing and Unpacking wizards.
Or, click the Open Log button ![]() on the ribbon's Project tab. In the dialog box that opens, navigate to and select the package log (.log.xml) file, then click Open. The Pack or Unpack report is loaded in the Workbench Classic. Click here to see an example.
on the ribbon's Project tab. In the dialog box that opens, navigate to and select the package log (.log.xml) file, then click Open. The Pack or Unpack report is loaded in the Workbench Classic. Click here to see an example.
You can set an option within the Workbench Classic Options dialog box to specify which project is shown when you open the Workbench Classic. Click the Workbench Classic main menu and click the Options button at the bottom of the menu. (Click here to see the menu and button.) The following options are available to you:
Load Last Project. The project file last opened when the Workbench Classic was closed is opened automatically.
Load Project. This option opens the project file you specify.
Show Empty Environment. The Workbench Classic opens with nothing displayed in the Project Explorer or in the work area.
|
|
Warning If you select to show an empty environment the next time the Workbench Classic opens the navigation tree control will be empty (show no nodes or components) and the provider menu (Add Buttons) will also be empty. Create a new project and add a provider (component) to begin your work. |
Show New Project Dialog This option opens the New Project dialog box which allows you to select the server connection and save the project file.
Show Open Project Dialog This option shows an Open file dialog box with a Project Files (*.PRJX file filter) to allow you to open the project file you indicate.
To view the Project Startup Options, click the Workbench Classic menu, Options button, and select Startup. The page is shown in the figure below.
Startup Options

See also: