![]()
![]()
The Security Server offers nearly identical security options for user accounts and for groups. You can apply security restrictions at the group level, the user level, or both. The Security Server uses the following rules for determining whether a privilege is extended or denied to a user based on his or her security:
If a user lacks a privilege and is added to a group that has that privilege, the privilege is extended to the user.
Least restrictive permissions take precedence. There is one exception: each user and group setting has two lists for each category: the Allow list and the Deny list. In this context (a single user or single group), the Deny list takes precedence over the Allow list.
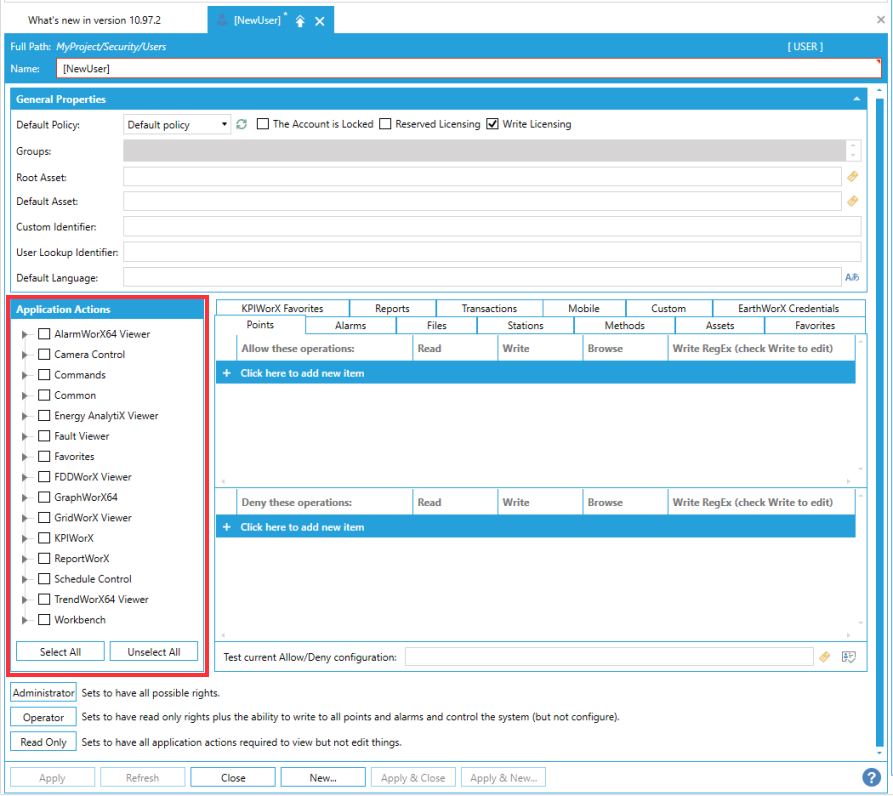
Once you define a group or user account (as described in Users and Groups), you define its privileges. You do this by using the several tabs available when you define or edit the group or user.
The Application Actions section of the User or Group properties remains visible, regardless of which of the following tabs is selected.
Each tab is described below:
Points tab
Alarms tab
Files tab
Stations tab
Methods tab
Assets tab
Favorites tab
Reports tab
Transactions tab
Mobile tab
Custom (Strings) tab
Many of these tabs are divided into two sections: an Include section (called Allow these operations) and an Exclude section (called Deny these operations). When you fill a line in one of these sections, click on the next blank line and enter the string. During runtime, when a GENESIS64 client sends an OPC point string, alarm, file, or other object to the Security Server for access testing (granted or denied), the include and exclude lists are string-compared as described below for each active user and group until access is granted. OPC point strings are used in this example, but the same logic applies to all objects that require access:
Compare the OPC point string with each string in the include list until a match is found. If no match is found, access is denied.
If a match is found in the include list, compare the OPC point string with every string in the exclude list. If no match is found in the exclude list, access to the point is granted, and no further testing of active groups and users is performed.
Privileges can be extended or denied to users and groups on an application-by-application basis. The Application Actions section of the User (shown below) or Group properties is where you define these privileges for a user or for a group. Each client application has its own set of actions that can be controlled, and you have precise control over each action. When you create a new user account or group, all applications and actions are selected by default. You should begin your definition of an account by visiting the Application Actions tab and setting the restrictions that you require.
Security Role Application Actions
The table below lists the different applications and the actions that are available for giving access or limiting. Select the action to give users access; deselect the action to deny the ability to perform the action.
|
Application |
Actions |
Sub Actions |
|
AlarmWorX64 Viewer : |
Allow Toolbar |
|
|
Chart: |
Toggle Details Visibility |
|
|
Edit Filters |
|
|
|
Fire Custom Event |
|
|
|
Grid: |
Advanced Sorting Clean Empty Rows Column Reorder Column Resize Confirm Notification Enable Tool Tips Selection Grouping Minimize All Groups Row Resize Simple Sorting Toggle Column Visibility Toggle Details Visibility Toggle Group Header Visibility Unselect |
|
|
Historical Data: |
Allow Reporting Refresh Historical Data Set Historical Data Time Range |
|
|
Load and Save Configuration |
|
|
|
|
|
|
|
Real Time Data: |
Enable Ack By Comparison Enable Ack Filtered Items Enable Ack Not Active Enable Ack Selected Items Enable Acknowledge Enable Global Acknowledge |
|
|
Runtime Filtering |
|
|
|
Commands: |
Acknowledge |
|
|
Add Favorite |
|
|
|
Apply Discard |
|
|
|
Call Method |
|
|
|
Schedule Clear Override |
|
|
|
Create Pen |
|
|
|
Custom Command |
|
|
|
Delete Pen |
|
|
|
Edit Pen |
|
|
|
Execute Commands |
|
|
|
Expand Collapse |
|
|
|
Export Data |
|
|
|
Export Image |
|
|
|
Export Statistic |
|
|
|
Go To Location |
|
|
|
Group |
|
|
|
Load Alarm Configuration |
|
|
|
Load DataGrid Configuration |
|
|
|
Load Energy Data |
|
|
|
Load Executed Reports |
|
|
|
Load Facility Data |
|
|
|
Load Graphics display |
|
|
|
Load KPI Dashboard |
|
|
|
Load Mobile Layout |
|
|
|
Load Report |
|
|
|
Load Schedule Control Configuration |
|
|
|
Load Trend Configuration |
|
|
|
Load Url |
|
|
|
Log Event |
|
|
|
Login Dialog |
|
|
|
Navigate |
|
|
|
Open Url |
|
|
|
Schedule Override |
|
|
|
Phone Call |
|
|
|
|
|
|
|
Recipe: Copy |
|
|
|
Recipe: Delete |
|
|
|
Recipe: Download |
|
|
|
Recipe: Load |
|
|
|
Recipe: New |
|
|
|
Recipe: Save |
|
|
|
Recipe: Upload |
|
|
|
Refresh |
|
|
|
Remove Favorite |
|
|
|
Run Report |
|
|
|
Run Script |
|
|
|
Run Transaction |
|
|
|
Save Configuration |
|
|
|
Select Asset |
|
|
|
Select Element |
|
|
|
Select View |
|
|
|
Send Alert Email |
|
|
|
Send Alert Page |
|
|
|
Send Email |
|
|
|
Send Message |
|
|
|
Set Filter |
|
|
|
Set Freeze Mode |
|
|
|
Set Global Alias |
|
|
|
Set Global Color Theme |
|
|
|
Set Language |
|
|
|
Set Period |
|
|
|
Set Time Range |
|
|
|
Set Visibility |
|
|
|
Show Details |
|
|
|
Sort |
|
|
|
Switch Layout |
|
|
|
Write Value |
|
|
|
Zoom |
|
|
|
EnergyAnalytiX Viewer: |
Configuration Mode |
|
|
Save Existing Configuration |
|
|
|
Save New Configuration |
|
|
|
FDDWorX Viewer: |
Configuration Mode |
|
|
Save Existing Configuration |
|
|
|
Save New Configuration |
|
|
|
GraphWorX64 : |
Exit Application |
|
|
Menu: |
Cache Display Settings Carousel Data Explorer Display Back-Forward Exit Runtime File Open Fit to Window Help Functions KPIWorX Print Functions Recent Files List Set Icon Sizes Set Language Set Main Menu Visibility Set Navigation Bar Visibility Set Scrollbar Visibility Set Status Bar Visibility Show Diagnostics Stop File Load System Health Monitor Zoom Functions |
|
|
Mouse: |
Drag-Drop DataSource Zoom Functions |
|
|
Pick Actions: |
Close Window Compose Email Database Update Display Back Display Forward Load Display Make Phone Call Play Sound Popup Menu Run Report Run Script Run Transaction Send SMS Set Global Aliases Set Language Set Local Aliases Set Object Visibility Set View Start Application Toggle Value Write Value |
|
|
Tabs: |
Load Display |
|
|
GridWorX64 Viewer: |
Allow Toolbar |
|
|
Edit Filers |
|
|
|
Grid: |
Advanced Sorting Allow Delete Allow Insert Allow Update Column Reorder Column Resize Enable Tool Tips selection Grouping Minimize All Groups Refresh Data Row Resize Simple Sorting Toggle Column Visibility Toggle Group Header Visibility Unselect |
|
|
Load and Save configuration |
|
|
|
Runtime Filtering |
|
|
|
Favorites: |
Private favorites |
|
|
Public favorites see |
|
|
|
Public favorites modify |
|
|
|
ReportWorX: |
Enable ReportWorX Express |
|
|
Schedule Control: |
Allow Toolbar |
|
|
Configuration: |
Load Save |
|
|
Override |
|
|
|
Schedule |
|
|
|
TrendWorX64 Viewer : |
Allow Toolbar |
|
|
Configuration: |
Load Save |
|
|
Cursor |
|
|
|
Data Navigation: |
Scroll Trend Set Right Time Shift Pen |
|
|
Export Data |
|
|
|
Freeze Mode: |
Enter Exit |
|
|
Historical Update Actions: |
Delete Sample Insert Sample Update Sample |
|
|
Legend: |
Show-Hide |
|
|
Operator Comments: |
Create Show |
|
|
Pen Actions: |
Add Pen Delete Pen Edit Pen Stack-Unstack Switch Plot |
|
|
Refresh Data |
|
|
|
Side Panel: |
Show-Hide |
|
|
Trend Actions: |
Edit Period Edit Trend Show-Hide Axis Swap Axis |
|
|
Zoom |
|
|
|
VideoWorX: |
Camera |
|
|
Workbench : |
AlarmWorX64 Logger: |
Browse Items Delete Items Edit Items Start-Stop Server |
|
AlarmWorX64 Multimedia: |
Add-Remove Database Browse Items Delete Items Edit Items Start-Stop Server |
|
|
AlarmWorX64 Server : |
Browse Items Delete Items Edit Items Start-Stop Server |
|
|
AlertWorX: |
Browse Items Delete Items Edit Items Start-Stop Server |
|
|
AssetWorX: |
Browse Items Delete Items Edit Items Start-Stop Server |
|
|
BACnet: |
Browse Items Delete Items Edit Items Start-Stop Server |
|
|
BI Server: |
Browse Items Delete Items Edit Items Start-Stop Server |
|
|
BridgeWorX64: |
Browse Items Delete Items Edit Items Start-Stop Server |
|
|
Energy AnalytiX: |
Browse Items Delete Items Edit Items Start-Stop Server Upgrade Database |
|
|
Exit Application |
|
|
|
FDDWorX |
Browse Items Delete Items Edit Items Start-Stop Server Upgrade Database |
|
|
FrameWorX Server: |
Browse Items Delete Items Edit Items |
|
|
GenTray: |
Browse Items Edit Items Start-Stop Server |
|
|
Global Aliasing: |
Browse Items Delete Items Edit Items Reload Configuration |
|
|
GridWorX: |
Browse Items Delete Items Edit Items Start-Stop Server |
|
|
Hyper Historian: |
Browse Items Delete Items Edit Items Start-Stop Server |
|
|
Internet of things: |
Browse Items Delete Items Edit Items Start-Stop Server |
|
|
Language Aliasing: |
Browse Items Delete Items Edit Items |
|
|
Layout Management: |
Arrange Documents Carousel Close Document File New File Open Gallery Maximize Document |
|
|
MergeWorX: |
Browse Items Delete Items Edit Items Start-Stop Server |
|
|
MobileHMI: |
Browse Items Delete Items Edit Items |
|
|
Modbus: |
Browse Items Delete Items Edit Items Start-Stop Server |
|
|
Mode Configuration |
|
|
|
Mode Runtime |
|
|
|
Platform Services Configuration |
|
|
|
Project Management: |
Configure Certificates Configure Services Configure SSRS Edit Project Get Installed Files Open Project Pack Toggle Audit Log Unpack |
|
|
RecipeWorX: |
Browse Items Delete Items Edit Items Start-Stop Server |
|
|
ReportWorX64: |
Browse Items Delete Items Edit Items Start-Stop Server |
|
|
ScheduleWorX64: |
Browse Items Delete Items Edit Items Monitor Mode Override Start-Stop Server |
|
|
Security: |
Browse Items Delete Items Edit Items |
|
|
SNMP: |
Browse Items Delete Items Edit Items Start-Stop Server |
|
|
System Designer: |
Add-Remove Database Browse Items Delete Items Edit Items |
|
|
Templates: |
File New File Open Gallery Template Editor |
|
|
TrendWorX64 Logger: |
Browse Items Delete Items Edit Items Start-Stop Server |
|
|
Triggers: |
Browse Items Delete Items Edit Items Start-Stop Server |
|
|
Unified Data Manager: |
Browse Items Delete Items Edit Items Start-Stop Server |
|
|
User Profiles and Favorites: |
Browse Items Delete Items Edit Items |
|
|
Web Services: |
Browse Items Delete Items Edit Items Start-Stop Server |
|
|
Workflow: |
Browse Items Delete Items Edit Items |
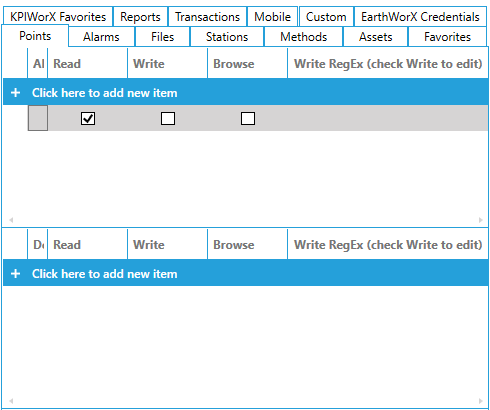
A GENESIS64 application that is configured to send write to points in OPC servers and other data sources will disable them if denied by the Security Server. Point names (with or without wild cards) are placed in include or exclude lists for each user or group.
Before a GENESIS64 client writes a process value to a server, the unique string (the point name) that identifies the output point is sent to the Security Server to determine if the write should be allowed based on the currently logged-in users and/or the groups to which they belong. Use the Points tab of the Properties form, shown in the figure below, to configure which output points are allowed to be written to by users and groups. Refer to Granting or Denying Access for a description of how entries on this tab are used. Refer to Wildcards and Performance Optimization for a description of the wild cards you can use.
Starting in version 10.97.2, it is possible to secure which folders user can see in the Data Browser. The ability to hide individual points from the data browser based on security was added in 10.97.1, but it could not be used to secure folders. It was used to secure for example OPC tags. The folder structure was always visible, even if browsing was denied for all points.
Folders can also be hidden based on security. Folder names can be added to a user or group's Points tab, and the Browse checkbox can be used to allow or deny visibility of that folder in the Data Browser.
Users can select a folder in the Data Browser and view the breadcrumb bar to see the name of the folder according to security. Wildcards can be used in this name as normal when adding it to the Points tab in security.
Note that some data providers do not have hierarchical names for folders. These providers may be unable to hide and show individual folders with security.
Points Tab
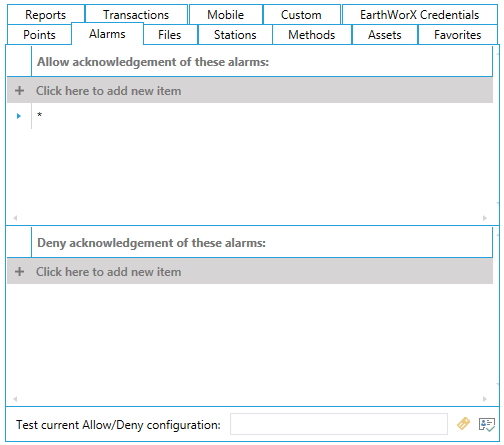
You can protect individual alarms or groups of alarms by securing those alarms. Do so by placing alarm names with or without wildcards in include (allow acknowledgement) or exclude (deny acknowledgement) lists for each user or group. (Include and exclude lists are commonly used by file backup programs to specify a backup set.) A GENESIS64 application will query the Security Server for alarm access before opening a file. Use the Alarms tab (shown below) to control access to alarm acknowledgement during runtime. Refer to Granting or Denying Access for a description of how entries on this tab are used. Refer to Wildcards and Performance Optimization for a description of the wild cards you can use.
Note: Alarms can also be secured by Asset Name. See Secure Alarms by Asset Name for more info.
Alarms Tab
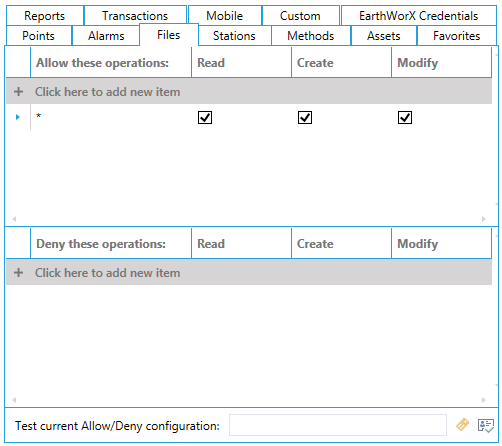
The Files form (shown below) controls access to files that GENESIS64 clients may open during runtime. You can use any of the features that are available, but all are optional and should be used only in accordance with policy strategies you have set up at your company. This tab is frequently used to define user access to GraphWorX64 display files; some users create the files and need complete access to the files they create, while others are runtime users such as dashboard operators or supervisors who much monitor operations.
In the Allow These Operations section, identify the files that the user can access then select the actions that are allowed for each file. In the Deny These Operations section, identify the files and actions that users are specifically denied. In both sections, you can use wild cards to include multiple files with one entry.
Refer to Granting or Denying Access for a description of how entries on this tab are used. Refer to Wildcards and Performance Optimization for a description of the wild cards you can use. The runtime processing and wildcard pattern matching apply here with the following differences:
The pattern matching is done on the file extension, separate from the file name, to match the DOS wildcard semantics. For example, the wildcard string to indicate all files is *.*
You must specify the file path (or include * before the filename).
Files Tab
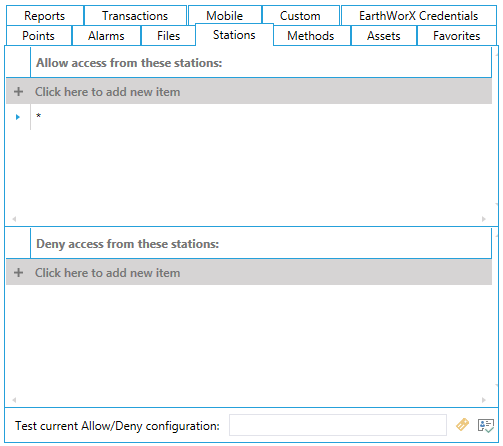
The Stations form is used to grant (allow login) or restrict (deny login) access from specific nodes on the network. Each node on a Microsoft network is identified by a unique computer name. Refer to Granting or Denying Access for a description of how entries on this tab are used.
Stations Tab
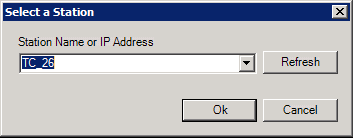
When you click the Ellipsis button [...], the Select a Station dialog box appears, as shown in the figure below. Select the Station Name from the drop-down list, or enter the name or system IP address into the drop-down list box to define the station criteria.
Select a Station Dialog Box
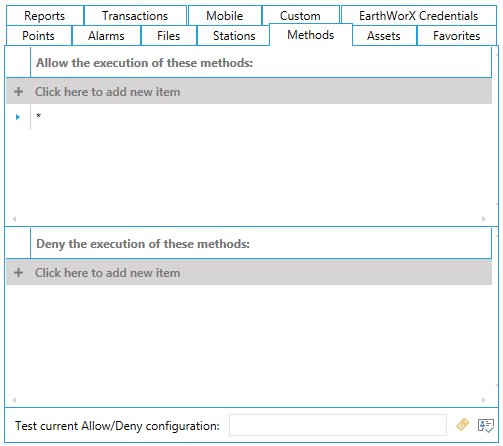
The Methods tab (shown below) is used to grant or restrict the use of listed methods.
Methods Tab
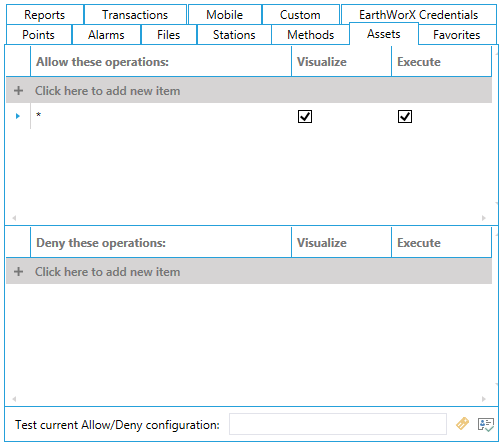
The Assets Tab (shown below) is used to grant or restrict the visualization and/or execution of listed assets in a connected asset catalog database through the AssetWorX provider in the Workbench.
Assets Tab
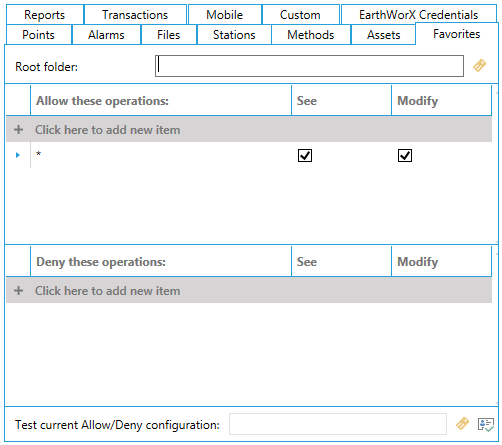
The Favorites Tab (shown below) is used to grant or restrict the visualization and/or execution of Favorite operations.
Favoritess Tab
The KPIWorX Favorites Tab (shown below) is used to grant or restrict the visualization and/or execution of KPIWorX Favorite operations.
KPIWorX Favorites Tab

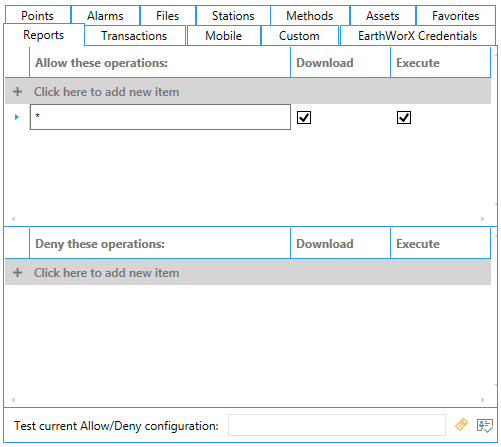
The Reports Tab (shown below) is used to grant or restrict the download and/or execution of reports.
Reports Tab
The Transactions Tab (shown below) is used to grant or restrict the download and/or execution of transactions.
Transactions Tab
![]()
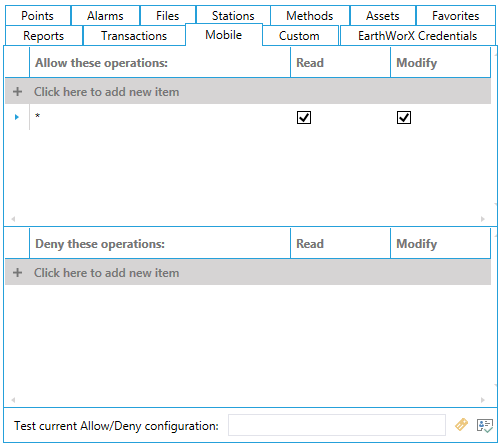
The Mobile Tab (shown below) is used to grant or restrict the visualization and/or execution of listed mobile operations.
Mobile Tab
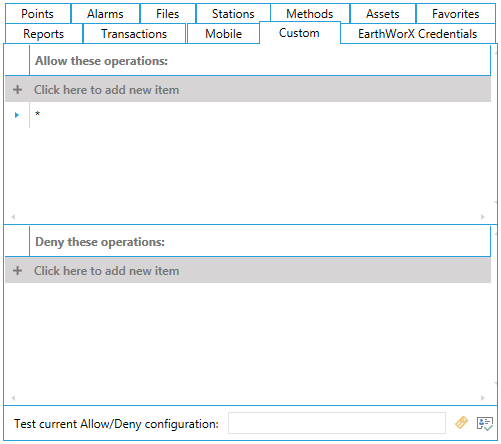
VBA Scripts may use custom-defined strings as security tokens that are evaluated by the Security Server. As with the file names, custom strings with or without wildcards are placed in include (allow access) or exclude (deny access) lists for each user or group. The Custom form, shown below, is used to include or exclude strings that will be tested in runtime by VBA scripts executing within GENESIS64 clients. The meaning of these strings and the functionality they protect are controlled entirely by the author of the VBA script.
Refer to Wildcards and Performance Optimization for a description of the wild cards you can use. Refer to Granting or Denying Access for a description of how entries on this tab are used. For example, from a GENESIS64 VBA script, a custom security item is tested by calling the method TestCustomSecurityItem(BSTR customString) in the GwxDisplay object.
Custom Tab
The EarthWorX Credentials tab (shown below) is used to grant or restrict visualization and/or execution options within the EarthWorX provider.
EarthWorX Credentials Tab

The Assets tab of a Security User or Security Group setting can separately allow/disallow the use of individual commands defined on equipment in AssetWorX. This is controlled by the Execute checkbox and the command name in the text field.
While the browse button helps with setting up the correct syntax for the text field, here are a few examples to explain the logic. The first three columns of the table correspond to settings in the Assets tab on either the User or Group setting.
Note: The correct syntax must be set up manually.
|
Allow view or ack of these alarms: |
Execute |
Visualize |
(description) |
|
ac:Equipment/|CmdName=MyCommand |
☑ |
☐ |
The Asset Navigator will just show the command named MyCommand on ac:Equipment/.
Note that the visibility of the ac:Equipment/ must be enabled by another entry on the Asset tab of Security. |
|
ac:Equipment/|CmdName=MyCommand |
☑ |
☑ |
The same as the previous row. The Visualize checkbox has no effect at all because the text field specifies a command. |
|
*|CmdName=MyCommand |
☑ |
☑ |
Allows the MyCommand command on all Equipment. Again, the Visualize check box has no effect. |
|
ac:Equipment/ |
☑ |
☐ |
As no command name is specified, this allows all commands on the equipment ac:Equipment/. |
See Also: