|
|
The features on this page require a GENESIS64 Advanced license and are not available with GENESIS64 Basic SCADA . |

![]()
|
|
The features on this page require a GENESIS64 Advanced license and are not available with GENESIS64 Basic SCADA . |
![]()
When you installed GENESIS64, you created a default database for use with the AlarmWorX64 Logger . If you need to use a different database or alter the parameters of the existing database, refer to the AlarmWorX64 Server 's Database Configurations topic. The database you intend to use as the logger must be the active database in AlarmWorX Logger. To make a database active, right-click the database object in the Project Explorer's navigation tree, then select the Make Active command.
It is recommended that you configure a new database as a System Data Source so it is available to any user who is logged into the specific PC. The Alarm Logger includes native support for Microsoft SQL Server and SQL Express with the following limitations:
For MSDE (Microsoft Data Enginer), the maximum database size is 2 GB. Performance may decrease if more than five connections are open at one time.
AlarmWorX Logger itself does not impose any limits, nor do Standard or Enterprise versions of SQL Server. They also have no performance decrease with multiple connections.
“Modern” SQL Express instances have limits of 4 or 10 GB. They also have no performance decrease with multiple connections.
To configure the AlarmWorX Logger, follow the steps below.
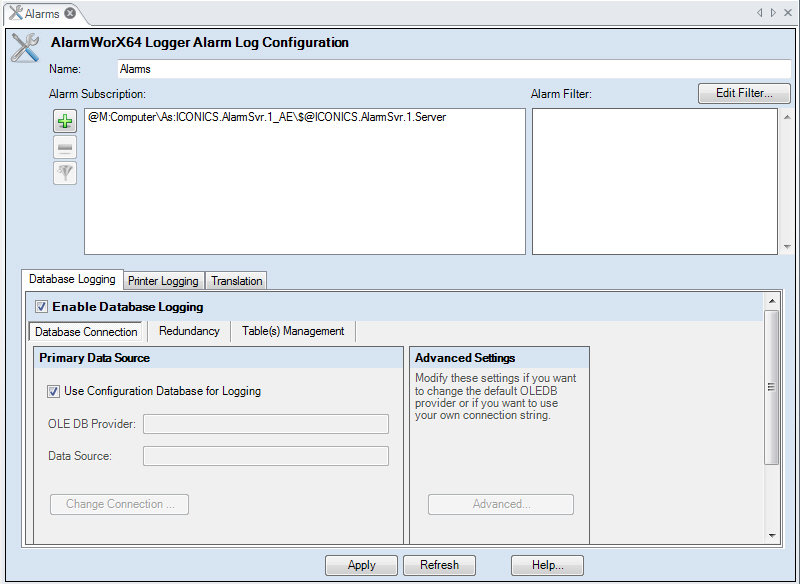
In AlarmWorX64 Logger, the Configurations node manages the overall details of the logging session. You set the data source that supplies alarm events in the Alarm Subscription section of the form. Alarm events are generated by different types of alarm servers, as well as by the GenEvent server. Unless you set a filter, all of the alarms appear in the log. Use the filter to control the data set, choose particular classes and categories of alarms, and make the data set smaller, more selective, and more manageable.
To create an alarm configuration:
Open AlarmWorX64 Logger in the GENESIS64 Workbench. (If you don't know how, refer to the AlarmWorX64 Logger topic for instructions.)
In the Project Explorer, right-click the Configurations node in the navigation tree and select the Configuration command. The Alarm Log Configuration Form appears.
Enter a name for the configuration in the Name text box.
Select the server that is subscribed to that will supply the Event Points. Click the Minus button to remove the current selection and the Plus button to open the Unified Data Browser to select a new alarm server.
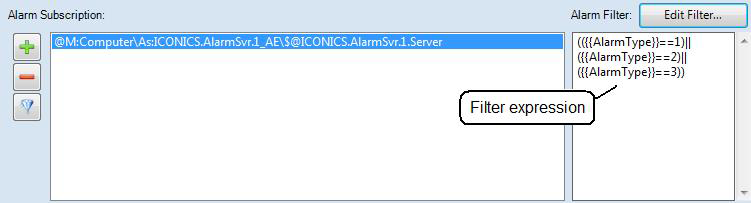
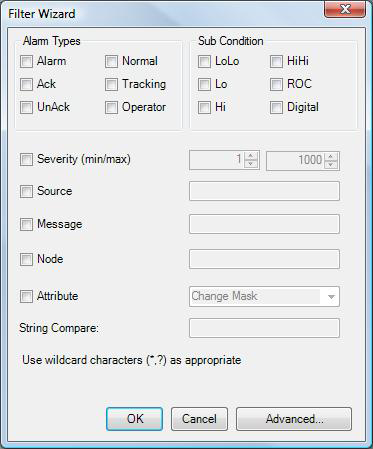
Optionally, you can filter the events that are logged by clicking the Alarm Filter: Edit Filter button on the right side of the form to create a filter and control the alarms that are logged. (You may want to log all events at first, and then filter out unwanted alarm events as time goes by.) If no filter information appears in the box below the button, clicking this button opens the Filter Wizard dialog box, which is a front-end for writing an expression; clicking its Advanced button opens the Expression Editor. After you use the wizard, the written expression appears in the Alarm Filter box. Click here to see an example. You can also type the expression into the box, or delete the expression from the box, or edit the expression by clicking the Edit Filter button.
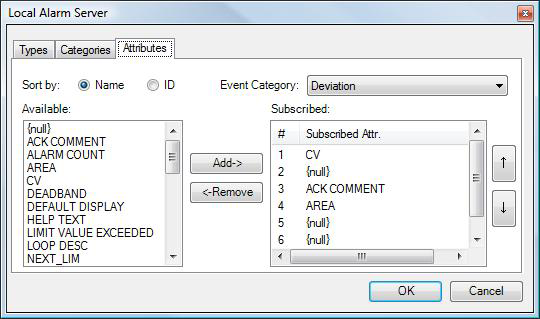
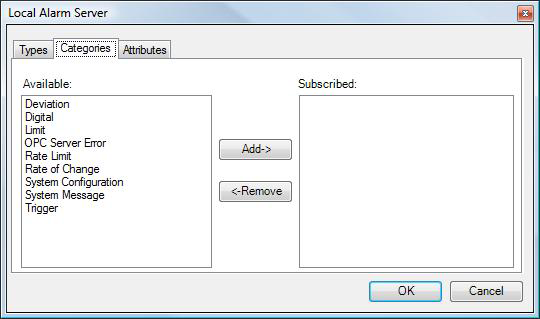
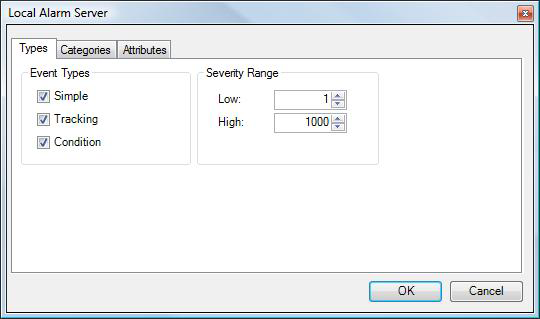
Optionally, you can also enter individual event points and, optionally, click the Edit Categories Filter button ![]() to filter categories and attributes for individual event points that are logged. Clicking this button opens the Local Alarm Server dialog box, which has three tabs: the Types tab, the Categories tab, and the Attributes tab. For help using these tabs to set up a filter, refer to the Limiting Alarm Subscriptions by Event Type and Category topic.
to filter categories and attributes for individual event points that are logged. Clicking this button opens the Local Alarm Server dialog box, which has three tabs: the Types tab, the Categories tab, and the Attributes tab. For help using these tabs to set up a filter, refer to the Limiting Alarm Subscriptions by Event Type and Category topic.
At the bottom of the form are three tabs: Database Logging (described below in this topic, in Database Logging Tab), Printer Logging and Translation (described separately in the Printer Logging Tab and Translations Tab topics). Complete these tabs.
When you are done, click Apply to save and apply your settings to the configuration.
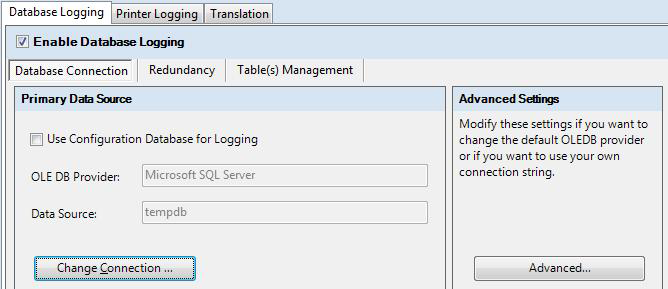
The Database Logging tab of the AlarmWorX Logger Alarm Log Configuration form provides database connections, redundancy options, and table management options. To set up this information, follow the steps below:
In the Alarm Log Configuration form, click on the Database Logging tab.
Make sure that the Enable Database Logging check box is enabled.
The Database Connection sub-tab establishes a connection to a primary ODBC data source. So, on the Database Connection sub-tab, confirm that the current database is selected by making sure there is a checkmark ![]() in the Use Configuration Database for Logging checkbox.
in the Use Configuration Database for Logging checkbox.
Alternatively, to change the database:
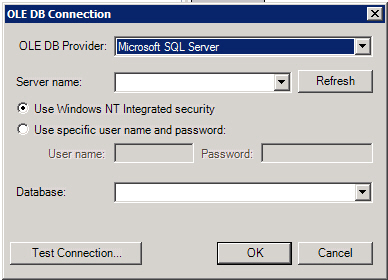
Remove the checkmark ![]() from the Use Configuration Database for Logging check box and the click the Change Connection button to select a different database from the OLE DB Connection dialog box.
from the Use Configuration Database for Logging check box and the click the Change Connection button to select a different database from the OLE DB Connection dialog box.
|
|
Tip. The Primary Data Source is the database to use for logging. If you leave a checkmark (the default) in the Use Configuration Database for Logging check box, alarm events will be logged to the active configuration database. It is highly recommended that you change this default database option and log alarm data to a database different from the configuration database. |
Enter the OLE DB Provider, Server Name, security model and credentials; then select the Database from the fields in the OLE DB Connection dialog box. The Server Name and Database drop-down menus are populated automatically. It is recommended that you use Windows NT Integrated security, which eliminates the need for maintaining individual user accounts and passwords.
Click Test Connection to test the connection to the database.
Click OK to close the dialog box.
The Advanced button allows you to enter a connection string into the OLEDB Advanced Settings dialog box.
Click Apply on the Database Logging tab.
Make the alternative database the active database. You do this in the Project Explorer, where the alternative database now appears. Right-click the alternative database, then select Make Active from the pop-up menu. The database's icon's red arrow changes to green when it is the active database.
Optionally, use the Redundancy tab to set up a redundant database for logging data when the primary database is not available, and for enabling store-and-forward data caching. Refer to the Redundant Databases for the AlarmWorX64 Logger topic for information about this sub-tab.
Optionally, use the Table(s) Management sub-tab to set up table management and table archiving. Refer to the Table Management topic for information about this sub-tab.
Continue to the Printer Logging and Translation tabs (described in the Printer Logging Tab and Translations Tab topics) and set up options as appropriate.
When you are done, click Apply to save and apply your settings to the configuration.
See also: