
Possible Scenario with ICONICS Voice Machine Interface and Amazon Alexa
ICONICS Voice Machine Interface (VMI) integrates with its GENESIS64 HMI/SCADA and building automation suite. This solution; compatible with Microsoft’s Cortana, Amazon’s Alexa, and Google’s Assistant voice assistant technologies; enables users to leverage the convenience of hands-free, natural language interaction to boost productivity and improve operational efficiency. Through GENESIS64’s Workbench tool, users can create “skills” that work through these vendors’ cloud services and voice interactivity technologies.
ICONICS VMI Architecture

ICONICS Voice Machine Interface makes it simple and intuitive to issue voice commands for monitoring the status of systems and process, controlling equipment and devices, and analyzing key performance indicators (KPIs). The technology recognizes commands in multiple languages, empowering any operations or facility manager, maintenance engineer, or executive around the world to interact with their processes in a whole new light. With just a few words, users can start/stop equipment, change temperatures, adjust setpoints, view work orders, and make sense of massive amounts of data – all without looking away from the task at hand or lifting a finger.
ICONICS’ VMI, and voice-based command technology in general, is beginning to appear in multiple industries.
For Plant/Operations Managers, one could ask Cortana, for instance, “Hey Cortana. What is the OEE for Line One, and how does it compare to last shift?” and be met with the voice response of “The OEE for Line One is 78.3 percent, which us up two percent from yesterday.”
For Facility Maintenance personnel, one could ask Alexa, for example, “Alexa. What is the current voltage of this chiller compressor?” and the immediate reply could be “The current voltage of this compressor is 200V at 50Hz.”
For Organizational Management, one could query the Google Assistant, if preferred, with, “OK Google. What is our total oil production year-to-date, and how does it compare to last year?” and the response could be, “You have produced 5,640,000 barrels of oil year-to-date. That is up four percent from last year.”
For a video demonstration of ICONICS Voice Machine Interface in action, visit https://iconics.com/Videos/VMI.
HTTPS
You must configure HTTPS binding in IIS. See https://docs.microsoft.com/en-us/iis/manage/configuring-security/configuring-ssl-in-iis-manager.
Url Rewrite (optional)
On the IIS server configured for Url Rewrite, disable “Reverse rewrite host in response headers” in Application Request Routing -> Server Proxy Settings.
Application Request Routing

In Platform Services, make sure you fill in the “Public origin” with the protocol and host name where the service will be accessible from the outside. This step is important, because the IdentityServer must be able to provide endpoint discovery at https://<host_name>/fwxserverweb/security/.well-known/openid-configuration.
Platform Services Configuration

Open Workbench Desktop.
Open Security -> Web Login -> Global Settings (General Settings section).
Check “Enabled” and select some certificate (This step is important; otherwise, all issued tokens will be invalidated once the FwxServer is restarted).
Add “Relying parties” (right-click “OIDC Relying Parties” -> “Add OIDC Relying party”.
Add Relying Parties
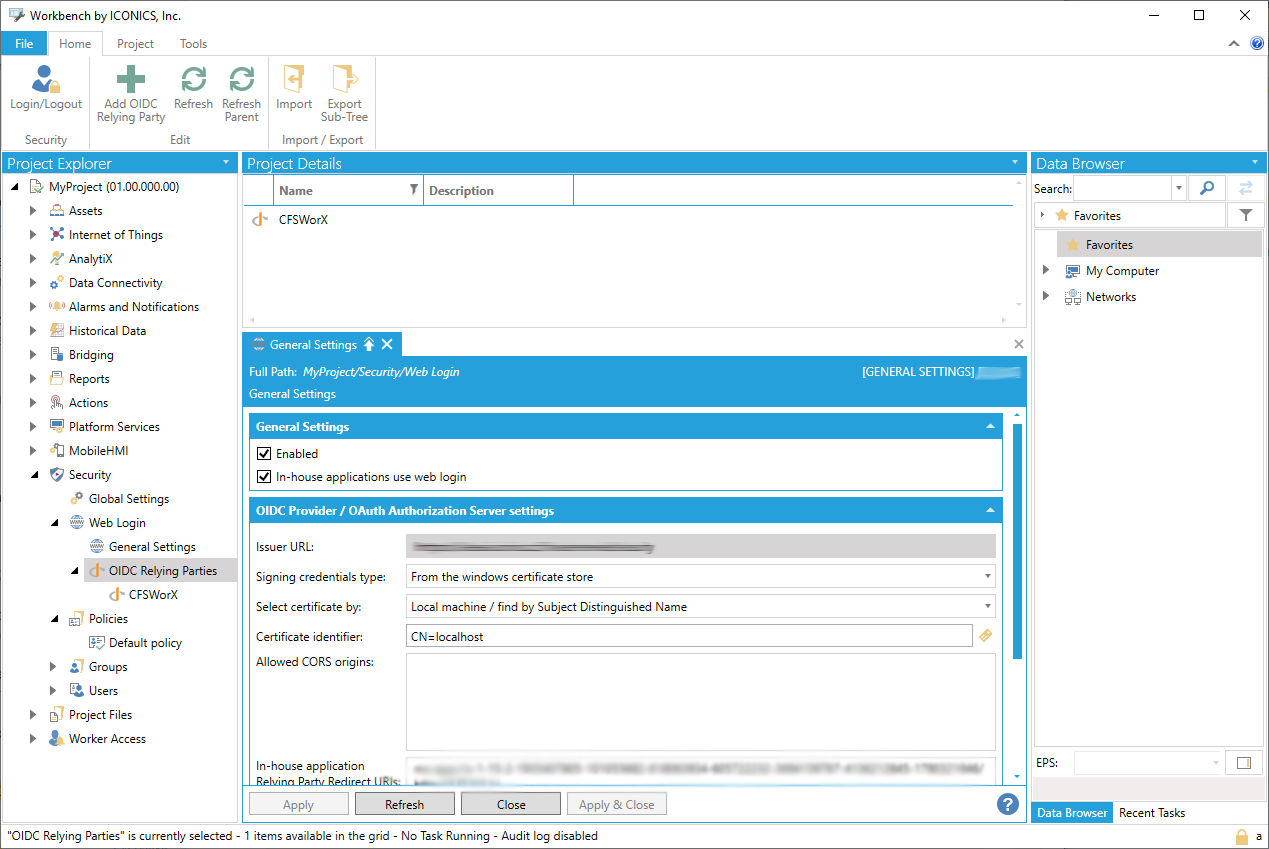
Each service has different configuration, the OIDC Relying Party must be configured for each service individually.
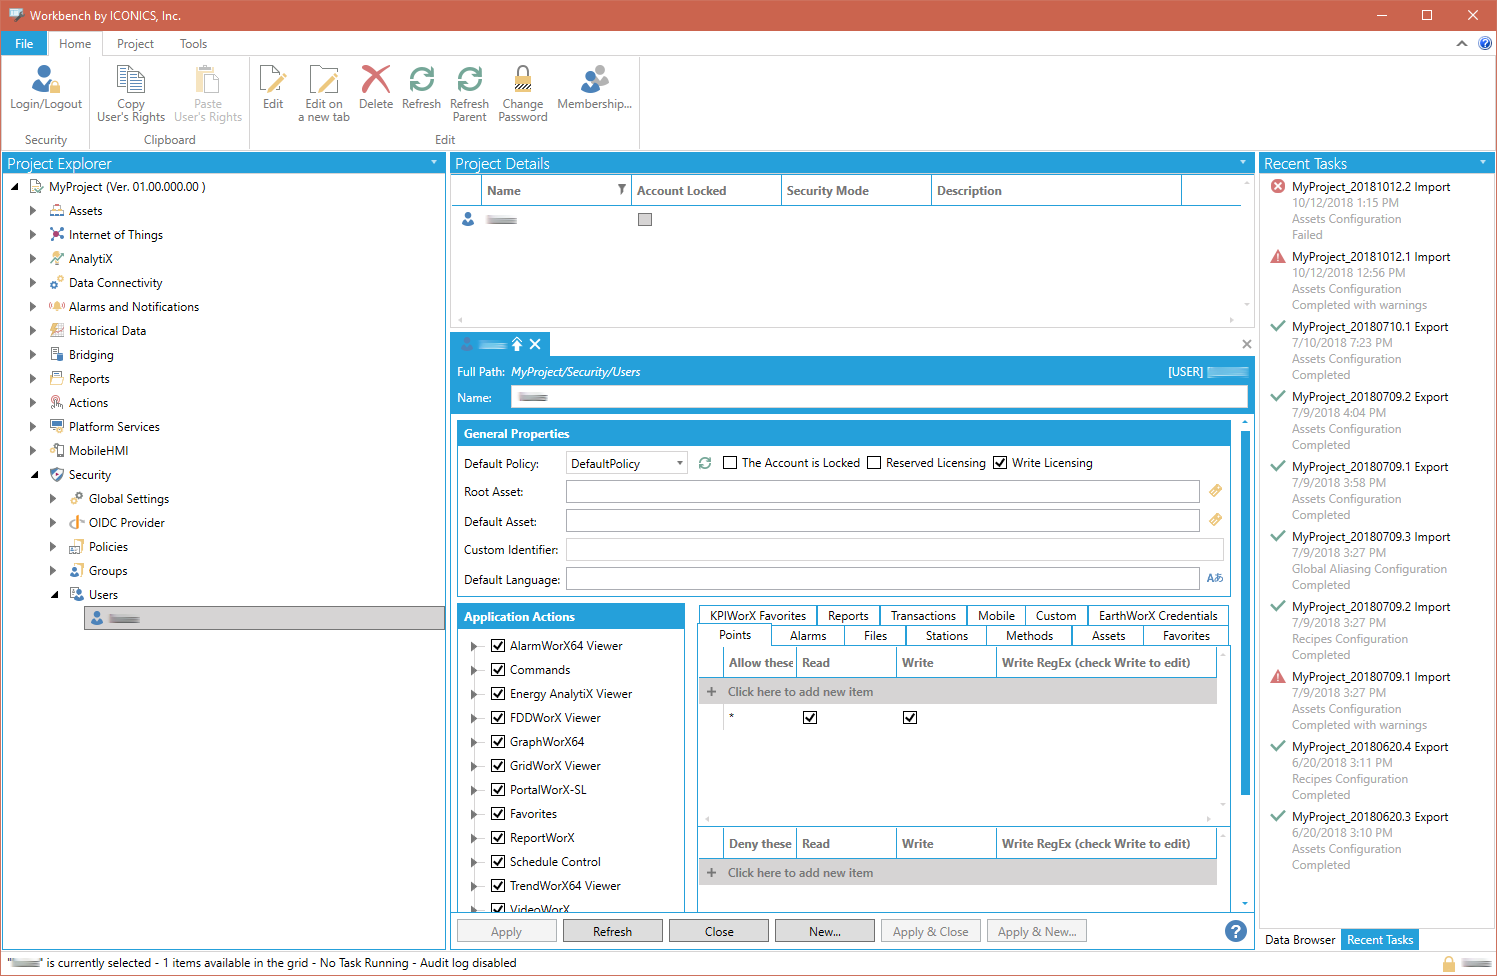
Add users to the Security.
Add Users to Security
[Note: Amazon Alexa server-side configuration steps can change frequently. Due to this fact, corresponding screenshots of these steps have been intentionally withheld from ICONICS-hosted documentation. The following configuration steps were current as of the time of this ICONICS product release.]
Developer portal
To create a new Skill, or modify an existing one, go to https://developer.amazon.com. Sign in with the credentials for your developer account. Go to Alexa -> Skills.
Select the skill you want to modify and you should see the skill configuration page.
Now on the left, there are multiple configuration sections. The first one, under Interaction Model, is the Invocation. There, you can configure the skill name that the user must say in the phrase “Alexa, ask <skill name> …”, or “Alexa, open <skill name>”.
Next, there are Intents. Intents represent “actions” the user can execute. Each intent can have multiple utterances – examples of what the user might say – more is better.
In these utterances, you can use Slots. Slots represent “placeholders” for words the user may say and they must be defined later. Clicking on Edit Dialog, one can specify whether the slot is required and how should Alexa should ask the user in case he did not specify it.
Type is a custom slot type and it can have multiple values. Note: After each change to the interaction model, hit “Save Model” and “Rebuild Model”; otherwise, the changes won’t take effect.
Next there is the Endpoints section. Here is the URL that Alexa will call and it must point to the server where the IcoWebAPIService is running. The URL has a couple of limitations (by Amazon):
Port 443 only. No other port can be specified, Alexa will not call an endpoint on any other port than 443.
SSL. The endpoint must have a valid SSL certificate for the domain name and the certificate must come from Amazon-approved certificate authority. Self-signed certificates may possibly be available for development purposes.
The private key for the certificate must be set up in IIS
Lastly, there is account linking. This ties the Alexa Skill user and ICONICS user together. For the URL specified here, the same rules as for the endpoint URL do apply (443 port, SSL, etc.). When changing the backend URL, do not forget to change the URL here, as well, for the authentication.
Configuration in ICONICS Workbench - 1

Configuration in ICONICS Workbench - 2
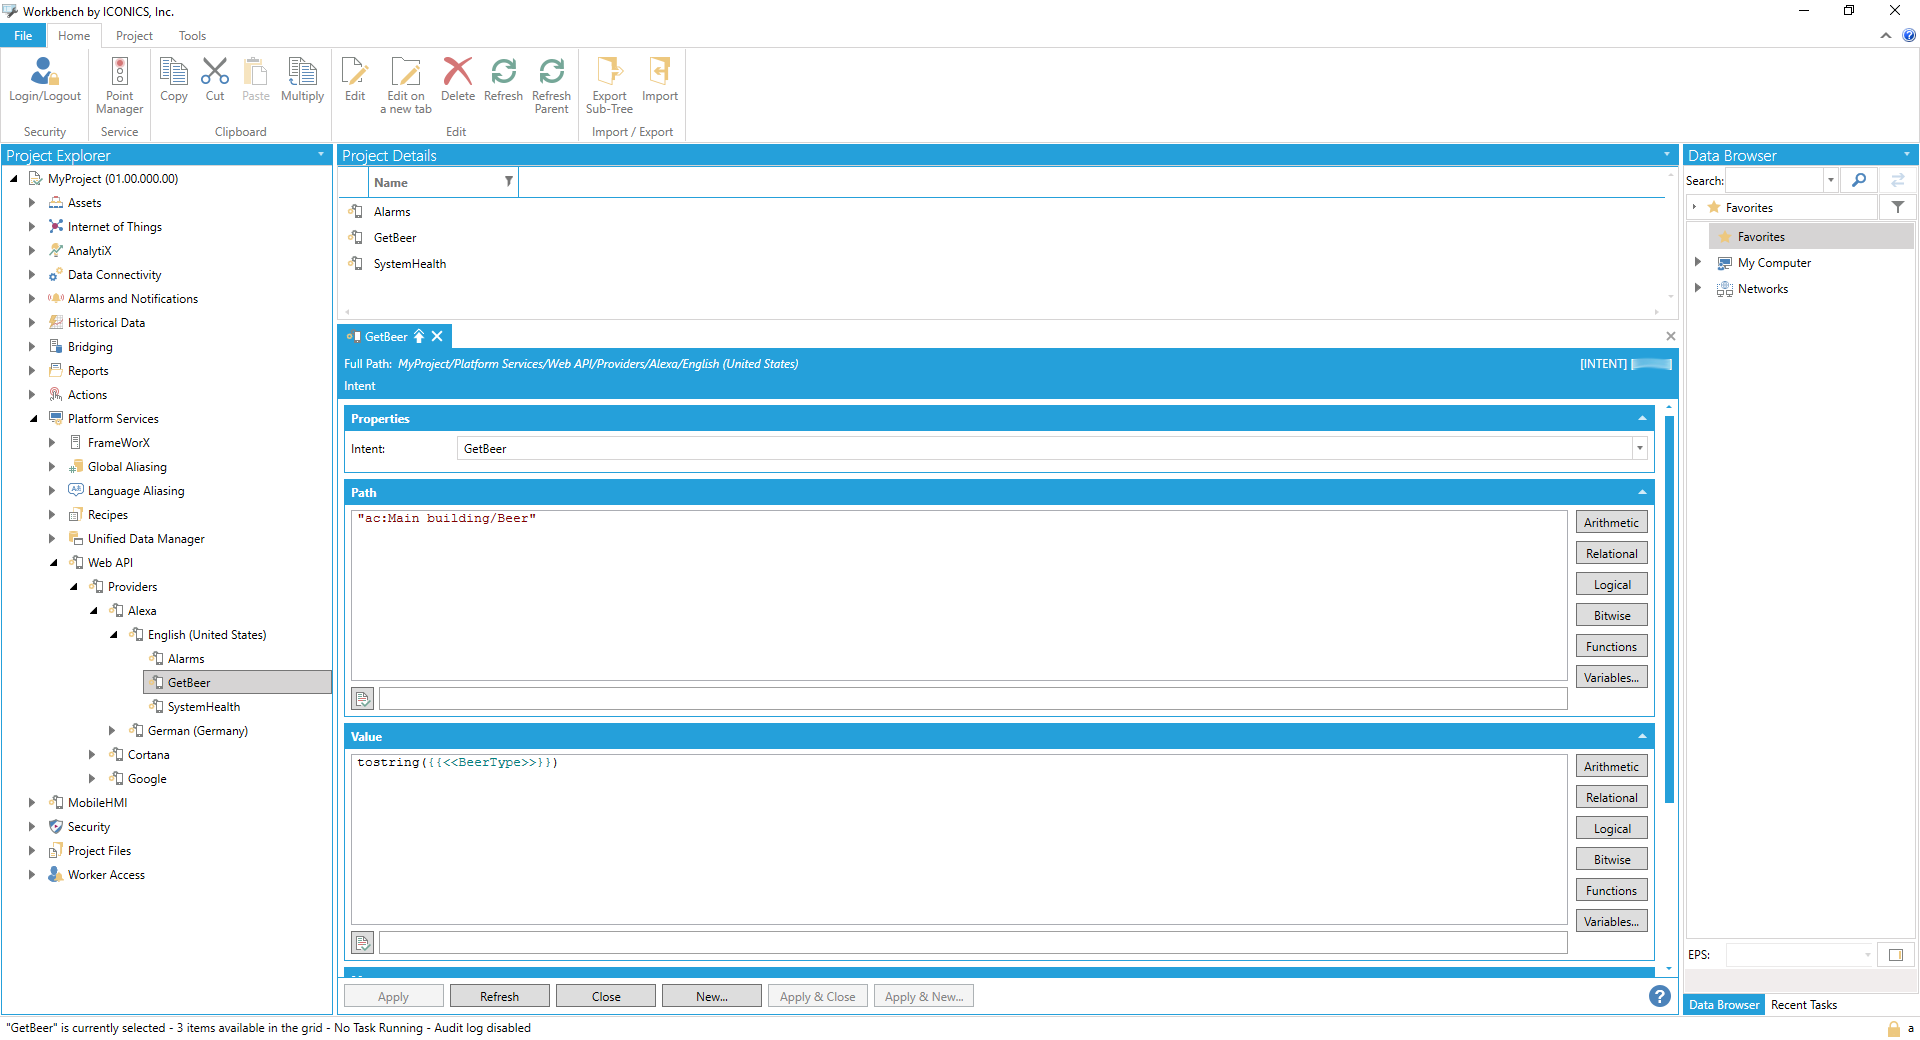
The configuration is done in the IcoAlexa.json config file. This file can be exported from Workbench or created manually as described here. Sample configuration looks like:
"AlexaSkillConfiguration": [
{
"culture": "en-US",
"messages": {
"authexpired": "Sorry, my authentication has expired. Please try logging in and try again.",
"authfailure": "Sorry, I am no longer authorized to do this. Please update my credentials and try again.",
"license": "Sorry, it looks like your license has expired.",
"notfound": "Sorry, I was not able to find the requested device. Please check the device is connected and try again.",
"timeout": "Sorry, the requested operation timed out.",
"unknown": "Sorry, something went wrong and I am not able to complete the request.",
"reprompt": "What would you like to do next?",
"ok": "OK",
"welcome": "Hello and welcome to the ICONICS skill."
},
"mapping": [
{
"intent": "GetBeer",
"path": "\"ac:Main building/Beer\"",
"value": "tostring({{<<BeerType>>}}))",
"message": "\"Getting \" + tostring({{<<BeerType>>}}) + \", please wait.\""
},
{
"intent": "Alarms",
"message": "\"You have \" + tostring({{@ICONICS.AlarmSvr_.1\\Recursive_Active_Count.Value}}) + \" alarms and \" + tostring({{svrsim:sine int16 0 100}}) + \" warnings.\""
}
]
},
{
"culture": "de-DE",
"messages": {
"authexpired": "Entschuldigung, meine Authentifizierung ist abgelaufen. Bitte versuchen Sie sich anzumelden und versuchen Sie es erneut.",
"authfailure": "Entschuldigung, ich bin nicht mehr dazu berechtigt. Bitte aktualisieren Sie meine Zugangsdaten und versuchen Sie es erneut.",
"license": "Es sieht so aus, als ob Ihre Lizenz abgelaufen ist.",
"notfound": "Entschuldigung, ich konnte das angeforderte Gerät nicht finden. Bitte überprüfen Sie, ob das Gerät angeschlossen ist, und versuchen Sie es erneut.",
"timeout": "Entschuldigung, die angeforderte Operation ist abgelaufen.",
"unknown": "Entschuldigung, etwas ist schiefgelaufen und ich kann die Anfrage nicht abschließen.",
"reprompt": "Was willst du als nächstes machen?",
"ok": "OK",
"welcome": "Hallo und willkommen bei der ICONICS-Fähigkeit."
},
"mapping": [
{
"intent": "GetBeer",
"path": "\"ac:Main building/Beer\"",
"value": "tostring({{<<BeerType>>}}))",
"message": "tostring({{<<BeerType>>}}) + \" holen, warten bitte.\""
}
]
}
],
AlexaSkillConfiguration contains a list of skill configurations per language/culture. The skill configuration consists of the culture name (“en-US”, “de-DE”, …), a list of messages that the skill uses to interact with the user (optional) and the mapping section. The mapping section specifies a list of intents and appropriate actions to do when the intent is invoked by the user.
There are two kinds of actions, or responses to the intent: read and write. Read action is simply just an intent name and message. Write action adds a path (point name) and a value. All three properties (path, value, message) can contain expressions. On top of that, the expressions support {{<<Slot Name>>}} syntax that will fill in the Slot from the intent sent by Alexa.
A Smart Home Skill cannot be configured with a custom endpoint, it must always use AWS Lambda. First, you will need to create an AWS Lambda function in the AWS console. Set the region according to the languages you want to support. For example, Japanese requires a specific region and it is not available anywhere else. You might end up with multiple Lambda functions in different regions just because of this limitation.
Upload the IcoSmartHomeService.dll that you will find in your GENESIS64 installation in the C:\Program Files\ICONICS\GENESIS64\WebSites\IcoWebAPIService\AWSLambda folder. This DLL is a NET Core 2.1 DLL that contains the implementation of the proxy. The proxy is required to forward all the requests coming to the AWS Lambda back to GENESIS64's backend.
Set the environment variables for the AWS Lambda: add a new variable called BACKEND and set its value to https://<host_name>/fwxapi/alexa.
After this, open the developer portal and create a new Smart Home Skill.
Set the AWS Lambda ARN for the region and language (each language might require a different Lambda in different region) and set up account linking (authorization and token endpoints can be found at https://<host_name>/fwxserverweb/security/.well-known/openid-configuration).
Finally, create a new OIDC Relying Party in the security with the settings above.
The AssetWorX configuration is based upon virtual trees. Default configuration in the IcoAlexa.json, IcoBots.json and IcoGgl.json uses ac:.Tree Views/Voice Controlled Devices/. This default configuration requires each asset that represents a voice-controlled device to have an asset property called IsVoiceControlledDevice of Boolean type and value set to True. This default configuration can be changed for each plugin in its *.json config file.
AssetWorX Configuration

Voice controlled assets then declare their capabilities having asset properties with a custom name. The name must contain information about the plugin (Alexa_, Google_), the controller, or let’s say the capability which corresponds to the property (BrightnessController_) and the property name (brightness, brightnessDelta…). Documentation for the BrightnessController is here: https://developer.amazon.com/docs/device-apis/alexa-brightnesscontroller.html .
Other controllers follow the same rule. Other providers (Google) share the same concept – basically, the asset properties will start with Google_ and the rest of the name will be similar, just using Google documentation instead of Amazon documentation.
As for supported controllers, there are some limitations (not all controllers and all features are supported by the service) and there are differences among languages as well, which means some controllers are supported in one language only (English) and not in Japanese or German.
RecipeWorX Configuration

Recipe Items are used as “scenes”. The skill takes all recipe items and treats them as scenes. You can then say “Alexa, turn on <recipe item>” and the recipe will be activated.
Brightness, CameraStream, Color, ColorTemperature, Input, Lock, Percentage, Playback, Power, PowerLevel, Scene, Speaker, StepSpeaker, Thermostat.
Go to https://alexa.amazon.com or open the Alexa app on your phone to manage your devices and skills.
Go to Your Skills.
Select the skill you want.
Here you can disable/enable the skill. This operation is necessary if:
You have changed the skill invocation name
Your authentication has expired – this can happen if:
The service was not running for a long time (Refresh token failed due to the service being offline)
Here you can manage the device region and language. Changing the language is only possible here, you cannot do it on the device itself.
Smart Home skills need to enumerate all devices and their capabilities before you can use them. Device discovery will be started automatically after enabling Smart Home skill, or it can be triggered manually in Smart Home -> Devices -> Discover. During the discovery, Alexa calls our AWS Lambda, which forwards the call to our backend that enumerates all the assets in the virtual tree and all the recipe items and returns a complete list of all devices and scenes available back to Alexa. After device discovery is complete, you can start using Alexa Smart Home.
[Note: Microsoft Cortana server-side configuration steps can change frequently. Due to this fact, corresponding screenshots of these steps have been intentionally withheld from ICONICS-hosted documentation. The following configuration steps were current as of the time of this ICONICS product release.]
Bot Registration
In Azure portal, you must first create a new bot registration. Set the messaging endpoint to https://<host_name>/fwxapi/messages.
Configure Channels
Channels are all the services that you want to support.
Configure OAuth2 Authorization
The authorization/token endpoint URLs can be found at https://<host_name>/fwxserverweb/security/.well-known/openid-configuration.
Set the name of the OAuth2 configuration in an environment variable called Ico_AzureOAuthConfigurationName.
Set Microsoft App ID and Microsoft App Password from the bot registration page into environment variables called Ico_MicrosoftAppId and Ico_MicrosoftAppPassword.
For language understanding, you must create a LUIS.AI model. Go to https://www.luis.ai and create a new application.
Get the Application ID and store it in an environment variable called Ico_LuisModelId.
Go to User Settings, get an Authoring Key and store it in an environment variable called Ico_LuisSubscriptionId.
Now you can start building the application. The concept is very similar to Alexa: there are intents and entities and you use them to configure and train your model.
To use the skill, you must first enable it. For Skype, you add it as a new contact (see the instructions in the Azure portal). For Cortana, you must log into Windows with the same account as the one you have on Azure and for which the skill is enabled, or you must configure an additional test account in the Azure portal in the Cortana configuration. The flow for Cortana is different than the flow for other providers. Generally, the chat works without any authentication and only when you ask the bot to do something it will reply with a sign in card for you to log in first. For Cortana, once you enable the skill, it will ask you to log in immediately.
[Note: Google Assistant server-side configuration steps can change frequently. Due to this fact, corresponding screenshots of these steps have been intentionally withheld from ICONICS-hosted documentation. The following configuration steps were current as of the time of this ICONICS product release.]
Go to https://developers.google.com/actions/. Create a new project, set the name.
Configure actions (again, the concept is the same as for Alexa and Cortana).
Configure the backend URL.
Configure account linking.
The only difference in the Smart Home Skill configuration will be on the Actions tab. Instead of using DialogFlow and configuring the backend URL there, you will provide the backend URL right on the Actions tab.
The Smart Home configuration for Google Smart Home is similar to the one for Alexa. Due to the different feature set of both solutions, Google uses different Asset properties. Otherwise, the concept is the same. See the documentation for more info: https://developers.google.com/actions/smarthome/traits/onoff.
Example property name for turning the device on/off: Google_OnOff_on, type: Boolean
As for Scenes, they are the same as in the case of Alexa; configuring RecipeWorX is enough.
Brightness, ColorSetting, Dock, OnOff, Scene, StartStop, TemperatureControl, TemperatureSetting.
Smart Home, as well as the skill, can be tested on any Android device with the Google Assistant application. This application has to be downloaded unofficially and side-loaded to the device. You should see your skill in the app settings where you can enable it, discover devices, and then interact with them.