The SQL Server and File Browser Setup is a separate application from the Workbench, installed with GENESIS64, which allows users to add potentially targeted SQL Servers or File Browsers for use within ICONICS' applications. The tool is available directly from the following file location (C:\Program Files\ICONICS\GENESIS64\Components\IcoWorkbenchSqlSetup.exe) or can be accessed via the Start menu.
SQL Server and File Browser Setup

The tool is separated into two tabs:
The SQL Servers tab allows you to add individual SQL Server connections.
SQL servers Tab in the SQL Server and File Browser Setup

To Add a New SQL Server Connection:
Click on the Add button [![]() ] to begin entering information for your selected SQL Server.
] to begin entering information for your selected SQL Server.
In the SQL Server column, enter the name of the SQL Server to which you later intend to connect via the ICONICS application(s).
In the Use Windows Security column, click on the checkbox if you wish to use Windows Security for login purposes.
If you opted not to use Windows Security, you can enter the respective Login and Password information for that specific SQL Server in the following two columns.
Clicking on the arrow in the last column [![]() ] checks to make sure the entered SQL Server and corresponding login information are configured correctly and that the connection to the server can occur successfully.
] checks to make sure the entered SQL Server and corresponding login information are configured correctly and that the connection to the server can occur successfully.
Click Apply to save your settings.
You also have the option of clicking on the green plus sign [![]() ] in the bottom left corner of the window in order to add SQL Servers available from your connected network.
] in the bottom left corner of the window in order to add SQL Servers available from your connected network.
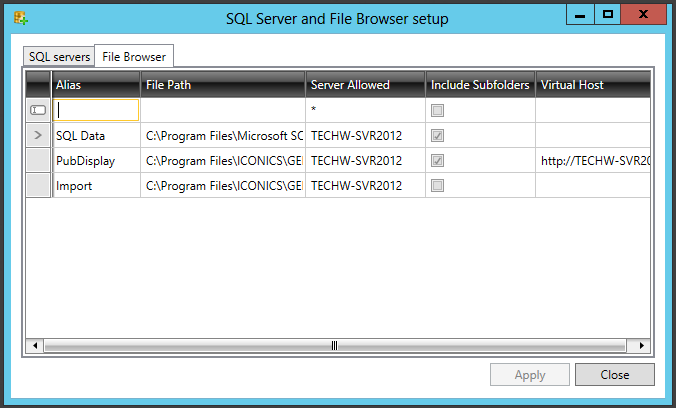
The File Browser Tab allows you to set which files and folders can be browsed by ICONICS clients. This helps with security in that it can prevent all users from browsing the entire file system of a connected server.
File Browser Tab in the SQL Server and File Browser Setup

To Add a File Browser Connection:
Click on the Add button [![]() ] to begin entering information about your selected file browser connection.
] to begin entering information about your selected file browser connection.
Enter an Alias for the connection. Note that three connections are included within the File Browser tab by default (SQL Data, PubDisplay and Import).
Enter the File Path. Double-clicking within the File Path column entry causes the ellipsis [...] button to appear. Clicking the ellipsis button [...] opens a 'Browse for Folder, which allows you to navigate to, and select, your desired folder location.
Enter the 'Server Allowed'. Note that in the Workbench, users can configure multiple servers at the same time. The Workbench is capable of browsing the file system of each server, but a user might want to allow different folders on, for instance, 'localhost' and 'Remote Server 1'. This is possible by specifying the server in the 'Server Allowed' field. If you specify "*" , all servers are allowed.
In the Include Subfolders column, click the checkbox if you would like to allow permission to access subfolders of the folder set in the File Path column.
In the Virtual Host column, you can choose whether or not to use a Virtual Host path to your selected file browser connection. This is sometimes useful if your File Path would be considered long or easy to forget.
Click Apply to save your settings.
Once you've made your File Browser settings, you will be able to utilize them in certain properties and settings in the Workbench. In the example below, clicking on the ellipsis button [...] allows you to browse the file system.
Accessing Your Configured File Browser within Workbench

When the browser is opened, you'll see the folders you configured through the File Browser tab within the SQL Server and File Browser Setup utility, similar to the image below.
Browsing file or folders

Clicking through the folders then allows you access to the individual files and subfolders (if allowed through the SQL Server and File Browser Setup utility), similar to the image below.
Individual Files Accessed through an Allowed Folder

Once you select an item and click OK, the path will then be set in the particular setting you originally accessed, similar to the image below.
File Path Set through the File Browser
