Simulation variables are used to replace static values, dynamic tags and other functions that are used in expressions.
You can use simulations:
To provide a value to a property
To allow input to a variable
To help you determine what a display will look like prior to connecting the various items to their ultimate data sources
To check that a control outputs the correct values
Or that a dial or slider can perform throughout a range of values.
The possibilities are nearly endless. Simulation functions are invaluable in your design work.
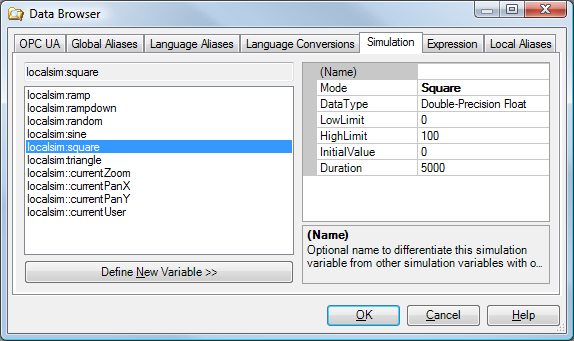
You access the ICONICS local simulator functions on the Simulator tab of the Unified Data Browser. On the Simulator tab, you can select not only the function, but set the datatype that is returned, value limits and other features of the simulation that are described in the next section.
The Simulation Tab for Simulator Functions
The Unified Data Browser also exposes some variable data simulators meant to simulate tags and real-time data. To access a simulated tag, click on the Simulation node in the Shortcuts pane of the browser's OPC UA tab, as shown in the figure below in the Grid view.
The Simulation View Displays Real Time Data Tag Functions

GraphWorX64 provides several different variables for local simulation which are useful for testing or simulating tags in GraphWorX64 displays. The following simulation variables are available for your use in the Simulation tab; each makes use of the localsim function. You can create additional variables by clicking the Simulation tab's Define New Variable button. The properties that define each variable are described following this list.
localsim:ramp. This simulation variable rises from 0 to 100 over 5 seconds using the Ramp (Up) mode (described below), then starts over creating a sawtooth trend. This variable's behavior is determined by its property settings.
localsim:rampdown. This simulation variable falls from 100 to 0 over 5 seconds using the Ramp (Down) mode. It is the inverse of the localsim:ramp variable. The pattern looks like a sawtooth with a set of forward slashes. This variable's behavior is determined by its property settings.
localsim:random. This simulation variable creates random data from 0 to 100. This variable's behavior is determined by its property settings.
localsim:sine. This simulation variable varies like a sine wave or sine curve in the range from 0 to 100 and 100 to 0. This variable's behavior is determined by its property settings.
localsim:square. This simulation variable goes from 0 to 100 or from 100 to 0 every 5 seconds. The function has two states, high and low, which makes it useful in representing digital functions.
localsim:triangle. This simulation variable varies from 0 to 100 and then 100 to 0 in a continuously varying manner. This variable's behavior is determined by its property settings.
localsim:currentZoom. This simulation variable captures the current zoom level of the GraphWorX64 display. This variable is useful in displays that have views, displays that have an EarthWorX map, or displays that contain detailed information at various zoom levels.
localsim:currentPanX. This simulation variable captures the current value on the X-axis at the center of the runtime user's view in a 2D grid. This variable is useful in large displays in which you need to know the current X and Y values.
localsim:currentPanY. This simulation variable captures the current value on the Y-axis at the center of the runtime user's view in a 2D grid. This variable is useful in large displays in which you need to know the current X and Y values.
localsim:currentUser. This simulation variable captures the account ID of logged-in user. This variable is useful for determining account security or for determining if a user is logged in. For an example of its use, refer to Modifying the Access Denied Screen. For more information, refer to Logins and Passwords.
Each variable has its own properties. The properties you can set for variables are:
Name. The name of the Simulator.
Mode. The type of Simulator. The localsim function provides functions that are provided by the local machine to GraphWorX64 . There are seven different types of variables:
None (Local Variable). This mode is used for a writeable local variable that you might use as an input function in a control. You can set the update rate.
Ramp (Up). The function rises from a low value to a high value during the duration period and then starts over creating a sawtooth with back slashes. You can set the update rate.
Ramp (Down). The inverse function for a ramp creates a sawtooth that varies from a high value to a low value during the duration period. You can set the update rate. The pattern looks like a sawtooth with a set of forward slashes.
Random. Random data provides a function that creates random data within the range you set. You can set the update rate.
Sine. The Sine function varies sinusoidally in the range limit from high to low and low to high. The function has a frequency (period rate) of the duration you set.
Square. A Square function goes from the low value to the high value or from the high value to the low value every time a period ends. The function has two states: high and low; and is therefore useful in representing digital functions.
Triangle. The Triangle function varies from low to high and then high to low in a continuously varying manner. If you added a ramp and a rampdown function together the result would be a triangle function.
DataType. The kind of data type returned. You can select any data type in the DataType drop-down list, shown below.
DataType Drop-Down List

LowLimit. The lowest value to be returned to the simulation variable.
HighLimit. The highest value to be returned to the simulation variable.
InitalValue. The starting value of the simulation variable.
InitialElapsedTime. The period of time that must elapse before the simulation begins. Enter the time in milliseconds.
Duration. The length of time over which the function cycles. Enter the time in milliseconds.
UpdateRate. The period between simulated data value refreshes. Enter the time in milliseconds.
The Define New Variable button in the Simulation tab allows you to define a new variable. After you click this button, enter values in the properties on the right side of the Simulation tab. After you enter a name in the Name property, the name appears at the top of the list of simulation tags, preceded by the function localsim::. To see an example, click here.
When used as a variable, a simulation's syntax depends on the type of variable. For simulation variables within an expression, use the following syntax:
{{simulation_variable_name}}
Example:
x={{localsim:random}}
You can use the Simulation tab in the Unified Data Browser to select simulation variables. In the left-hand pane, select a simulation variable from the list. In the right-hand pane, you can edit the properties (described above) for each selected simulation variable. To create a custom variable, click the Define New Variable button and then select the variable mode in the properties.
To get a sense for how a variable is handled, in the figure below three different objects have had their data source set to the value localsim::var1. The circular knob's triangular indicator has a rotation dynamic assigned to it, and that rotation dynamic's data source was assigned to localsim::var1 as well. The local simulator for var1 is declaring a variable that can be written to or read from. The figure below is shown at runtime, and what you observe is that if you click and drag the knob around, the values in the two objects at the top (a Data Entry object and a Process Point) change accordingly. A value of 22 on the knob shows up as 22.00 in the objects. You can click in the Data Entry object, but not in the Process Point object. When you click in the Data Entry object and change the value to 53, the Process Point object and the indicator on the circular knob both change to reflect the var1 value of 53.
An Example of Using a Variable with a PPT and DE Label

Localsim is a local simulator that can store a single value, or perform a function.
You can simulate OPC tags for OPC UA data source that varies over time (or could vary over time). To assign an OPC data tag, go to the DataSource property of the three different objects and assign them an OPC tag. You would open the Data Browser and go to the OPC UA node where you can locate the tag which will have a format similar to the following:
@\\ServerName\OPC_Server.Simulator.1\SimulatePLC.Ramp3.Value
If you assign a tag that has variable values, what you find at runtime is that the Process Point, Data Entry label, and Circular knob (described above) all display the value of the tag as it changes over time. You also find that the Data Entry label displays the value of the tag but has grey text and cannot get the focus of action (that is, it cannot be edited) because it is READ-only. Many OPC tags show a single value or state, and in that instance the assignment of the three objects above to a tag similar to:
@sim64:Double.Static("Static1").Value
ends up returning you to a condition that is similar to the one you saw earlier for the variable assignment localsim::var1; except you are now storing the variable value into an OPC tag value, albeit one that is a static value.
When you use a tag simulator, you are selecting an object in the OPC UA hierarchy. The properties of these objects are described in the next section, and are quite useful in understanding how OPC UA is organized.
You can see how the Simulator functions are organized by opening the Mesh view of the browser. The mesh for the Sim64 view is shown in the figure below. You can observe the following features:
The remaining relationships are Organizes relationship from the FolderType objects that represent the storage location of the datatypes being returned: String, Long, Float, Double, Short, or Boolean.
The Sim64 view has !Organized relation to its object class of Views. Each relationship is a one way relationship. For example, HasParentOf or IsChildOf. The Exclamation point tells you its the inverse relationship of IsChildOf, ContainedIn, etc.
The Sim64 view has the HasTypeDefintion of a PlugInDAType that shows that the view is constructed of real time data access data, and that the system is extensible with additional functions of this type.
The Simulator View Object Hierarchy

The actual simulator functions themselves are contained within the different datatypes as shown in the figure below. Expanding the Long datatype displays the purple rectangles of the DataTypeObject: Static, Triangle, Step, Sine, Square, Random, and Ramp which are the ultimate output that you select for your simulator. The green squares: Step, Square, Triangle, Random, Ramp, and Sine are folders; each expands to show additional content. As you select a simulator the address for the node appears in the Address bar. Shown selected below is the Static value, which would return a single unvarying value and is located on the path: @sim64:Long.Static("Static1").Value.
Simulation Value Object Relationships

See also:
