
Use Global Settings to set policies that control how the GENESIS64 Security Server maintains accounts in its database. You can also identify critical points and alarms in your database that cannot be written to without user authorization.
To Access Global Settings:
Open the Workbench, then expand the current project to show the Security provider node, and then expand to show the Global Settings node as shown below.
Global Settings Node in Security Provider in the Workbench
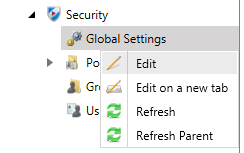
Double-click the Global Settings node or right-click the Global Settings node and select Edit, as shown below.
Edit Global Settings from Project Explorer
-OR-
Select the Global Settings node then click on the Edit button, shown below, in the Edit section of the Home ribbon in the Workbench.
Edit Button

The Global Settings form appears, shown below, with its three tabs: General, Critical Points, and Critical Alarms. Each tab is described below in this topic.
Global Settings Properties

Global Settings General tab (shown below) provides access to the polices that control how the GENESIS64 Security Server maintains accounts in its database. You can choose to have the Security Server interact with the Windows domain services and provide the connection to the correct domain, how the account user name in the ICONICS security database maps to the Windows domain account, and provide the necessary domain credentials so that GENESIS64 can accept pass-through authorization from the Windows domain.
You can set a policy that will accept the current Windows user account credentials, populate the login dialog with domain users, and change the security mode. Settings maintained in the Security Server database are the automatically synchronized with the domain service.
Global Settings - General Tab
The following properties may be set on the General tab:
Security active. There are three options for the ‘Security active’ setting:
Inactive – Security is deactivated, all permissions are granted all the time.
Testing – Security is activated, but when nobody is logged in, all permissions are granted. When somebody is logged in, permissions are granted as normal. This setting is mostly meant for the phase when setting up a GENESIS64 installation, as it allows tweaking the settings while minimizing the risks of getting locked out.
Active – security is active as normal.
Provide list of existing users in the login dialog. When this box is checked, the Security Login dialog box displays a list of all users in the User Name drop-down list. This option is often desirable for touch-screen systems.
Show currently logged in user in login dialog. When this box is checked, the Security Login dialog box displays the name of the most recent and current user that successfully logged into the User Name field.
Allow simultaneous login
Create a local copy of the configuration on the server
Check file security in configuration mode
Time window for interacting with critical objects. Amount of time (in seconds) after logging in that a user will be allowed to manipulate a critical point before being required to log in again.
Security mode: Database or Active Directory or Azure Active Directory. You can select either to authenticate using the ICONICS Security Server database or using the Active Directory.
Only one Windows domain can be used to authenticate users if you choose to use the Active Directory synchronization feature. This feature eliminates the need for users who have already logged into an Windows domain to enter a user name and password a second time to gain access to the Security Server through the Security Login application. This feature, commonly referred to as "single sign-on," is available in all security modes (i.e., basic, advanced, and integrated NT). (Default is off.)
Active Directory Settings (Highlighted in Red) Activated in Global Settings

Active Directory Settings
Domain Name – This is the domain name. Can be a long or short (Netbios) name.
Server Type:
Domain LDAP – With this option, our Security will connect to the default controller of the domain.
Global Catalog – Security will connect to the Global Catalog. A Global Catalog in Active Directory is a read only cache of all domains in a single domain forest. Use this option, users are in multiple domains inside a single forest, and the Security needs to show them all.
Map user name from - For users, Security will use the selected Active Directory attribute as the username. Users which do not have this attribute specified in Active Directory will not be shown.
SAM-Account-Name – This will use the “SAM-Account-Name” attribute.
User-Principal-Name – This will use the “User-Principal-Name” attribute.
Initial administrator account – Security will enable all Application Actions and will put an asterisk (*) to all other security permission for this user, when pressing “Apply” on the Global Settings form.
AD synchronization period - Enter an Active Directory synchronization period, in minutes, in the text entry field. Click the Synchronize now button to cal the method '?\FullSyncExternalSecurityProvider' on the default server to perform a full synchronization of Active Directory users and groups.
User authentication method - Use the pulldown menu to select from Active Directory, Active Directory (User-Principal-Name being translated to SAM-Account-Name), Active Directory (SAM-Account-Name being translated to User-Principal Name), or Local Logon.
Show Managed Service Accounts - Click this checkbox to show the managed service accounts.
Automatic log in
Enabled - Click this checkbox to enable automatic log in. Note: For the auto login to work, it is also necessary to enable to the option 'Use Integrated Windows Authentication' in the Default Server Location dialog settings under the Tools menu, or to set up authentication using client certificates that map to Active Directory.
Also enable manual login -Click this checkbox to allow manual login in addition to automatic.
Allow the automatically logged in user to log out -Click this checkbox to allow a user who may have automatically logged in to also have the ability to log out.
Only users from a specific group
Enabled - Click this checkbox to allow log in only from a named group. Once checked, you can enter the group name in the setting below.
Group name - Enter a group name in the text entry field that will contain users allowed to log in.
Show groups of every user - Click this checkbox to show each group connected to each user.
Domain connection authentication
This section is all about securing the connection between our Security (running as an internal part of the FrameWorX Server) and the Active Directory.
User name - Enter a user name in the text entry field. If filled in, this will get used to authenticate access to the Active Directory, so that Workbench and Security can list users, groups and all it needs. If left empty, Security will try to authentication using the identity of the FrameWorX server process. This will work only if the FrameWorX server process is running under a domain account which has access to the Active Directory.
Password - Enter a password in the text entry field. If filled in, this will get used to authenticate access to the Active Directory, so that Workbench and Security can list users, groups and all it needs. If left empty, Security will try to authentication using the identity of the FrameWorX server process. This will work only if the FrameWorX server process is running under a domain account which has access to the Active Directory.
Authentication type - How the credentials are transferred to Active Directory for verification. These two setting correspond to the options “Secure” and “None” in this link: https://msdn.microsoft.com/en-us/library/system.directoryservices.authenticationtypes.aspx.
Secure – Security will use Kerberos, and possibly NTLM to authenticate to Active Directory. This is the recommended setting.
Basic (simple bind) – Security will use basic authentication
Use Secure Sockets Layer (SSL) - Security will use LDAPS (LDAP over SSL). This needs to be supported by the Active Directory, for details. Details to set this up are outside our concern.
Note: ICONICS Suite (GENESIS64, Hyper Historian, AnalytiX, MobileHMI) is compatible with Azure Active Directory Domain Services. Users should be able to synchronize ICONICS security with an Azure AD tenant that has been integrated with Azure Active Directory Domain Services. Auto-login should work as well, provided that all machines are joined to the domain.
See this link for more information on how to configure Azure Active Directory Domain Services:
Active Directory Settings (Highlighted in Red) Activated in Global Settings
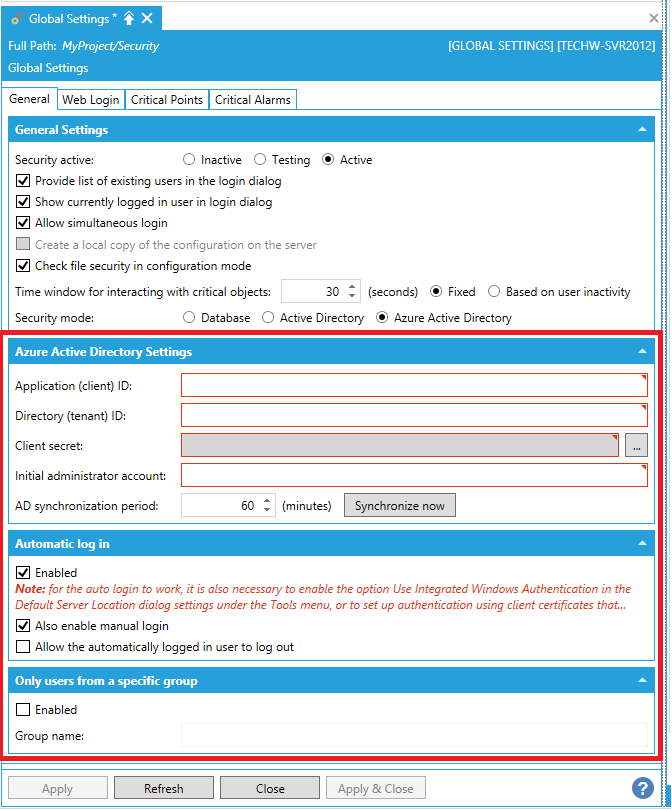
Azure Active Directory Settings
Application (client) ID - Enter the Application (client) ID in the text entry field.
Directory (tenant) ID - Enter the Directory (tenant) ID in the text entry field.
Client secret - Click the ellipsis button [...] to open the 'Shared secret' window and enter the Secret in the text entry field. Close the box to save your Secret.
Initial administrator account - Enter the initial administrator account in the text entry field.
AD synchronization period - Enter an Active Directory synchronization period, in minutes, in the text entry field. Click the Synchronize now button to cal the method '?\FullSyncExternalSecurityProvider' on the default server to perform a full synchronization of Active Directory users and groups.
Automatic log in
Enabled - Click this checkbox to enable automatic log in. Note: For the auto login to work, it is also necessary to enable to the option 'Use Integrated Windows Authentication' in the Default Server Location dialog settings under the Tools menu, or to set up authentication using client certificates that map to Active Directory.
Also enable manual login -Click this checkbox to allow manual login in addition to automatic.
Allow the automatically logged in user to log out -Click this checkbox to allow a user who may have automatically logged in to also have the ability to log out.
Only users from a specific group
Enabled - Click this checkbox to allow log in only from a named group. Once checked, you can enter the group name in the setting below.
Group name - Enter a group name in the text entry field that will contain users allowed to log in.
[For more info on Web Login, click HERE.]
To Edit the Global Settings (Web Login) Properties:
Expand your project in the Workbench's Project Explorer, then expand the Security provider node, and then the Web Login sub-node.
Double-click on the Global Settings node, or right-click on the Global Settings node and select Edit from the menu, or select the Global Settings mode then click on the Edit button in the Edit section of the Home ribbon in the Workbench.
This opens the Global Settings properties, shown below.
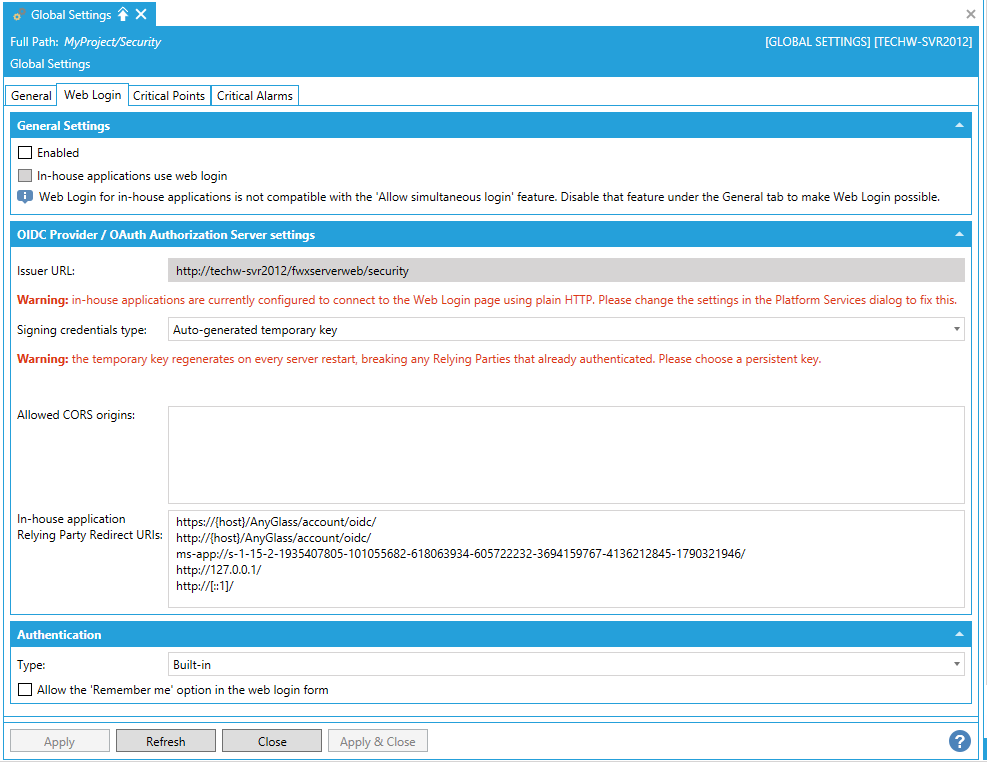
Global Settings (Web Login) Properties
General Settings
These settings set up both Security as an OIDC IdP, as well as configure the external OIDC or SAML login.
Enabled -Enables the OIDC IdP. When disabled, the HTTP endpoints of OIDC/OAuth remain functional, although they will not allow any authentication/authorization. Click the checkbox to enable the selected OIDC Provider.
In-house applications use web login -This instructs the GENESIS64 applications to use Web Login, instead of the regular Login dialog. This option only make sense when also using some sort of external IdP. If not, using the regular Login dialog is the preferred way to authenticate.
Web applications use web login -This instructs the web applications to use Web Login, instead of the regular Login dialog. This option only make sense when also using some sort of external IdP. If not, using the regular Login dialog is the preferred way to authenticate.
Note: Web Login in those applications also comes with limitations.
The Allow simultaneous login must be disabled on the General tab of Global Settings.
When logging into GENESIS64 using Integrated Windows Authentication to automatically log in users, it is advisable to also allow to log off the automatic user. This is an option on the Global Settings. If this option is left disabled, Web Login will not be able to log anybody in through the Web if there is already somebody logged in automatically.
The 'Password required to log out' Policy is ignored for users that logged in through the Web Login.
The Critical Points and Critical Alarms will not work. These points and alarms will always be inaccessible for users logged in through the Web Login.
OIDC Provider / OAuth Authorization Server Settings
This section sets up the OIDC Provider (called ‘Authorization Server’ in OAuth terminology) that is built into Security.
Issuer URL -The base URL of the OIDC/OAuth endpoints. This field cannot be changed directly, it serves just to inform about the URL. To change the base address where Security listens on, see the separate section ‘Changing the URL that Security Listens On and Enabling HTTPS’.
Signing credentials type -What certificate to use to cryptographically sign the OIDC/OAuth tokens. Use the pulldown menu to select either 'Auto-generated temporary key' or 'From the windows certificate store'. Your selection will determine whether you can make further edits to the General Settings properties.
Auto-generated temporary key – This option should only be used for testing. Security will generate a new random key every time it starts, so all clients that already authenticated will lose the authentication and will need to re-authenticate again.
From the windows certificate store – Selects a key saved in the certificate store. For OIDC/OAuth, the certificate does not need to be signed by a trusted authority.
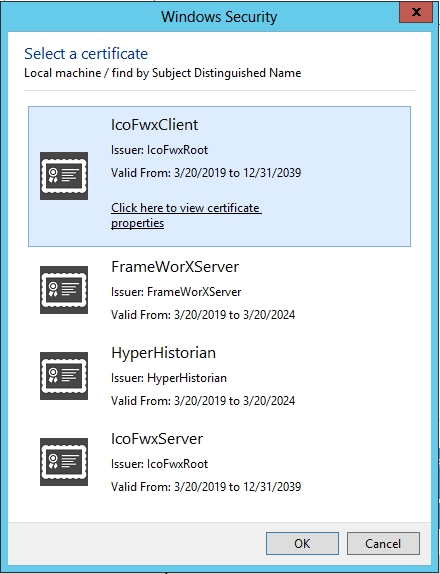
Select certificate by/Certificate identifier - Serves to select a certificate from the certificate store. If you selected 'From the windows certificate store' as your selected Signing credentials type, you can use the now activated pulldown menu to select from 'Local machine/find by Subject Distinguished Name', 'Local machine/find by Thumbprint', 'Current user/find by Subject Distinguished Name'. or 'Current user/find by Thumbprint'. You can enter a Certificate identifier in the text entry field or click on the  button, which opens the Windows Security window specific to what you selected for 'Select certificate by', as shown below.
Windows Security Window Customized to Selection of 'Local machine/find by Subject Distinguished Name'
Allowed CORS origins -An optional new line separated list of JavaScript client origins that are allowed to use the OIDC/OAuth feature for logging in. This is only required for JavaScript SPAs (Single page applications) and only if they are hosted on a different domain than the FrameWorX Server. Currently, in GENESIS64 V10.96 applications, ICONICS does not have any such in-house applications, so this only appies to custom-developed SPAs. Note: CORS origins are case-sensitive.
In-house application Relying Party Redirect URIs -These are the OIDC Redirect URLs used by GENESIS64 applications (GraphWorX64, AnyGlass, UWP). Normally, there should be no need to change these. The {host} placeholder gets replaced by the server name. See the section ‘Changing the URL that Security Listens On and Enabling HTTPS’ on what name that will be.
Authentication
These settings switch between built-in authentication and using an external OIDC or SAML Identity Providers.
Type -Use the pulldown menu to select from Built-in or OpenID Connect.
Built-in
With this option, Security will not redirect to an external OIDC or SAML web page, but instead will present its own login page that authenticates against either Active Directory or against the list of users specified directly in Security. There is just one setting for this option.
Allow the 'Remember me' option in the web login form -This enables or disables a “Remember me” check box on the web login form. When enabled and the user checks the check box, the authentication cookie will be persisted in the user’s web browser, so the next time the browser is opened and the OIDC/OAuth login feature is used, the user will already be signed in. Without this check box checked, the cookie will remain in the user’s web browser only until the browser session ends.
OpenID Connect
These settings, together with the OIDC Authentication User Mapping section, set up login through an external OIDC Identity Provider.
Redirect URL -This value is informational only and will be required when setting up the external OIDC Identity Provider. For information about changing the base URL, see the separate section ‘Changing the URL that Security Listens On and Enabling HTTPS’.
Logout redirect URL -This value is informational only and will be required when setting up the external OIDC Identity Provider. For information about changing the base URL, see the separate section ‘Changing the URL that Security Listens On and Enabling HTTPS’.
Issuer URL -The base URL of the endpoints of the external OIDC Provider. Enter the Issuer URL for authentication in the text entry field.
Client ID -The OIDC/OAuth ‘Client identifier’. Enter the client ID associated with the issuer URL/authentication in the text entry field.
Client secret -The client secret, if required. It is stored in the database in obfuscated form and can be reverted to clear text easily. Enter the Client secret used for the external authentication in the text entry field or click on the ellipsis button [...] to open the Shared secret window, where you can type in the secret.
Use PKCE -Determines whether the client must use PKCE (Proof Key for Code Exchange).
Prompt -This is an optional OIDC protocol parameter that instructs the OIDC Identity Provider to re-prompt the user for some information. See this link for more information: https://openid.net/specs/openid-connect-core-1_0.html#AuthRequest. Select whether the authentication prompt will be Default, or use Login, Consent or Select account (by clicking the respective check boxes).
OIDC Authentication User Mapping
OIDC scope to request - By default, Security requests only the ‘openid’ scope. It is possible to specify additional scopes here (even multiple, space delimited). The combo box option contains the standard scopes defined by the OIDC standard, but Identity Providers can define their own. Use the pulldown menu to select from profile, email, address, or phone.
Use this OIDC claim - What claim to extract from the OIDC tokens when mapping to existing users. Servers are likely to define their own claims, but a list of standard ones can be found here: https://openid.net/specs/openid-connect-core-1_0.html#StandardClaims. Enter an OIDC claim to use for user mapping with the external authentication. This field may be pre-populated but can be edited.
Find existing user by - Use the pulldown menu to select from Display Name, Unique name (Active Directory GUID), Active Directory SID (Security ID), or Active Directory UPN (User Principal Name).
SAML 2.0
These settings, together with the SAML Authentication User Mapping section set up login through an external SAML Identity Provider.
Assertion Consumer Service (ACS) -This field is informational only and will be required when setting up the external SAML Identity Provider. For information about changing the base URL, see the separate section ‘Changing the URL that Security Listens On and Enabling HTTPS’.
SP metadata URL -This field is informational only and will be required when setting up the external SAML Identity Provider. For information about changing the base URL, see the separate section ‘Changing the URL that Security Listens On and Enabling HTTPS’.
SP Entity ID -This is like the OIDC Client Identifier. Enter the ID in the text entry field.
IdP metadata document -Save the metadata XML from the external IdP here. The two links to the left can be used to download the document from a URL or load it from a file. Security currently does not support dynamically loading the metadata from a URL.
Force authentication - This is like the ‘Prompt’ parameter from OIDC.
SAML Authentication User Mapping
Use this SAML claim -What information from the SAML token to use when mapping to an existing user. These rules apply when Security extracts information from the SAML token and assigns them to individual claims:
The <Subject> → <NameID> element gets mapped to claim ‘http://schemas.xmlsoap.org/ws/2005/05/identity/claims/nameidentifier’
Each value of an <Attribute> element gets mapped to a claim named the same as the <Attribute> (using the Name attribute of the <Attribute> element). If there are multiple values in the <Attribute> element, only the first one is used.
Find existing user by -See the separate section ‘’Security with an External OIDC or SAML Identity Provider".
Show list of claims -See the separate section ‘’Security with an External OIDC or SAML Identity Provider".
Azure Active Directory Authentication
This setting is only available when Security is connecting to Azure Active Directory. This uses the OIDC protocol, but instead of requiring to set up all the details, this takes the details from the Azure Active Directory Settings section of the General tab.
This authentication uses the version 2 of Microsoft identity platform, as described here: https://docs.microsoft.com/en-us/azure/active-directory/develop/v2-overview.
Specifically, these settings are used:
• The Authorization Code flow is used.
• The issuer URL is formatted as https://login.microsoftonline.com/{tenant}/v2.0.
• The ‘profile’ scope gets requested.
• The ‘oid’ claim from the ID token gets extracted and mapped to the ID property read from Azure Active Directory.
On the Critical Points tab of Global Settings, shown in the figure below, you can designate a subset of write-able points (OPC data items) known as critical points. When writing a new value to a critical point, the user will be prompted to login again immediately before writing a new value. This ensures that the person writing the value is an authenticated user.
Global Settings - Critical Points Tab
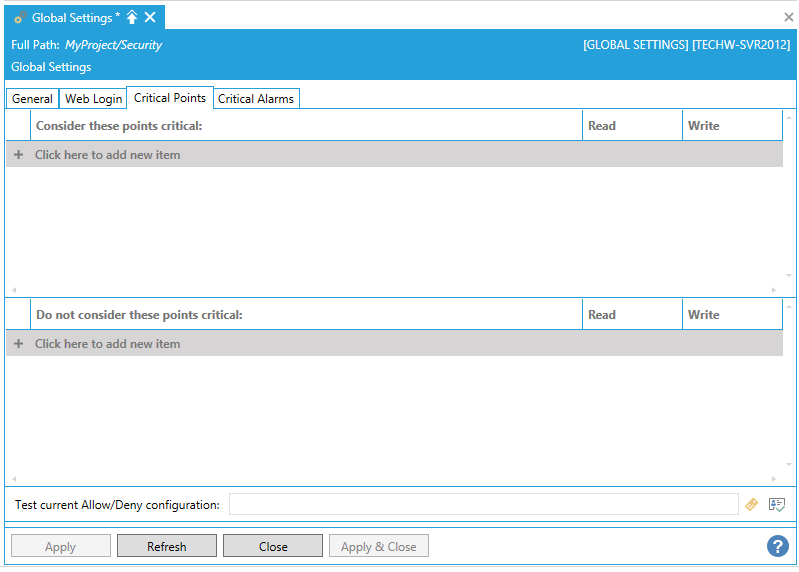
You can use wild cards as part of the point name. This lets you specify multiple tags without listing them individually. For details about how to do this, refer to Wildcards and Performance Optimization.
In order for a user to write a new value to a critical point, the following two conditions must be met:
The user must be granted rights to the point via his or her user configuration or via one of the explicit groups he or she belongs to. (Rights cannot be granted from the default group).
The user must have logged in within the past Time window for interacting with critical objects period (configured on the Policy tab of Global Settings). If condition 1 is met, but not condition 2, the client application (e.g., GraphWorX64) will open a Security Login dialog box, requiring the user to log again and satisfy condition 2.
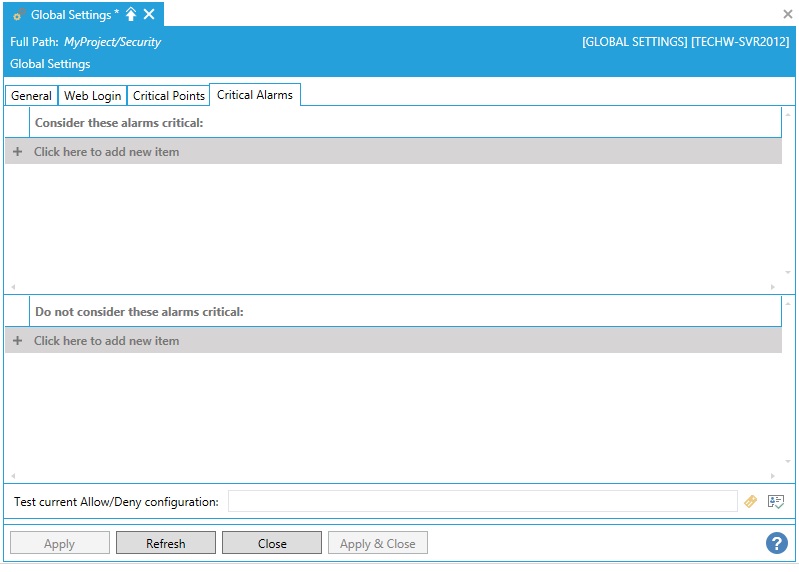
On the Critical Alarms tab of Global Settings, shown in the figure below, you can designate a set of critical alarms. When writing a new value to a critical alarm, the user will be prompted to log in before acknowledging an alarm. This ensures that the person acknowledging the alarm is an authenticated user.
You can use wild cards as part of the point name. This lets you specify multiple tags without listing them individually. For details about how to do this, refer to Wildcards and Performance Optimization.
Global Settings - Critical Alarms Tab
See also: