Triggers are divided into condition triggers and event triggers. The type used is a function of the application. A Date/Time Trigger executes an event or condition periodically according to a specified recurrence pattern (i.e. daily, weekly, monthly, or yearly; a specified interval or at a one specified time only). Time triggers are organized in a tree structure of folders and time trigger tags (items). Folders allow organization of data tags into a hierarchical tree structure.
To Create a New Time Trigger Folder:
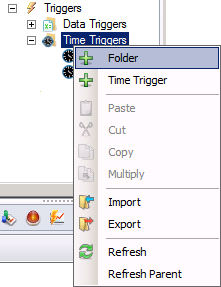
In the Unified Data Manager, right-click the Time Triggers node in the navigation tree and select the New Folder command from the context menu, as shown in the figure below.
Creating a New Time Trigger Folder
In the Time Trigger Folder tab that opens, in the Name field, type a name for the new folder.
Click the Apply button. The new folder appears under the Time Triggers tree control.
To Create a New Time Trigger Item:
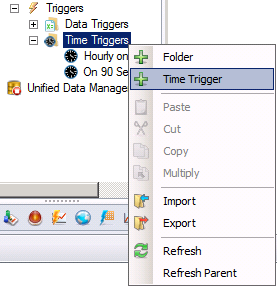
In the Unified Data Manager, right-click either the Time Triggers node in the navigation tree or on a folder in that node and select the New Time Trigger command, as shown in the figure below.
Creating a New Time Trigger Item
In the New Time Trigger tab (shown below) that opens, ensure that the Enabled button is enabled on the Time Trigger form if you intend your trigger to be active after you define it.
In the Name field of the Unified Data Manager Time Trigger form (shown below), type a name for the new time trigger.
Time Trigger Form
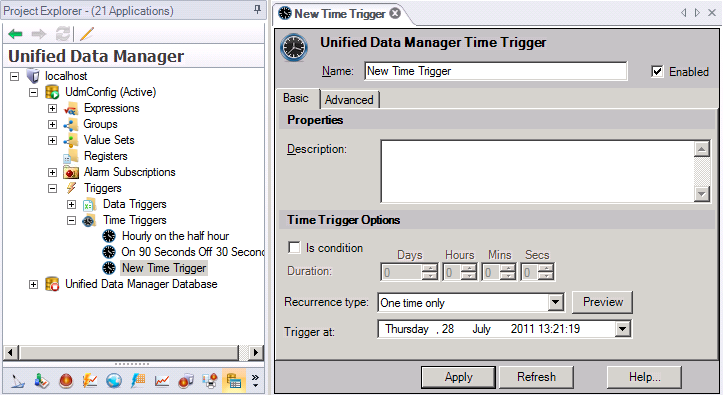
In the Description field, you can type an description for the new time trigger (optional).
Consider whether you want to put a check mark in the Is Condition check box. For information about this option, refer to the Time Trigger Conditions section, below in this topic.
Enter the parameters for the time trigger in the Time Trigger Options section. These options are described in detail below in the Time Trigger Options section.
Set the time for the trigger in the Trigger at date/time field.
Click the Apply button.
The new time trigger item appears under the Time Triggers node or in the folder that you clicked on in Step 1.
A time trigger execute an event periodically according to a specified recurrence pattern, or can signal a periodic condition. A time trigger can also set a condition or execution flag that can be used by clients to programmatically determine what action to apply.
A time trigger event can be set so that it fires:
At a set time, and only once
After an interval of time has passed
Recurring at specific dates and times
To set a time trigger event you should leave the Is condition check box disabled. Set the Recurrence type to either: One time only, Time interval, Specific date and time as shown in the figure below.
Time Trigger Recurrence Type
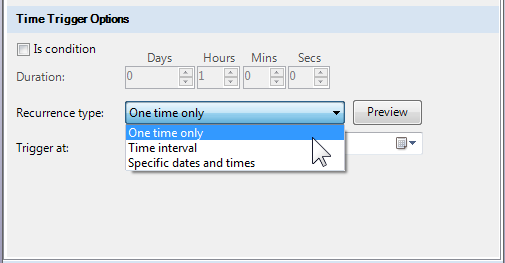
Depending upon the time trigger recurrence type you select the Options section changes to allow you to set appropriate parameters.
To Set a One Time Only Event:
Select the One time only Recurrence type (see above).
Enter the time that the trigger fires in the Trigger at combo box.
Click the Apply button.
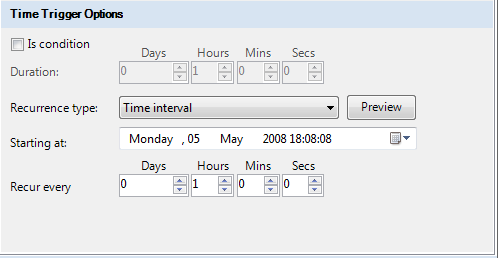
To Set a Time Interval when an Event Fires:
Select the Time interval Recurrence type (see above).
Enter the time that the time interval starts its counter in the Starting at combo box.
Set the interval between time trigger events in the Recur ever combo boxes (the time span cannot be zero).
A Time Interval Trigger Type
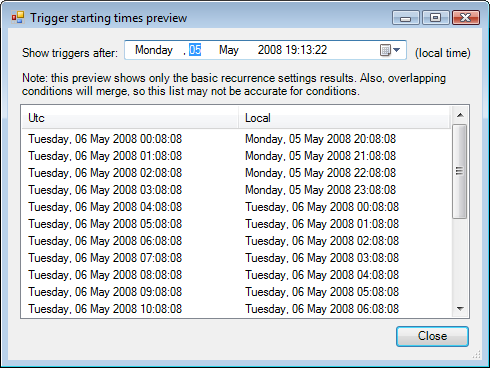
To preview the times that the trigger will fire click on the Preview button.
The Trigger Starting Times Preview dialog box appears, as shown in the figure below.
Trigger Starting Times Preview Dialog Box
Click the Apply button.
To Set Specific Dates and Times when Events Fire:
Select the Specific date and times in the Recurrence type drop down list (see above).
Enter the time that the time interval starts its counter in the Starting at combo box.
Set the interval between time trigger events in the Recur ever text box and the time period in the drop down list box. You can select seconds, minutes, hours, days, weeks, months, or years.
Depending upon the interval that you select the recurrence details section changes. Shown in the figure below is the weeks selection.
A Time Interval Set for Specific Dates and Times
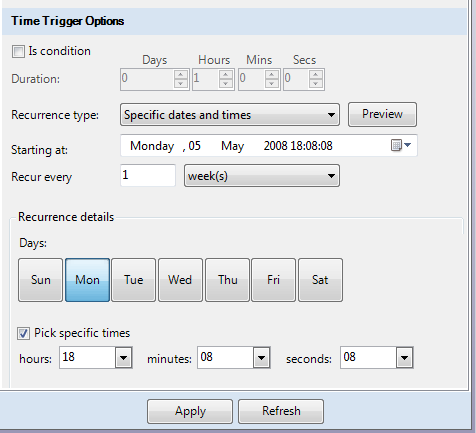
Select the different days, months or times desired in the Recurrence details section.
To select specific times enable the Pick specific times check box and set the time in the hours, minutes, and seconds combo boxes.
Some GENESIS64 applications can use a condition status to perform certain actions instead of relying on an event to be fired. For example, you can set a conditional time trigger in the Unified Data Manager so that the condition changes only once, changes in a repeating or recurring fashion, or changes at specific dates and times. All of the options that you saw in the section above apply to conditional time triggers, but now instead of an event a Boolean value or flag is stored so that a program can READ the value and act according to its own programming. The condition time trigger appears in the Unified Data Browser so that it can be selected by an application.
The time trigger condition is set when you put a check mark in the Is Condition check box. When this is set, the condition switches:
From inactive to active once for a one time only recurrence type.
From active to inactive; and then inactive to active on a recurring basis.
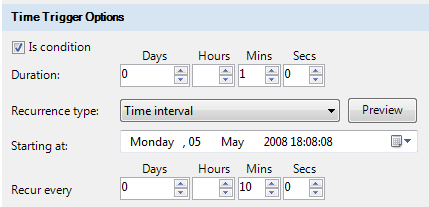
For example, if you wanted the Hyper Historian to log data for some time during a time interval you could create a condition where the duration is a subset of the recurring interval. In the figure below the logging time would be set to log for the first minute of every 10 minute interval as shown in the figure below.
An Is Condition Time Trigger for One Minute in a Ten Minute Interval
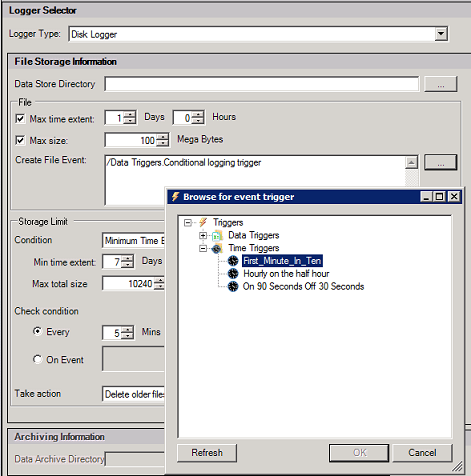
You might name the time trigger above something like First_Minute_in_Ten. When you save the conditional time trigger it gets stored in the Unified Data Manager database. The trigger would appear in the Unified Data Browser on the Triggers tab allowing an application to select that condition as its trigger. For the Hyper Historian you would set the file storage event as shown in the figure below where your triggers appear in the Browser for event trigger dialog box. The power of this system is that the First_Minute_in_Ten could be applied to logging, or to a security check interval, or to a display refresh, or to whatever you want. The trigger has to be defined and stored only once.
Selecting a Conditional Trigger in the Hyper Historian
|
|
Note. The Data Trigger has a similar condition type, although it isn't adjustable in quite the same way as the Time Trigger condition. In Data Triggers you select from a list of the following five conditions: on any data change, when True, when False, and when the condition changes from True or from False. Refer to the topic Data Triggers for further information. |
To Set a Conditional Time Trigger, do the following:
Enable the Is condition check box.
Set the duration period during which the condition remains at its current state.
Set the recurrence type in the Recurrence type list box so that the condition varies once, or repeatedly.
Set the trigger time(s) when the condition value changes from inactive to active and visa versa.
Click on the Preview button and view the starting times in the Trigger starting time preview dialog box to see that the intervals start when you intended.
Click the apply button to enforce your selections.
Remember that the duration period controls the condition change, whereas the trigger type starts the beginning of the state or the beginning of each interval.
The Advanced tab in the Time Trigger form offers you more control over your time trigger. Options in this dialog box allow you to control the time zone, when the time that the trigger is operational ends or is delayed by, send notification in advance, and when a tag value is valid or not. Refer to the figure below to view these options.
Advanced Time Trigger Conditions
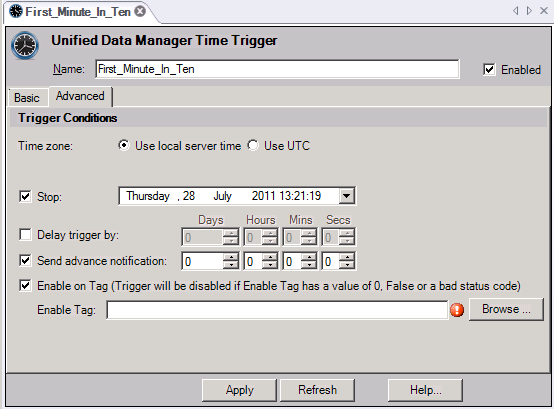
The options found on the Advanced tab offer the following capabilities:
Time Zone. You can select an option to use the local time zone of your system or switch to UTC, the Universal Time often referred to as Greenwich Mean Time or GMT.
Stop. Ends the period during which the time trigger remains active and changes state. The condition in place at the end of the period remains in effect after the condition period ends.
Delay trigger by. A one-time setting that moves the starting date and time by the number of days, hours, minutes, and seconds that you set in these combo boxes. You can choose this or the Send Advance Notification option, or neither option.
Send advance notification. A one-time setting that lets you know in advance when the trigger is going to execute. You can choose this or the Delay Trigger By option, or neither option.
Enable on Tag. Enable this check box to links the recurrence of a time trigger to a specified data tag value. Enter the tag name in the Enable Tag field.
Enable Tag. Specify a tag on which to enable the recurrence condition. Clicking the Ellipsis button allows you to select a tag from the Unified Data Browser. The trigger will be disabled if Enable Tag has a value of 0, FALSE, or BadQuality).
See also: