It is strongly recommended that you create equipment classes for use as templates when adding equipment nodes to the asset tree in AssetWorX. An equipment class looks a lot like an equipment node, except an equipment class is stored on the Equipment Classes node in AssetWorX, not in the asset tree itself. An equipment class is really just a template for creating an equipment node; as such, its properties are only anticipated values or default values or aliases. Using aliases in an equipment class lets you establish placeholders for properties and easily define these properties after the equipment node is added to the asset tree.
You can build equipment classes into multi-tiered structures so that they appear much like they would in the asset tree. Some equipment class configurations may require you to build a multi-tiered structure. For example, if you have installed the Energy AnalytiX provider, before you can configure a raw consumption calculation for an equipment class to be used for adding energy assets to the asset tree, you must create a second, "child" equipment class for a meter. Then you can use the multi-tiered equipment class as the basis for defining machines that have a meter.
Below are some possible uses you may have for creating single and multi-tiered equipment classes. You can create an equipment class to be used for defining the following:
Buildings (the top tier) with many floors (as child tiers) in the asset tree.
Machinery (the top tier) on a plant floor and the meters that monitor it (child tiers).
A plant (the top tier) with workstations (child tiers).
Campuses (one tier); or campuses with buildings (two tiers); or campuses with buildings and meters (three tiers).
By creating these structures in advance, you can preload all of their equipment information that they have in common, such as the right-click commands to be used for all sites. You can also provide aliases for equipment information, allowing you a way to easily define uniform information to be used for your equipment nodes.
The remainder of this topic describes how to work with equipment classes and use them as templates. You can click one of the hyperlinks below to go directly to a topic:
To Create an Equipment Class to be Used as a Template:
In the Workbench, expand your project to show the AssetWorX provider.
Expand the AssetWorX provider node to show the Equipment classes node.
Right-click Equipment classes or right-click the equipment class folder you want to add the equipment class to. Then select Add Equipment class from the pop-up menu (or select the Equipment Class node or an equipment class folder, then click on the Add Equipment class button in the Edit section of the Home ribbon in the Workbench). This opens the Equipment Class form with the Properties tab on top and the Commands tab underneath it.
In the Equipment class Name field, type the name of the new equipment class. Use the name field to identify the type of equipment node that this equipment class is designed to create. Note that whatever you type here will be used as the name of any equipment that is created from this equipment class. For example, if you type "Template for Multi-Story Building" then every equipment node that you create from this equipment class will be given that same name; you will have to modify the name for each equipment node that you create.
Alternatively, you can enter an alias, instead. For example, if you type /?Multi Story Building NAME?/, when you create an equipment node, you will be prompted to replace the name as the equipment node is created. For more details, refer to the Using Aliases in an Equipment Class section, below in this topic.
Click Apply. This saves the equipment class in the Equipment Classes node and enables the + tab, which we will get to later.
Complete the fields on the Properties tab. These fields are described in the Properties Tab for Equipment Classes topic.
Go to the Commands tab to define any standard right-click menu items you want provided during runtime for equipment nodes created from this equipment class. For detailed information about how to use this tab to create runtime menus, refer to the Setting up Commands for Runtime Navigation topic, as well as the Commands Tab for Equipment Classes topic.
If you have installed other providers that will be using the asset tree, or if you will be installing other providers that will use the asset tree, now is the time to define information that those providers will be using. Their information will be added as you add new equipment nodes to the asset tree; you cannot use equipment classes to add information once an equipment node has already been added.
If any provider that you will be using has not yet been installed, take the time now to install the provider so you can define information to be used by the provider. For more information, refer to the Installing Available Solutions topic.
If all of the providers you will be using are installed, click on the + tab. On this tab, you will see a drop-down list of all of the providers that are installed.
From the Add New list, select the provider whose information you want to configure for the equipment class. This adds a tab for the selected provider. For example, if you select FDDWorX from the drop-down list, then a tab called FDDWorX is added to the Equipment class form.
Go to the provider's tab and define the information. For help, refer to the provider's help for that tab. For example, use the help for the FDDWorX tab or the Energy AnalytiX Tab for Equipment.
Return to the + tab as many times as you need to configure information for additional providers.
Click Apply to save the equipment class.
At this point, you can create additional equipment classes and create a multi-tiered structure if you want to. For more information, refer to the Creating a Multi-Tiered Structure of Equipment Classes section, next in this topic.
When you are done, you can use the equipment class to add equipment nodes to your asset tree. For how to do this, refer to the Using an Equipment Class to Add an Equipment Node to the Asset Tree section later in this topic.
Back to Creating Equipment Classes for Use as Templates
Now that you know how to create an equipment class (as described above), let's take a look at how you can create a multi-tiered structure of equipment classes. As we work with multi-tiered equipment classes, keep in mind that a multi-tiered structure has a parent at the top tier and with children under it in the next tier down. If there is a third tier, then the children have children too.
A multi-tiered structure equipment class has one parent at the top, but the parent can have as many child equipment classes as is necessary, and as many tiers as needed. You will want to take time to plan out your multi-tiered structures so that they are detailed enough to be of good use to you, but not so elaborate that they become cumbersome. You may need to experiment with them before putting them to use.
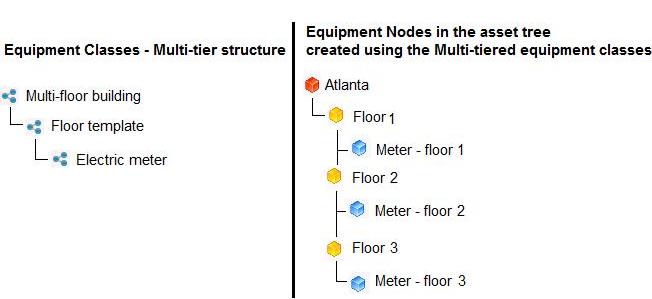
The following illustration shows a multi-tiered structure of equipment classes for creating a building. The Multi-Floor Building equipment class is the parent, and the Floor Template equipment class is its child. The Electric Meter is the child of the floor template. Keep in mind that a child equipment class can also be used independently of its parent; following the example shown below, you can use the Multi-Floor Building equipment class to create a building with one floor and one meter, and then use the Floor Template equipment class to add additional floors and meters, as shown in the sample asset tree (on the right) for the Atlanta equipment node.
Using a Multi-Tiered Equipment Class for Adding Equipment to the Asset Tree
The following steps assume that you are familiar with how to define an equipment class, described above in the Creating an Equipment Class topic.
To Create a Multi-tiered Structure of Equipment Classes:
Create the parent Equipment class first. The parent must be created in either the Equipment classes node or the equipment class folder you want to add the parent to.
Add a new child equipment class by right-clicking the parent equipment class and selecting Add Equipment class from the pop-up menu (or by selecting the parent equipment class, then clicking the Add Equipment class button from the Edit section of the Home ribbon in the Workbench). This adds a new Equipment class to the parent. Save the child Equipment class.
At this point, you can add more child Equipment classes to the parent, or add a third tier by adding a new child Equipment class to the child defined in step 2.
When you have finalized the structure that you want, you can return to each Equipment class and refine its definitions so that as much information as possible is included in the Equipment class before it is used as a template. For example, you can do the following:
You can use aliases, as described below in the Using Aliases in an Equipment Class section.
Define any standard right-click menu items you want provided during runtime for equipment nodes created from this equipment class. For detailed information, refer to the Setting up Commands for Runtime Navigation topic, as well as the Commands Tab for Equipment Classes topic.
If other providers will be using the asset tree, or if you will be installing other providers that will use the asset tree, now is the time to define information that those providers will be using. If any provider that you will be using has not yet been installed, take the time now to install the provider so you can define information to be used by the provider. For more information, refer to the Installing Available Solutions topic.
When you are done you can use the Equipment class to add equipment nodes to your asset tree. For how to do this, refer to the Using an Equipment Class to Add an Equipment Node to the Asset Tree section later in this topic.
Back to Creating Equipment Classes for Use as Templates
When creating an Equipment class, you must populate its fields with information that defines the type of equipment. For example, an Equipment class for creating buildings might contain all of the pop-up menu commands to be associated with buildings. However, not all buildings share the same information; for that reason, after using the equipment class to add a building to the asset tree, you will need to visit every field that needs to be defined uniquely for the building. You do not, however, want important information to go undefined for the building. To prevent this from happening, and to easily manage the information that will need to be defined, you can use aliases in you equipment classes.
An alias is simply a placeholder for information that will need to be defined for any equipment node that is defined using the Equipment class. Instead of entering values in every Equipment class field, you can enter an alias surrounded by /? and ?/, like this: /? Alias ?/. The alias can be any text string that you want; just make sure that it describes the information to be added, for example, /?BuildingName?/ or /?DescriptionOfMeter?/.
Then, when you use the Equipment class to create an equipment node (as described below in the Using an Equipment Class to Add an Equipment Node to the Asset Tree topic), you will be prompted to replace each alias with the information needed for defining the equipment node. If you are unable to provide the information at that time, the aliases will remain on the equipment node until information can be provided. When information becomes available, you can easily enter it by instantiating (or replacing) the aliases, as described in the Instantiating an Equipment Node's Aliases topic.
It is important that you realize that not all equipment class fields can be aliased. If you are not sure, you can enter an alias to see if one is allowed, or you can refer to the online help topics for the Equipment class tabs in AssetWorX; to access the help topics, refer to the Tabs for Equipment Classes (Templates) topic.
The following tips and reminders will help you to use aliases:
You can enter aliases only on Equipment classes, as described above in the Creating an Equipment Class topic.
To enter an alias in a field, type the alias surrounded by the characters /? ?/ as in the following format: /?alias?/
The alias is a string that can contain any alphanumeric characters as well as spaces and punctuation characters.
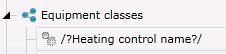
You can use aliases as the names of Equipment classes such as, /?electric meter name?/ or /?warehouse name?/. As a result, the alias will appear as the name of the Equipment class in the Equipment class tree structure, as shown below. When an equipment node is created using the Equipment class, the alias will be used as the node name until the alias is instantiated.
You can use an alias inside a string such as a URL or a description, as in the example highlighted in red in the Description field in the following illustration:
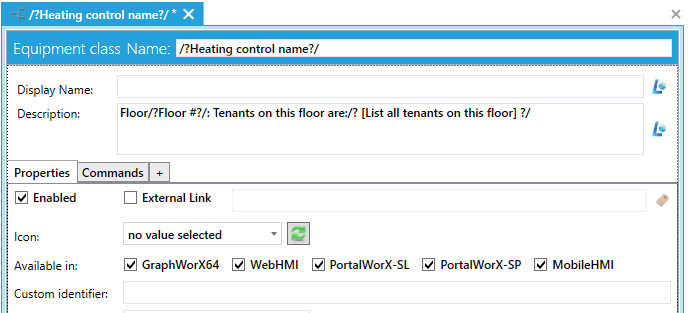
Other examples:
http://www./?office website?/.com
/?Product-Line?/ manufacturing in /?City, State of building?/
Back to Creating Equipment Classes for Use as Templates
Once you have defined an equipment class for the type of equipment you want to add to the asset tree, you can use it to define equipment nodes in the asset tree. You do this by dragging the equipment class from the Equipment Class node and dropping it into the asset tree where it belongs and instantiate the aliases.
To Add an Equipment Node to the Asset Tree by using an Equipment Class:
In the Workbench, expand your project to show the AssetWorX provider.
Expand the AssetWorX provider node to show the Equipment classes node.
Find the Equipment class to be used at the template for the equipment you are adding to the equipment tree.
Select the Equipment class and hold down the mouse while you drag the equipment class from the equipment class tree to an asset in the asset tree and hold the cursor over the equipment node you are adding a child node to. It should look something like the following example in which the equipment class is being held over the equipment node.
Dropping an Equipment Class into the Asset Tree
When the Equipment class is in the correct location, release the mouse to drop the Equipment class into the asset tree. At this point, the Equipment class (or classes, if you are using a multi-tiered Equipment class) are placed in the asset tree but are not yet saved there.
The Instantiation Options dialog box appears. This is where you will instantiate (or assign values to) the aliases in the Equipment class(es). Before you continue, read these conditional items:
If you copied the equipment to the wrong equipment node, you can click the Cancel button. The dialog box will close and no change is made to the asset tree.
If the message "No aliases found" appears in the dialog box, click the Instantiate button. A second dialog box will appear; click Close, and you are done.
The Instantiation Options dialog box lists all of the aliases defined for all of the equipment classes you just used. The following example shows two aliases, but there may be many.
Aliases in the Instantiation Options dialog box

At this point, you will be replacing aliases with values to be used for the equipment node you are creating -- or instantiating values for the equipment node. It is important to understand that you are not required to provide replacements for aliases at this point. In fact, it is possible that you do not yet know the values to use for the equipment node you are creating. You can skip step 8, or just instantiate a few aliases if you like, and go straight to step 9. You can instantiate aliases at any time later on by following the steps in the Instantiating an Equipment Node's Aliases topic.
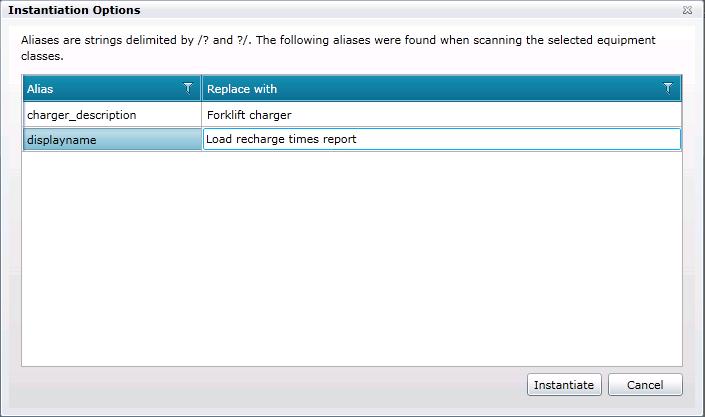
For each alias in the dialog box, go to the Replace With column and replace the alias with the value to be used for the equipment in the asset tree. In the following example, both aliases have been replaced. The charger_description alias has been changed to "Forklift charger" and the displayname alias has been changed to "Load recharge times report".
Aliases Replaced with Real Values
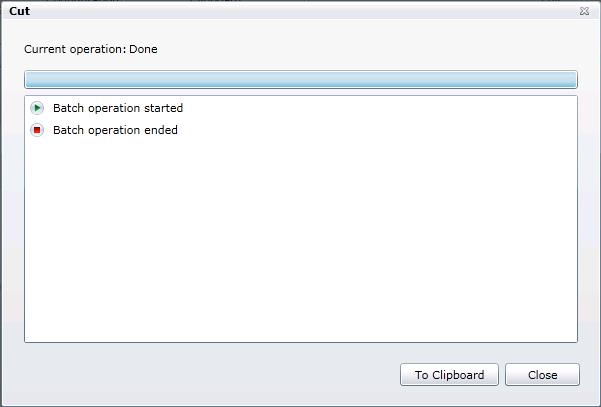
Click the Instantiate button. The replacements are made and the new equipment nodes are saved in the asset tree. If the save is successful, you will see the following dialog box. You are done.
However, if there were errors, no changes were saved to the asset tree; refer to the steps under the heading Handling Instantiation Errors, below.
A Successful Instantiation
If there were errors in the instantiation of the equipment class's aliases, you will see an error message in the resulting dialog box, like the example shown below. In this case, none of the new equipment nodes are saved. To easily record any errors that occurred, click the To Clipboard button; this copies all messages from the dialog box to the Windows clipboard.
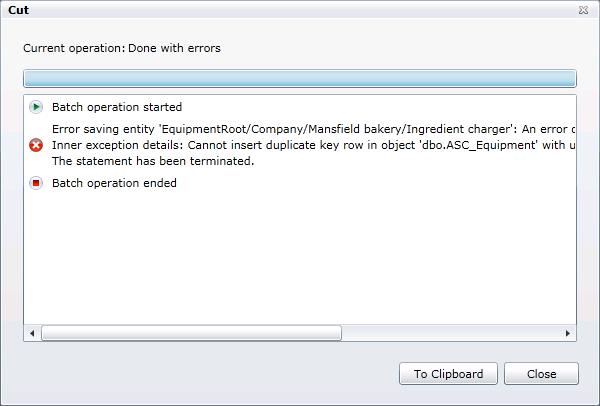
You may be prompted for permission to access the clipboard. If you are prompted, grant permission to the clipboard.
Once the dialog boxes close, the changes are not saved.
Open a text editor such as Microsoft Notepad and paste the text into the file, which you can save. Use the error text to correct the error, then try to create the equipment node again.
The following example shows the error's test pasted into a Notepad file.

Back to Creating Equipment Classes for Use as Templates
See also:
Introduction to Equipment Classes (Templates)
Strategies for Building the Asset Tree
Steps to Building an Asset Tree
Tabs for Equipment Classes (Templates)