GraphWorX64 displays and templates contain the animation and human-machine interface controls you use for monitoring and controlling equipment and assets at your company. GraphWorX for Mobile interactive technology creates walkthroughs and tutorials for users with faster displays and data downloads and includes an extensive help topic on Creating Displays.
In MobileHMI, you use the following file extensions when creating and saving GraphWorX64 templates and displays:
GDFX - Standard GraphWorX64 display file. See Support for GDFX File Format.
GDFXP - GraphWorX for Mobile display
GDFXZ - Compressed GraphWorX64 display for MobileHMI
TDFXP - GraphWorX64 template for MobileHMI
TDFXPZ - Compressed GraphWorX64 Template display for MobileHMI
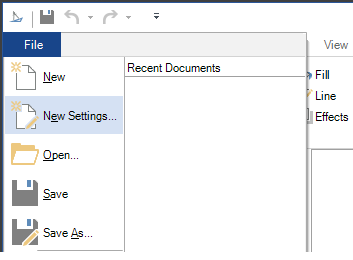
In GraphWorX64, click the "File" tab on the top right above the Ribbon. Then, go down and click on "New Settings." This will bring up the dialog box to create a new display.
GraphWorX64: New Settings

Once in the dialog box, select the settings appropriate to your device.
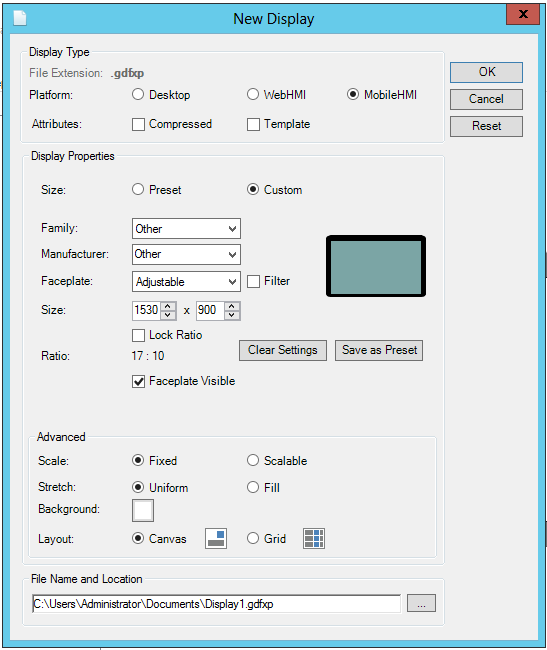
New Display Settings

Display Type
File Extension - This will autofill, showing the file extension for the selected Platform and Attributes.
Platform - Select from Desktop, WebHMI or MobileHMI. [The remainder of this Help topic will assume you have selected MobileHMI.]
Attributes - Select from Compressed (in order to save file space) or Template (for a reusable version of the file meant to be reused and edited further).
Display Properties
Size - Choose from Preset or Custom. The remainder of the Display Properties section of the New Display window will change accordingly.
Preset
Select display size from a set of basic display property presets. This section provides icons of preset device settings, as shown below. Clicking on the  button expands this section in order to view all included preset devices. Hovering over a device icon provides its name, screen resolution and aspect ratio.
Device Presets

Faceplate
Remove Selected - Removes the currently selected mobile display preset from the gallery above.
Remove All Custom - Removes all the custom mobile display presets added to the gallery above.
Faceplate Visible - Check this if you would like the mobile device faceplate to be initially visible for the new mobile display.
Gallery
Export - Saves the entire gallery of faceplates as a CSV file to a user-defined location.
Import - Merges faceplates from an external gallery stored in CSV file to the existing faceplates in the gallery. If identical faceplates exist in both galleries, the faceplate in the original gallery is kept.
Recover Defaults - Recovers back to the gallery above all the default mobile display presets, but still keeps any custom mobile display presets added to this gallery.
Manufacturer - Auto-filled upon hover/selection of device preset.
Resolution - (unlabeled) Auto-filled upon hover/selection of device preset.
Ratio - Auto-filled upon hover/selection of device preset.
Custom
Define custom basic display properties.
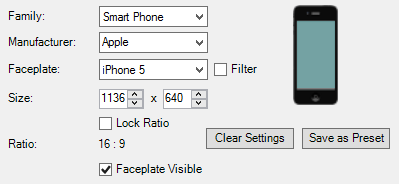
Custom Properties

Family - Family of the device whose faceplate is being used in the new mobile display. Use the pulldown menu to select from Other, Smart Phone or Tablet.
Manufacturer - Name of the manufacturer of the device whose faceplate is being used with the new mobile display. Use the pulldown menu to select from Other, Samsung, Apple, Nokie, Google, Motorola, HTC, Microsoft, or Amazon.
Faceplate - Faceplate model to be used in the new mobile display. Use the pulldown menu to select from Adjustable, Galaxy S4, Galaxy S6, iPhone 4S, iPhone 5, iPhone 6, iPhone 6 Plus, Lumia 920, Lumia 930, Nexus 5, Nexus 6, Moto X, HTC One, Galaxy Tab 10.1, iPad, iPad Mini, Surface RT, Surface 2, Surface 3, Surface Pro, Surface Pro 2, Surface Pro 3, or Kindle Fire HD 8.9.
Filter - Filter faceplates so that only the faceplates associated with the selected family and manufacturer are listed.
Size - Using the two text entry fields (or up/down arrows), you can set the width and height of the new mobile display.
Lock Ratio - Click this checkbox to lock the listed ratio (to be shown in the Ratio setting below).
Ratio - Autofilled. This shows the screen aspect ratio of the new mobile display.
Clear Settings - Resets the basic custom mobile display properties (family, manufacturer, faceplate, size) so that they match the properties for the last selected preset in the mobile display presets gallery.
Save as Preset - Saves the basic custom mobile display properties (family, manufacturer, faceplate, size) as a preset in the mobile displays presets gallery.
Faceplate Visible - Check this if you would like the mobile device faceplate to be initially visible for the new mobile display.
Advanced
Scale - Sets whether the display should be scalable or not. Select from either Fixed (display scale does not vary) or Scalable (display scale varies).
Stretch - Defines how the display should adjust its dimensions to best fit the screen size. Select from Uniform (the display content is resized to fit in the destination screen dimensions while preserving the display's native aspect ratio) or Fill (the display content is resized to fill the destination screen dimensions. The aspect ratio is not preserved.).
Background - Defines the display background color. Click inside the nearby square to launch the Color window in order to set your preferred background.
Layout - Defines the layout for the root element of the display. Select from Canvas (defines an area within which you can explicitly position objects by using coordinates that are relative to the area) or Grid (defines a flexible grid area that consists of columns and rows. The display size and aspect ratio are automatically adjusted to fit either viewport area [desktop and web displays] or the faceplate screen area [mobile displays]).
File Name and Location
File Name and Location - Select the display file location, name and type by typing them using the text box below or by the browsing dialog box accessible through the [...] button.
After you have created the new phone display or template you can follow the links below to see how to publish phone displays and change faceplates.
See Also
Downloading the Application from Windows Marketplace
Azure-based Push Notifications