
There are three ways to get Hyper Historian data in to a ReportWorX report.
Built into Hyper Historian is an HDA server and you can use the HDA Data Access Tag connection, described in HDA Data Access Tag below.
Use Hyper Historian SQL provider in Open Database connection, which allows you to use common SQL queries to retrieve data as described in Using an Open Database Connection below.
Use the Hyper Historian OLEDB provider directly within Excel, as described in SQL Query with ReportWorX Parameters below.
This topic provides details on how to retrieve data using all three methods. Before you begin:
In order to retrieve Hyper Historian data using ReportWorX, Hyper Historian must be running and you have some logged data for retrieval. You can use the sample configuration if it will help.
You should also create new Report and new empty Report Template in the ReportWorX Configurator.
Hyper Historian is an HDA server and this allows you to browse OPC HDA tags in a report template in ReportWorX.
Open your newly created Report Template in ReportWorX.
Select an area of cells and right-click in it.
In the popup menu, select Connect to a new Data Source > OPC HDA > HDA Data Access (DA) Tag.
Figure 1 - Using HDA to get Hyper Historian Data
In the OPC HDA Connection Wizard, click on the Browse button.
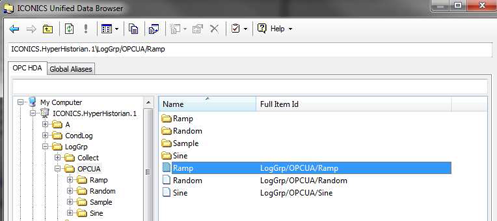
In the Unified Data Browser that opens, double-click on the Hyper Historian HDA server and drill down the data logging groups to select the history tag(s) of your choice.
Figure 2 - Selecting an HDA Tag from the Hyper Historian HDA Server
Go through the OPC HDA Connection Wizard until you see the Tag group properties window as shown below.
Figure 3 - Tag Group Properties
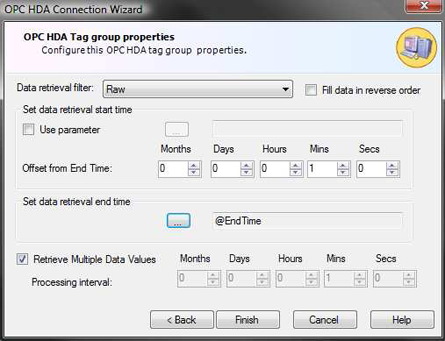
Set the Data Retrieval filter to Raw.
Uncheck the Set data retrieval start time checkbox and set the Offset from End time field to 1 minute.
Click on the Set Data retrieval end time browse button […] to create a new parameter that will specify to which date and time the report will retrieve data.
In the Parameter Browser, click on the Add button.
Change the name of the parameter to EndTime.
Select Automatically evaluate a date time as the data type of the parameter.
Click on the Configure Parameter Details button and select Today in the new window that appears.
Save and select the parameter by clicking on OK until the windows close.
NOTE: At this point, your window should look similar to Figure 3.
Click Finish to complete the data source creation.
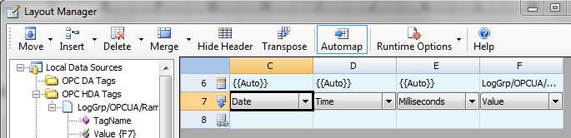
You should now see the Layout Manager. Depending on the number or columns you highlighted when you created the data source, you may have different columns available. Feel free to add or remove columns as necessary and assign the proper values from a data source to a column by dragging it from the tree on the left and dropping it into the desire cell. Once you are done, click on OK to save the changes and exit the Layout Manager.
Figure 4 - Layout Manager
Save your report template and assign the template to a report.
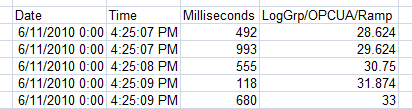
Once you have executed the report, open it and your results should display historical data for the last minute from when you executed the report.
Figure 5 - Hyper Historian Logged Data in a Report
You can use the Hyper Historian SQL provider to retrieve Hyper Historian data as well. You will need to connect to the Hyper Historian database using an Open Database connection in the report template and write an SQL query to retrieve the data.
Before you start editing the report template, you need to prepare the SQL queries. It is impossible to use the Simple or Advanced Query Wizard from the ReportWorX template because you do not have data stored in database tables; the data is actually in a proprietary format. You can only use the SQL provider to make a connection to the linked server, which will then allow you to query Hyper Historian data. For more details about the Hyper Historian data format and how it’s possible to query data through SQL, refer other Hyper Historian help topics.
We will not go through the details on how to create SQL queries for retrieving data from Hyper Historian in this topic. Instead, refer to the SQL Query Engine Quick Start topic.
For an example in this document, assume that you have an SQL query similar to the one below:
select * from openquery(HH2, 'select * from
LogGrp.OPCUA.rawdata where tagname = ''Ramp''')
Now that you have this information, you can start to edit the report template.
Open a newly created Report Template and select some area of cells.
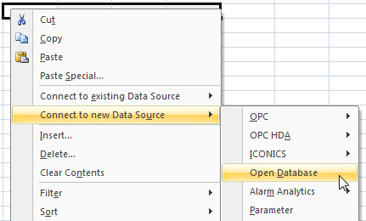
Right-click on the selected cells and choose Connect to New Data Source > Open Database in the popup menu.
Figure 6 - New Open Database Data Source
Click on the Browse button in Database Connection Configuration Wizard dialog.
Right-click on SQL Server Connections and select the Insert New Connection option.
Create a connection to your Hyper Historian configuration database.
Figure 7 - SQL Server Connection to the Hyper Historian Configuration Database
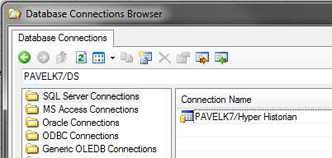
Select the newly created connection and click on OK. This should bring you back to the Data Source Configuration Wizard.
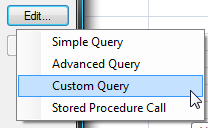
In the Database Query dialog on the next screen, click on Edit and select Custom Query.
Figure 8 - Custom Query
Copy and paste the SQL query that you created before editing template into the Custom Query dialog.
Click OK on information dialog.
Click on the Test button to see if you are getting historical data. Once you are done testing, click on Next.
You can change the Data Source name if you wish, when you are done click on the Finish button.
In the Layout Manager, select the columns of data that you are interested in displaying.
Figure 9 - Layout Manager
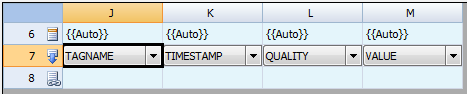
When you are done configuring the layout of the data, click on OK to close Layout manager.
Save your report template and exit Excel.
Assign the template to a report and execute the report.
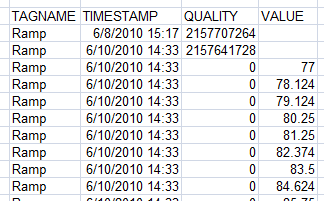
When you open the executed report, you should see the historical data for the queried tag.
Figure 10 - HDA Data in Report
You can define your SELECT SQL query with a WHERE condition for Timestamp, and with this condition specify the time frame for retrieving Hyper Historian data.
select * from openquery(HH2, 'select * from
LogGrp.OPCUA.rawdata where
tagname = ''Ramp''') WHERE timestamp >=
convert(datetime, '6/10/2010 2:33:19 PM') AND timestamp <=
convert(datetime, '6/10/2010 2:33:24 PM') ORDER BY timestamp DESC
NOTE: It is not possible to use ‘between’ command or ‘order by’ command inside red select. This select is sent to HH and needs to be translated by Hyper Historian. These commands are not implemented in ReportWorX v9.2. The query like this can slow down the performance.
Additionally you can use ReportWorX parameters for this improved SQL query and bind parameter to Timestamp values. With this binding, you’ll be able to define the time frame of your Hyper Historian HDA data dependently on report start.
select * from openquery (HH2, 'select * from
LogGrp.OPCUA.rawdata where tagname = ''Ramp''') WHERE
timestamp >= convert(datetime, @StartTime) AND
timestamp <= convert(datetime, @EndTime) ORDER BY timestamp DESC
Figure 11 - Parameter Mapping with SQL Query
