![]()
Important: The advanced settings are quite advanced. If you are not an expert, we recommend that you do not change these settings.
In Hyper Historian's Advanced Settings, various parameters and descriptions are listed, along with their Value Type (Boolean, Numeric, or Text). You can change the default numeric, text, or Boolean value for these parameters.
|
|
Important: The advanced settings are quite advanced. If you are not an expert, we recommend that you do not change these settings. |
In the Workbench, select the Hyper Historian provider in the Project Explorer
Expand the Hyper Historian's System Administration node, then double-click System Settings. This opens the System Settings form.
To configure system settings, use the Options tab. Settings on this tab are described in the Configuring the License Mode and Initial Setup topics.
To configure advanced settings for Memory Persistent Loggers, go to the Memory Persistent Logger tab, and use that tab's Tuning and Advanced sub-tabs.
To configure advanced settings for File-based Loggers, go to the File Logger tab, and use that tab's Cache, Logger, Master Logger, Logger Data Store, and Master Logger Data Store sub-tabs. Samples of these tabs are shown below. In this topic are the following sections; click on a hyperlink to go to that section:
In the Project Explorer, expand the Hyper Historian's System Administration node, then double-click System Settings. On the Memory Persistent Logger tab there are the following sub-tabs: General, Tuning, and Advanced. These sub-tabs are described below.
The General sub-tab has settings described in the Initial Setup topic. The Tuning and Advanced sub-tabs are shown below.
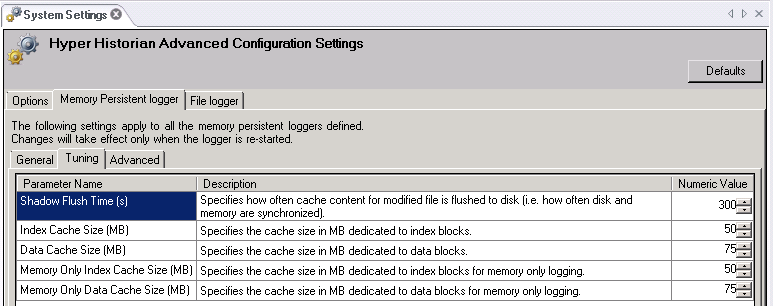
On the memory-persistent logger's Tuning sub-tab (shown below) you can modify the following options. For help setting these options, refer to Configure the Logger Cache.
Shadow Flush Time (s) specifies how often the modified content of memory (or files) is written to disk, or synchronized, in seconds.
Index Cache Size (MB) specifies the cache size, in megabytes, for index blocks.
Data Cache Size (MB) specifies the cache size, in megabytes, for data blocks.
Memory Only Index Cache Size (MB) specifies the cache size for index blocks, used only for memory logging.
Memory Only Data Cache Size (MB) specifies the cache size for data blocks, used only for memory logging.
Tuning Sub-tab for Memory Persistent Loggers
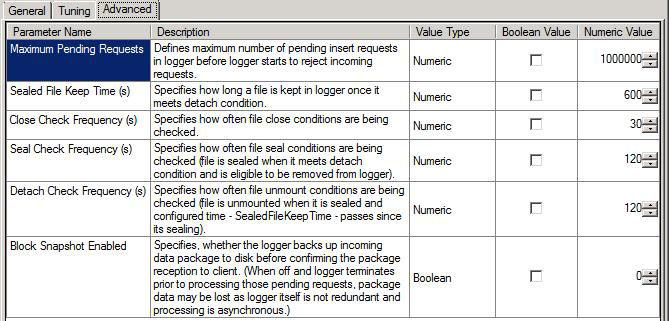
On the memory-persistent logger's Advanced sub-tab (shown below) you can modify the following options. For help setting these options, refer to Configure the Logger Cache.
Maximum Pending Requests specifies the maximum number of pending insert requests that are allowed before the logger starts to reject incoming requests.
Sealed File Keep Time (s) specifies how long a file is kept in the logger after it is sealed (that is, once it can be detached), in seconds. Note that the Detach Check Frequency determines the frequency with which sealed files are detached.
Close Check Frequency (s) specifies how often closed files are scanned, in seconds.
Seal Check Frequency (s) specifies how often the files are scanned which should be closed, in seconds.
Detach Check Frequency (s) specifies how often sealed files are scanned to determine if they can be detached, in seconds. A file is unmounted when its Sealed File Keep Time option has passed.
Block Snapshot Enabled, when checked in the Boolean Value column, indicates that each request is to be backed to disk before its receipt to the client is confirmed. By default, this option is unchecked, which means that if the logger terminates before processing pending requests, you could lose the requests.
Advanced Sub-tab for Memory Persistent Loggers
Return to Top
In the Project Explorer, expand the Hyper Historian's System Administration node, then double-click System Settings. On the File Logger tab there are the following sub-tabs: Cache, Logger, Master Logger, Logger Data Store, and Master Logger Data Store. These sub-tabs are shown below.
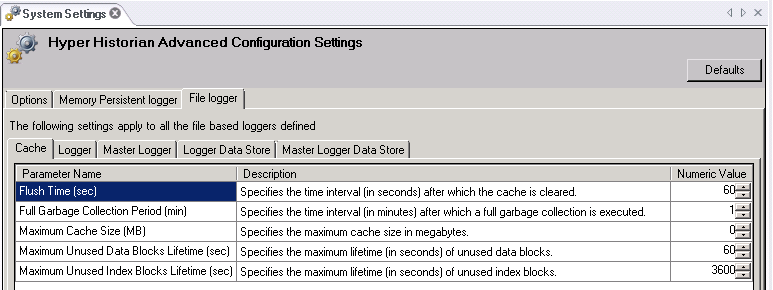
On the file logger's Cache sub-tab (shown below) you can modify the following options. For help setting these options, refer to Configure the Logger Cache.
Flush Time (sec) specifies the time interval, in seconds, after which the cache is cleared.
Full Garbage Collection Period (min) specifies the time interval, in minutes, after which a full Garbage Collection is cleared and changes write into disk.
Maxim Cache Size (MB) specifies the maximum cache size, in megabytes.
Maximum Unused Data Blocks Lifetime (sec) specifies the maximum lifetime, in seconds, for unused data blocks. Typically you want unused data blocks to be recycled expediently.
Maximum Unused Index Blocks Lifetime (sec) specifies the maximum lifetime, in seconds, for unused index blocks. Typically you want unused index blocks to be kept longer.
Cache Sub-tab for File-Based Loggers
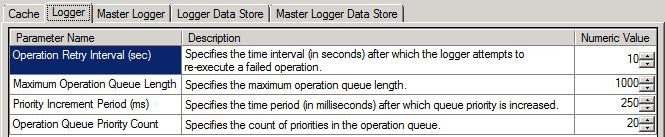
On the file logger's Logger sub-tab (shown below) you can modify the following options. For help setting these options, refer to Configure the Logger Cache.
Operation Retry Interval (sec) specifies the time interval, in seconds, before the logger re-tries a failed operation again.
Max Operation Queue Length specifies the maximum operation queue length.
Priority Increment Period (ms) specifies the number of seconds to wait before the queue priority is increased.
Operation Queue Priority Count impacts the priority settings in the operation queue.
Logger Sub-tab for File-Based Loggers
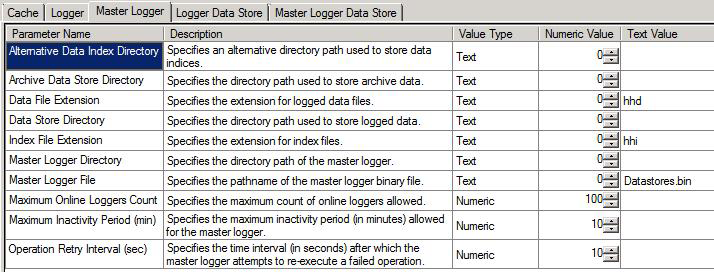
On the file logger's Master Logger sub-tab (shown below) you can modify the following options. For help setting these options, refer to Configure the Logger Cache.
Alternative Data Index Directory is an alternative directory path to be used for storing data indices.
Archive Data Store Directory is the directory path to be used for storing archived data.
Data File Extension is the extension to be used for logged data files; the default is “hhd”.
Data Store Directory is the directory path to be used for storing logged data.
Index File Extension is the extension to be used for index files; the default is “hhi”.
Master Logger Directory is the directory path for the master logger.
Master Logger File is the path name of the master logger binary file.
Maximum Online Loggers Count is the maximum number of online loggers allowed.
Maximum Inactivity Period (min) is the longest period of inactivity allowed for the master logger, in minutes.
Operation Retry Interval (sec) is the time interval, in seconds, after which the master logger will re-execute a failed operation.
Master Logger Sub-tab for File-Based Loggers
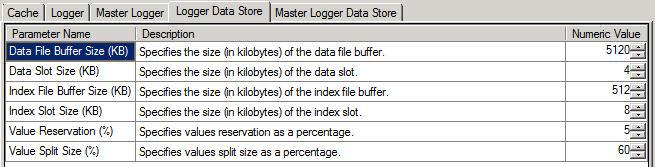
On the file logger's Logger Data Store sub-tab (shown below) you can modify the following options. For help setting these options, refer to Configure the Logger Cache.
Data File Buffer Size (KB) specifies the size of the data file buffer, in kilobytes.
Data Slot Size (KB) specifies the size allocated for the data slot, in kilobytes.
Index File Buffer Size (KB) specifies the size of the index file buffer, in kilobytes.
Index Slot Size (KB) specifies the size allocated for the index slot, in kilobytes.
Value Reservation (%) specifies values reservation as a percentage.
Value Split Size (%) specifies values split size as a percentage.
Logger Data Store Sub-tab for File-Based Loggers
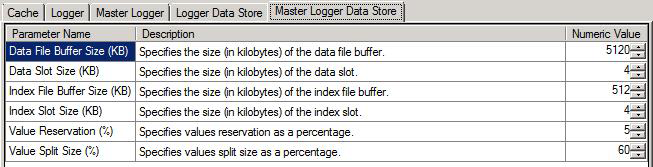
On the file logger's Master Logger Data Store sub-tab (shown below) you can modify the following options. For help setting these options, refer to Configure the Logger Cache.
Data File Buffer Size (KB) specifies the size of the data file buffer, in kilobytes.
Data Slot Size (KB) specifies the size allocated for the data slot, in kilobytes.
Index File Buffer Size (KB) specifies the size of the index file buffer, in kilobytes.
Index Slot Size (KB) specifies the size allocated for the index slot, in kilobytes.
Value Reservation (%) specifies the percentage of slots to be reserved for future updates.
Value Split Size (%) specifies values split size as a percentage.
Master Logger Data Store Sub-tab for File-Based Loggers
Return to Top
Collector cache is used in collectors to house data received from lower processing levels and in preparation for forwarding to the core.
When data is received from processing levels, it is stored to cache (as much as possible due to space requirements), or forwarded to storage. When a client (UA layer, core local communication layer) requests data, cache is used as a data source. When data reception is confirmed by the client, cached counterparts are removed and cache gets backfilled.
It is possible to configure the number of individual packages stored in cache (see collector pair configuration). Each package corresponds to 5 seconds of data values.
The cache exists to prevent unnecessary disk writes when communication is smooth. When connection to the core is unavailable, disk writes cannot be avoided. Other cache sizing considerations are:
Default of 5 is typically sufficient
Don’t use smaller values as you’d risk the corresponding minor delay in processing may introduce unnecessary disk reads/writes
Use higher values if you expect delays (e.g., in network communication). Note that data packages can be big, and therefore if full, cache may consume a lot of memory. Values higher than ~25 probably won’t make any difference, in general, due to call time outs for UA communication
Return to Top