|
|
The features on this page require a GENESIS64 Advanced license and are not available with GENESIS64 Basic SCADA . |

![]()
|
|
The features on this page require a GENESIS64 Advanced license and are not available with GENESIS64 Basic SCADA . |
![]()
Note: The following describes how to configure BACnet settings via the Workbench for IoT projects. The starting point is the Network Discovery tool.
From the Workbench, you need to expand your IoT project and then browse for the device template and find the BACnet configuration provider.
BACnet Provider in the Workbench's Project Explorer

It’s possible to discover the devices on each Channel level. So, for example, to browse for the Default Channel, right-click on it and select ‘Network Discovery’.
Starting Network Discovery

You will be asked to select an IoT Gateway to use as a target.
Available Gateways
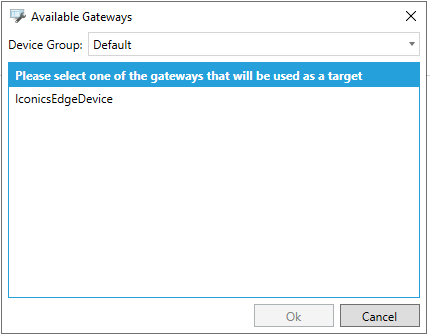
You can switch between the Device Groups and select one of the available gateways. Once it’s selected, you can click on the OK button to continue.
A dialog will appear. In this dialog, you can set some filters and start the discovery of the network.
Network Discovery Dialog
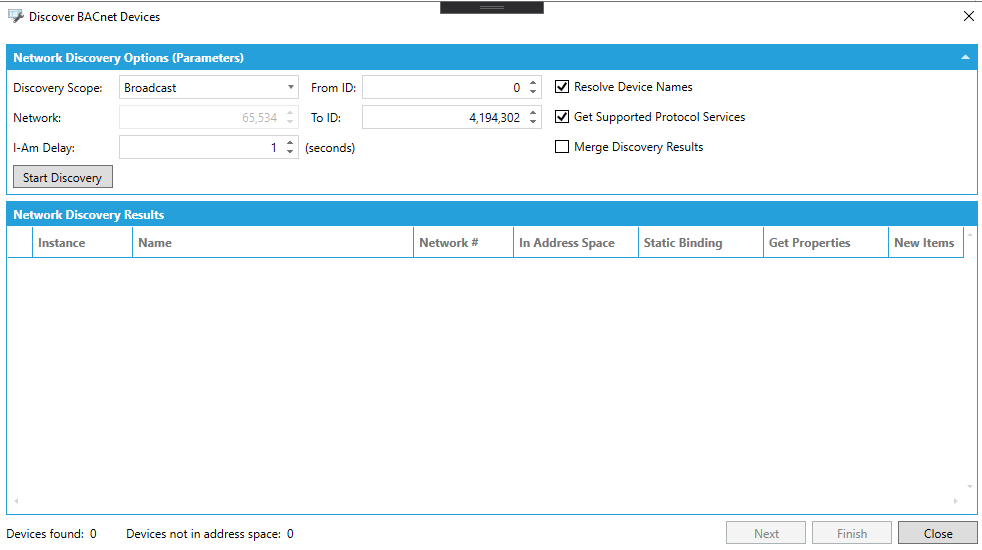
This is the list of filters that can be set before starting Network Discovery:
Discovery Scope: Choose between Broadcast, Global Broadcast, Local Network Broadcast and Remote Network Broadcast
Network -
I-Am Delay -
From ID -
To Id -
Resolve Device Names -
Get Supported Protocol Services -
Merge Discovery Results - If true, the results of the discovery is merged with the current set of discovered devices
When you click on the Start Discovery button, a request to the BACnet point manager is sent. The result of the call will populate the grid on the bottom of the dialog.
Network Discovery Dialog (with Discovered Devices)
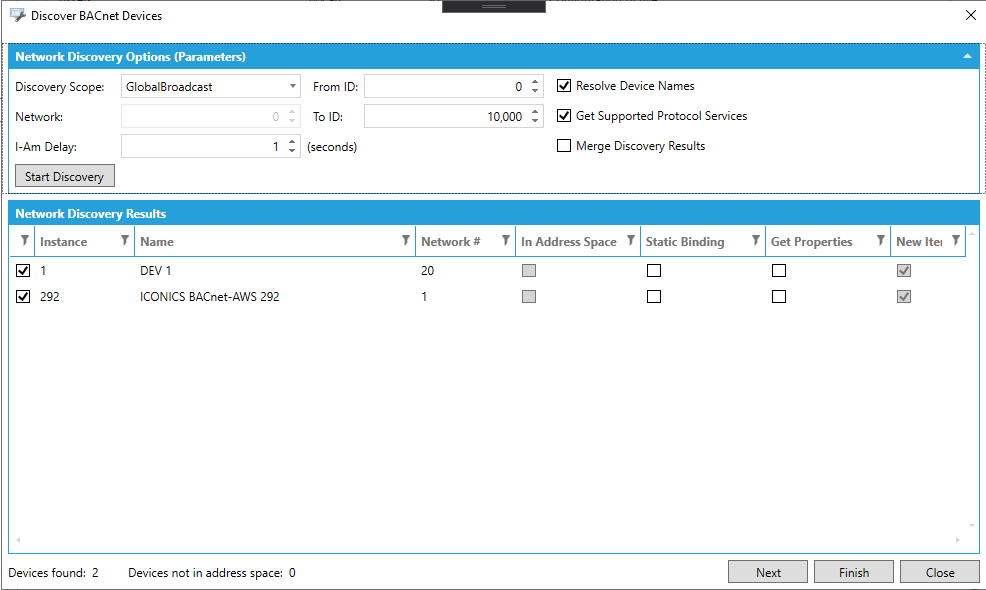
For each discovered device, the grid shows:
Instance -Specifies the instance of the device
Name - Specifies the name of the device
Network # - Specifies the network number of the device
In Address Space - True, if the device is already in the address space
Static Binding - If true, static binding information will be stored in the configuration database
Get Properties - If true, when scanning the devices, we will ask for the list of supported properties for each object of the device
New Items - True, if the device is coming from the latest network discovery (when merging the results)
You can easily filter/sort the results in the grid.
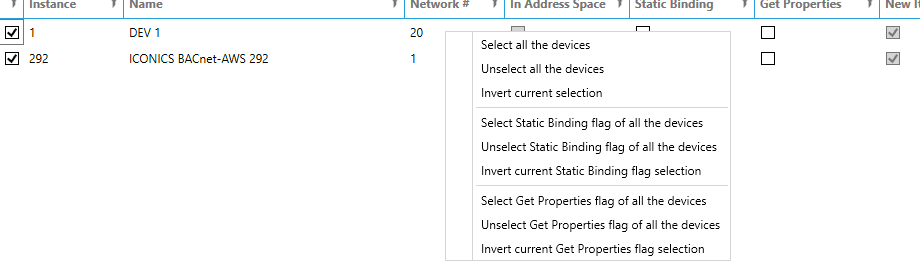
You can also select multiple devices (and set Get Properties/Static Binding flag) in one shot through the available context menu.
Network Discovery Dialog (Context Menu)
At this point, you can select all the devices or a subset of them and proceed with the scanning process. You have basically two options:
Finish - Clicking on Finish button, the selected device will be scanned and all the available objects will be stored in the configuration database
Next - Clicking on Next button, we will go in the next page of the dialog filter the scanning of the selected devices
This is what you can see when clicking on the Next button:
Network Discovery Dialog (Scan Devices)
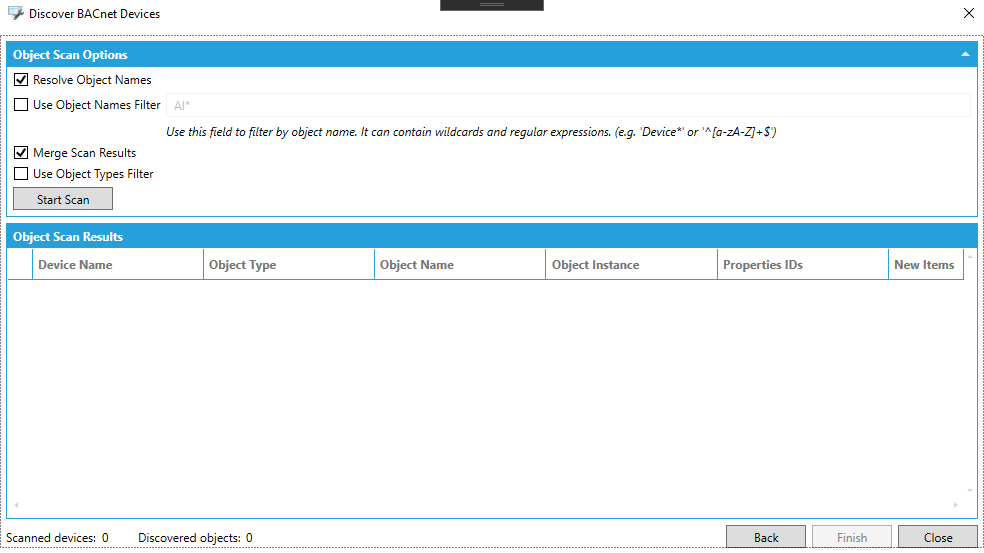
From this section, you can scan the previously selected devices. You can specify several scan options:
Resolve Object Names -
Use Object Names Filter - If you set it to true, you can use the field to filter by object name. It can contain wildcards and regular expressions. (e.g. ‘Device*’ or ‘^[a-zA-Z]+$’)
Merge Scan Results - If true, the results of the scan is merged with the current set of scanned objects
Use Object Types Filter - If true, you can specify which object types you want to get from the object types filter section
Network Discovery Dialog (Scan Devices) – Object Types Filters
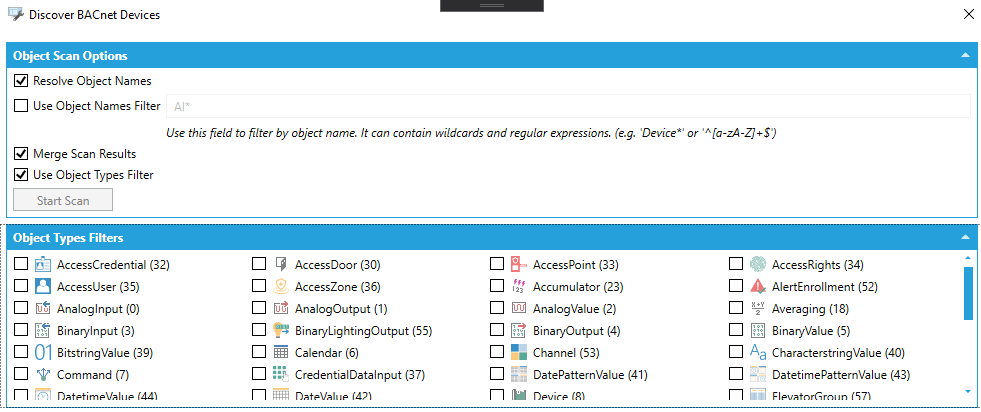
The collection of available Object Types to be filtered comes from the Object Library.
When you click on the Start Scan button, a request to the BACnet point manager is sent. The result of the call will populate the grid on the bottom of the dialog.
Network Discovery Dialog (Scan Devices) – Scan Results
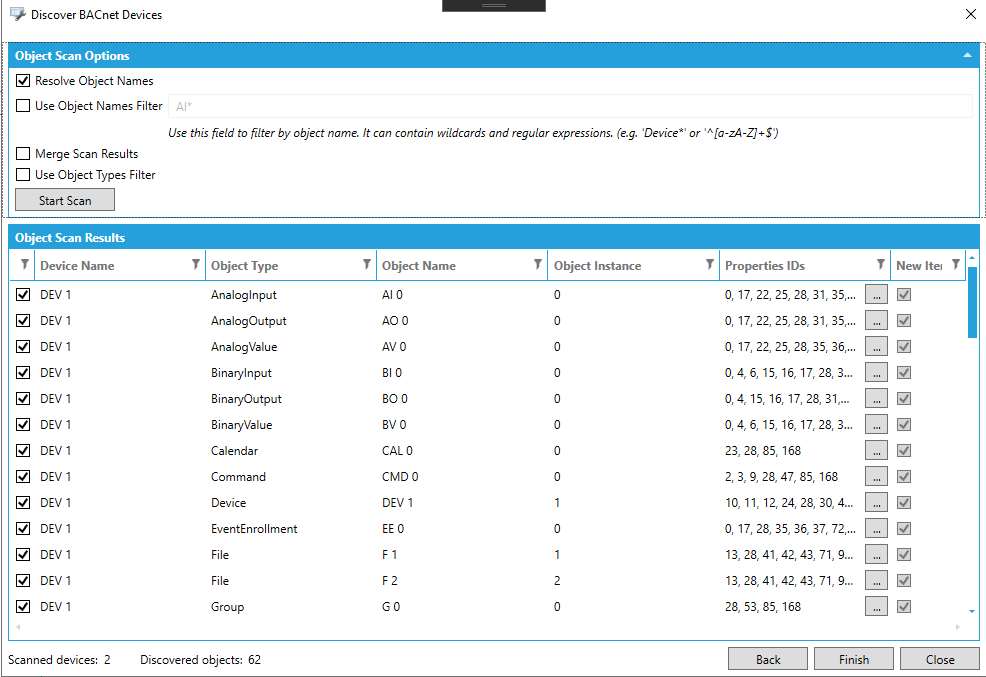
For each scanned object you can see:
Device Name - The name of the device containing the object
Object Type - The type of the object
Object Name - The name of the object
Object Instance - The instance of the object
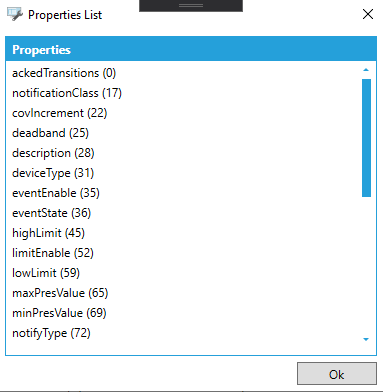
Properties IDs - The list of reported properties of the object as a string representation separated by a comma. You can click on the ellipsis button to see the list of the properties:
Properties List
New Item - True, if the object is coming from the latest device scan (when merging the results)
You can easily filter/sort the results in the grid.
You can also select multiple objects in one shot through the available context menu.
Device Scan Dialog (Context Menu)
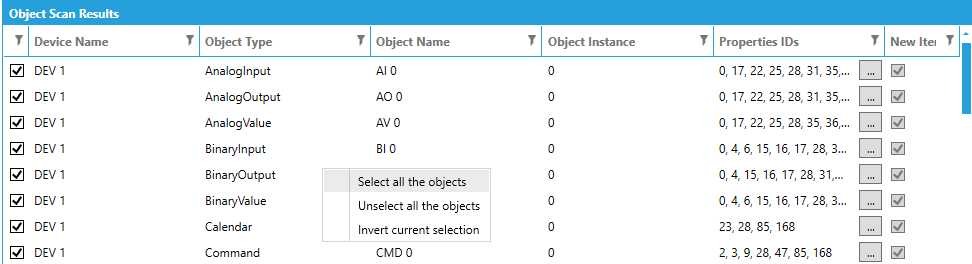
At this point, you can select all the objects or a subset of them and proceed with import operation. You have basically three options:
Finish - By clicking on the Finish button, the selected objects will be imported into the configuration database.
Back - Clicking on the Back button returns to the network discovery page.
Close - Clicking on the Close button closes the dialog without importing.
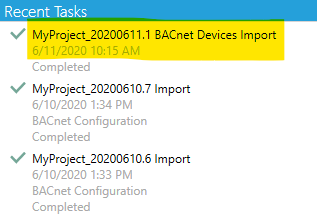
If you click on the Finish button, the selected options will be sent to the server and a Task will be generated. The task will process the data and will execute the import operation.
BACnet Devices Import Task
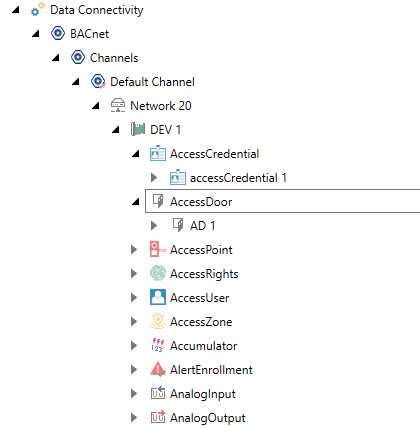
Once the task is completed, all the entities will be now browsable in the project tree.
Project Tree After the Import
From the task explorer, you can see the log generated during the import process (right-click on the task and select View Log).
Task Log
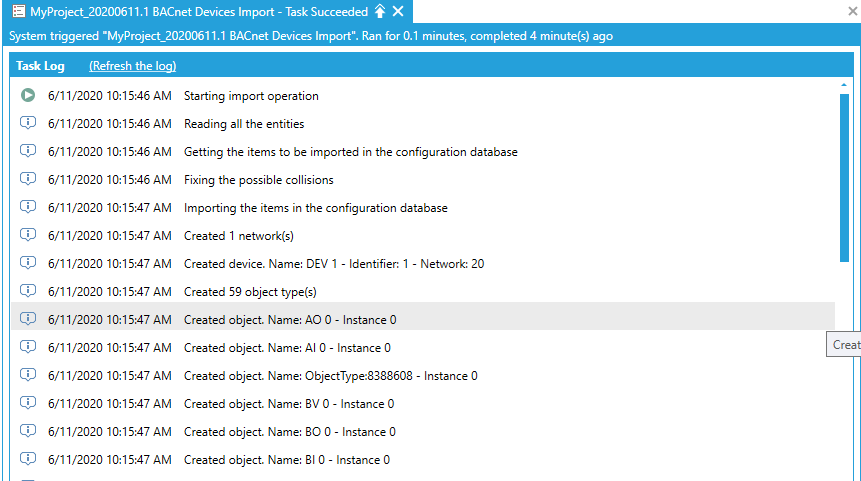
Note: The import operation will insert the new discovered entities and update the existing. It also provide a mechanism of collision detection in case of colliding names (for Devices and Objects). Since the operation is executed on a separate task, Workbench is fully available and responsive during the execution.
The Channel Root entity is the top most element in BACnet hierarchy. It contains the available Channels.
Channel Root Level in the Project Tree

If you double-click on it, a dialog will be opened.
Channel Root Dialog
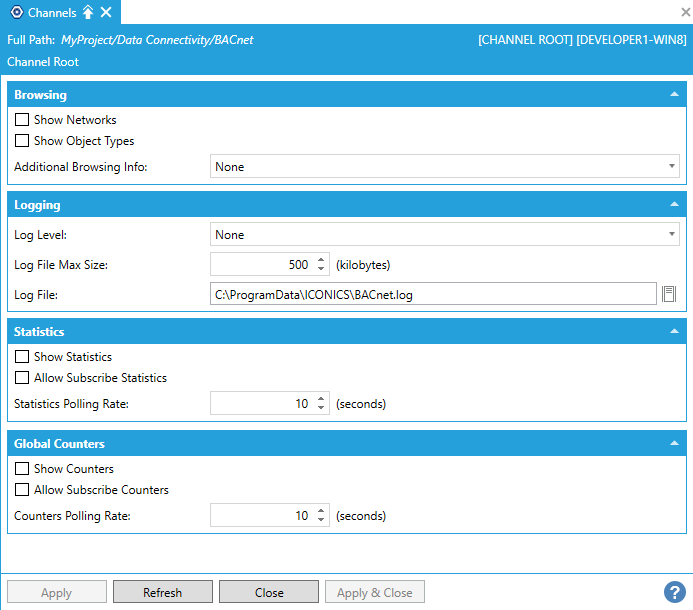
In this dialog, it’s possible to configure some settings that are globals for all the available channels. This is the list of the settings:
Browsing
• Show Networks -
• Show Object Types -
• Additional Browsing Info -
Logging
• Log Level -
• Log File Max Size [kilobytes] -
• Log File -
Statistics
• Show Statistics -
• Allow Subscribe Statistics -
• Statistics Polling Rate [seconds] -
Global Counters
• Show Counters -
• Allow Subscribe Counters -
• Counters Polling Rate [seconds] -
Click on the Apply button to apply the changes.
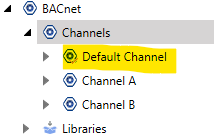
Under the Channel Root level, we can have multiple Channel entities. Each Channel can contain multiple Networks. There should be always a Channel marked as default. It’s possible to identify it easily since the icon contains a red flag.
Channel Level in the Project Tree
If you double-click on it, a dialog will open. The dialog contains four tabs to set up different sets of settings:
General Settings
Communication Settings
Port Settings
Foreign Devices Settings
General Tab
Channel Dialog (General Settings)
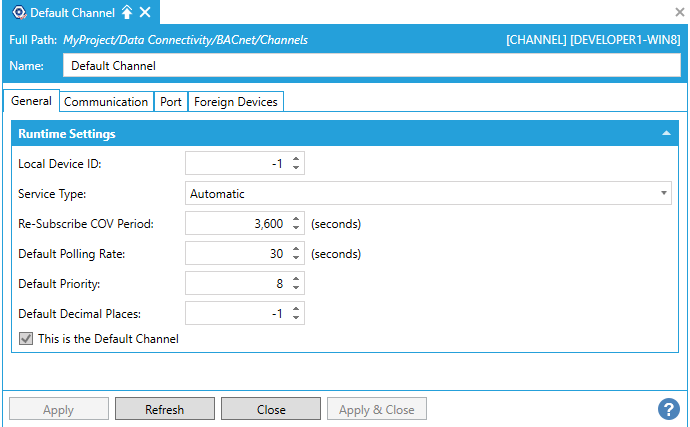
This tab contains the ‘General’ Channel settings. This is the list of the configurable settings:
Runtime Settings
• Local Device ID -
• Service Type -
• Re-Subscribe COV Period -
• Default Polling Rate -
• Default Priority -
• Default Decimal Places -
• This is the Default Channels - True, if the Channel is the ‘default’ Channel.
Communication Tab
Channel Dialog (Communication Settings)
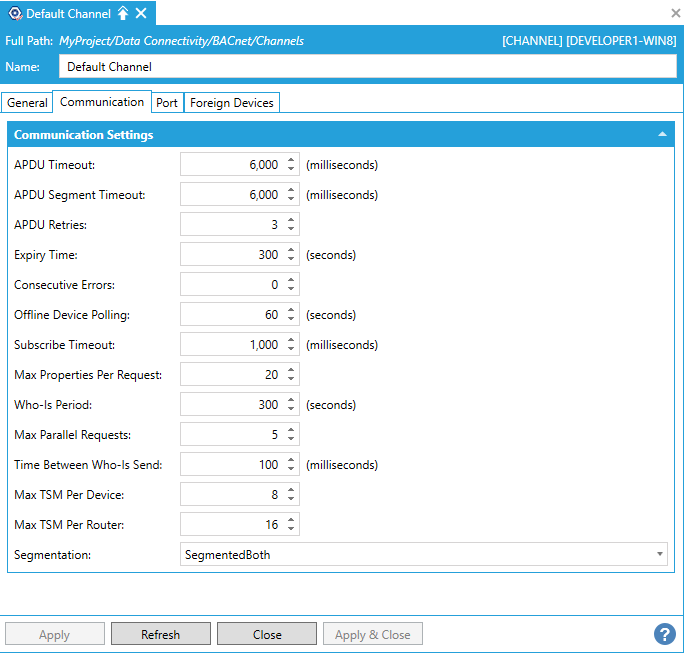
This tab contains the ‘Communication’ Channel settings. This is the list of the configurable settings:
Communication Settings
APDU Timeout -
APDU Segment Timeout -
APDU Retries -
Expiry Time [seconds] -
Consecutive Errors -
Offline Device Polling -
Subscribe Timeout -
Max Properties Per Requests:
Who-Is Period -
Max Parallel Requests -
Time Between Who-Is Send -
Max TSM Per Device -
Max TSM Per Router -
Segmentation -
Port Tab
Channel Dialog (Port Settings)
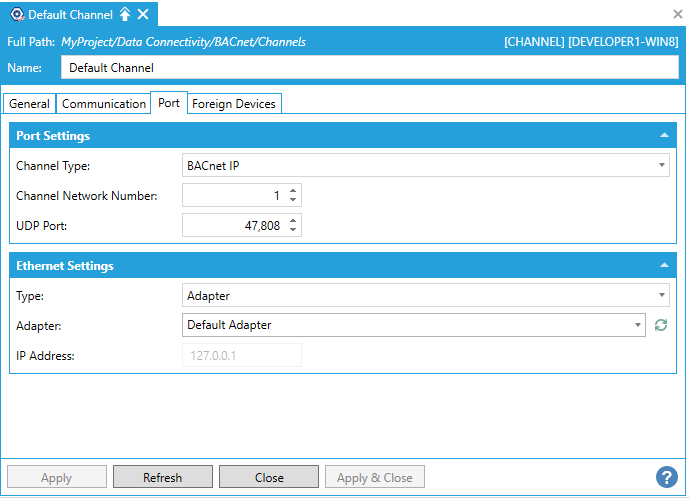
This tab contains the Port Channel settings. This is the list of the configurable settings:
Port Settings
• Channel Type -
• Channel Network Number -
• UDP Port -
Ethernet Settings
• Type -
• Adapter -
• IP Address -
Foreign Devices Tab
Channel Dialog (Foreign Devices Settings)
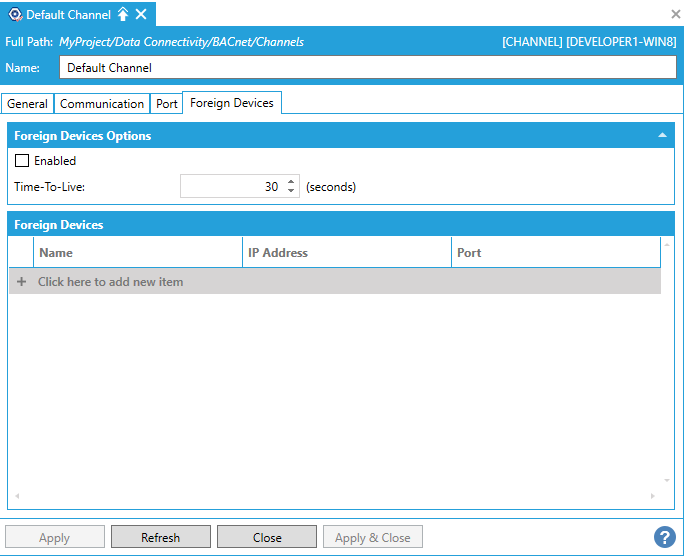
This tab contains the Foreign Devices Channel settings. This is the list of the configurable settings:
Foreign Devices Options
• Enabled - True if the Foreign Devices are enabled
• Time-To-Live -
Foreign Devices
The grid contains all the available Foreign Devices. For each Foreign Device, the following can be configured:
• Name - Automatically generated combining the IP Address and the Port
• IP Address -
• Port -
Click on the Apply button to apply the changes.
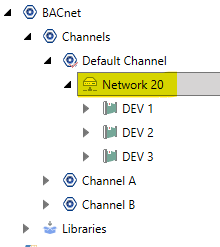
Under a Channel, there can be multiple Network entities. Each Network can contain multiple Devices.
Network Level in the Project Tree
If you double-click on it, a dialog will be opened.
Network Dialog
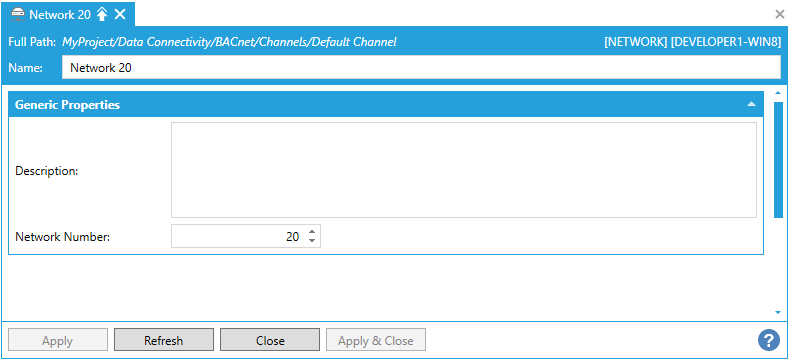
The dialog contains some settings that you can configure. This is the list of the settings:
Name - The name of the Network
Description - The description of the Network
Network Number -
Click on the Apply button to apply the changes.
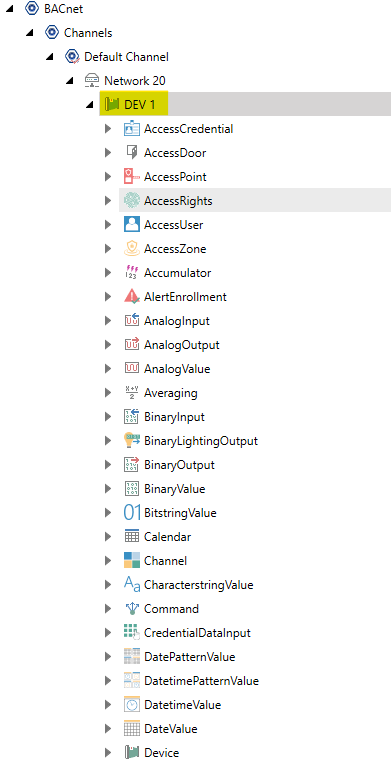
Under a Network, there can be multiple Device entities. Each Device can contain multiple Object Types.
Device Level in the Project Tree
If you double-click on it, a dialog will be opened.
Device Dialog
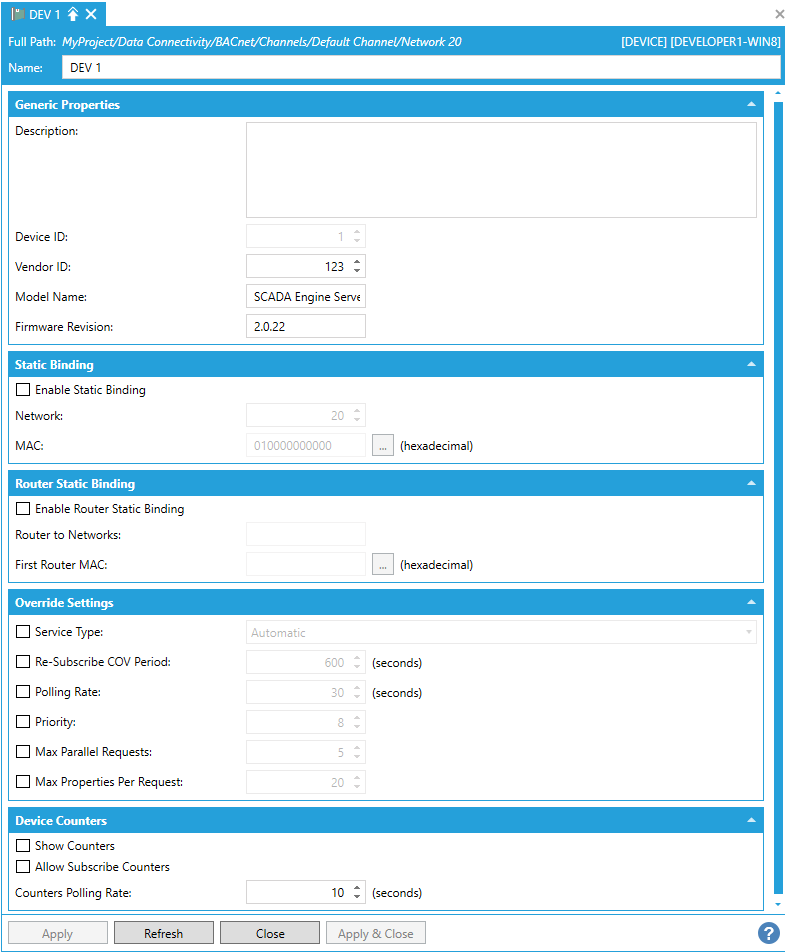
The dialog contains some settings that you can configure. This is the list of the settings:
Generic Properties
Name - The name of the Device
Description -The description of the Device
DeviceID -
VendorID -
Model Name -
Firmware Revision -
Static Binding
Enable Static Binding - True, to enable the Static Binding settings
Network -
MAC [hexadecimal] -
Router Static Binding
Enable Router Static Binding - True, to enable the Router Static Binding settings
Router to Networks -
First Router MAC [hexadecimal] -
Override Settings
Service Type -
Re-Subscribe COV Period -
Polling Rate -
Priority -
Max Parallel Requests -
Max Properties Per Request -
Device Counters
Show Counters -
Allow Subscribe Counters -
Counters Polling Rate -
Click on the Apply button to apply the changes.
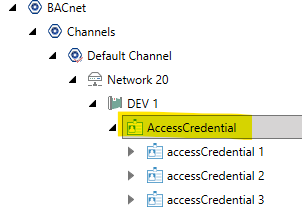
Under a Device, we can have multiple Object Types entities. Each Object Type can contain multiple Objects.
Object Type Level in the Project Tree
If you double-click on it, a dialog will be opened.
Object Type Dialog
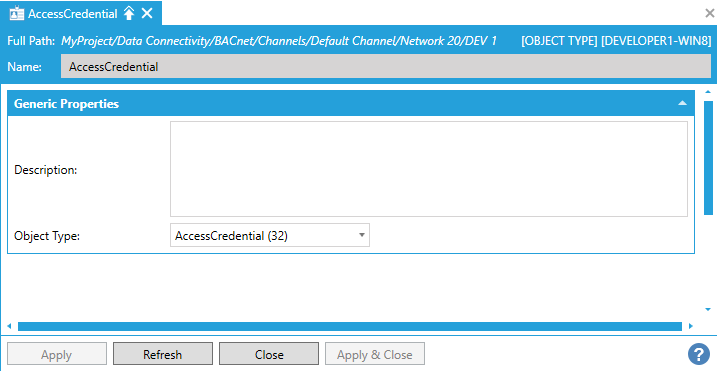
The dialog contains some settings that you can configure. This is the list of the settings:
Name -The name of the Object Type (automatically generated)
Description - The description of the Object Type
Object Type - The associated object type (the list of available object types comes from the Object Library)
Click on the Apply button to apply the changes.
Under an Object Type, there can be multiple Objects entities. Each Object can contain multiple Properties.
Object Level in the Project Tree
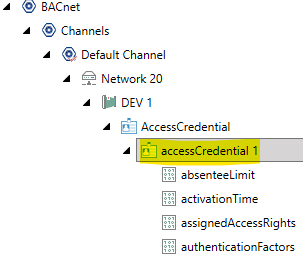
If you double-click on it, a dialog will open.
Object Dialog
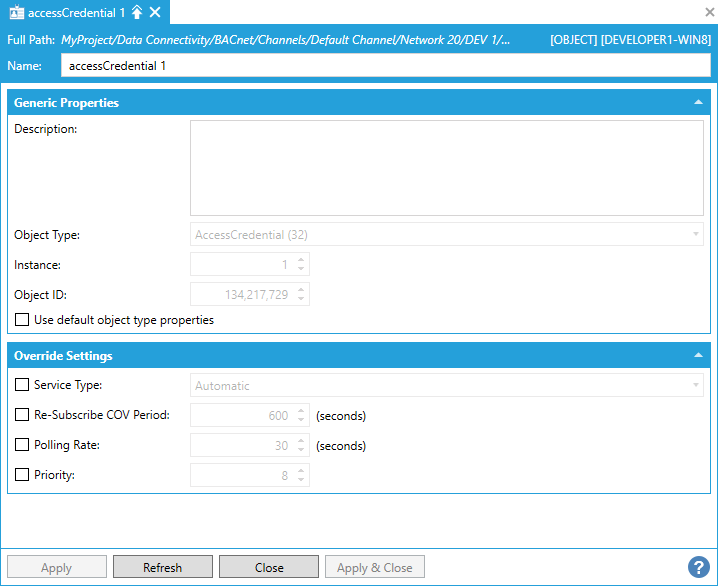
The dialog contains some settings that you can configure. This is the list of the settings:
Generic Properties
Name - The name of the Object
Description - The description of the Object
Object Type -
Instance -
Object ID -
Use default object type properties -
Override Settings
Service Type -
Re-Subscribe COV Period -
Polling Rate -
Priority -
Click on the Apply button to apply the changes.
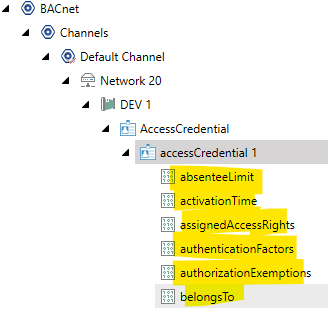
Under an Object, there can be multiple Property entities.
Object in the Project Tree
If you double-click on it, a dialog will open.
Property Dialog
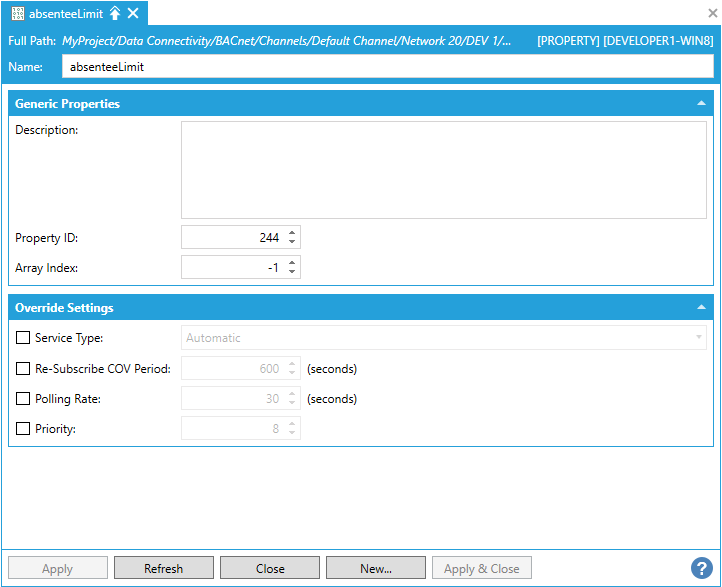
The dialog contains some settings that you can configure. This is the list of the settings:
Generic Properties
Name - The name of the Property
Description - The description of the Property
Property ID -
Array Index -
Override Settings
Service Type -
Re-Subscribe COV Period -
Polling Rate -
Priority -
Click on the Apply button to apply the changes.
Under the root level, there’s another section available called ‘Libraries’.
Libraries in the Project Tree

The Libraries level contains two sub-levels:
Property Library - Here, you can configure the available properties
Device Templates - Here, you can configure a set of templates for the devices (currently, only the standard device template is available)
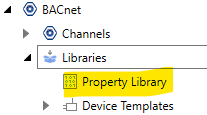
The Property Library is available under the Libraries root level.
Property Library in the Project Tree
If you double-click on it, a dialog will open.
Property Library Dialog
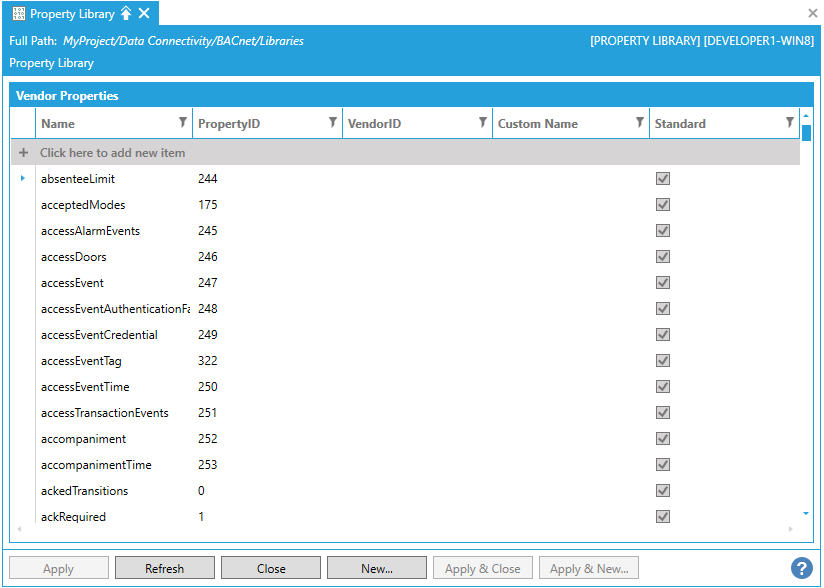
In this dialog we can configure the available properties (modify the existings or add / remove new ones). We can have two different kinds of properties: Standard and Custom. The standard properties cannot be added/remove. You can’t even modify them except the Custom Name. The Custom properties are otherwise fully supported (you can add/remove/edit them).
For each property, we have these properties:
Name - The name of the property.
PropertyID - The identifier of the property.
VendorID -
Custom Name - The custom name of the property.
Standard - True, if the property is a standard property.
Click on the Apply button to apply the changes.
The Device Templates level is the virtual root level of the Device templates. It could contain multiple Device Templates. In current version we have only the Default Device Template (we cannot add new templates).
Device Templates in the Project Tree

The Device Template entity is under the virtual root level Device Templates. Currently, we can have only one Device Template (the default one) and there are no configurable properties. It contains multiple Object Type Templates.
Device Template in the Project Tree
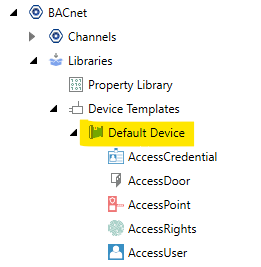
The Object Type Template entity is under a Device Template entity.
Object Type Template in the Project Tree

If you double-click on it, a dialog will open.
Object Type Template Dialog
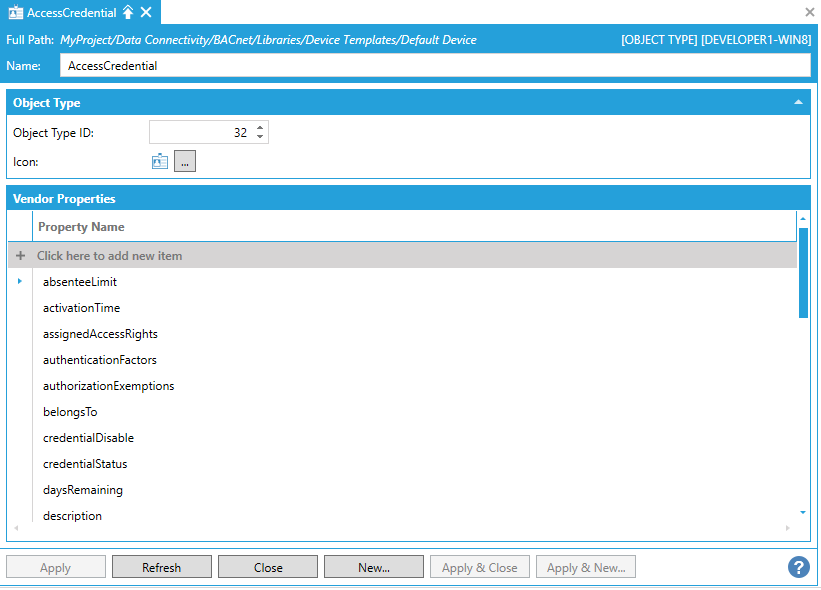
The dialog contains some settings that you can configure. This is the list of the settings:
Object Type
Object Type ID - The identifier of the object type
Icon - The icon to be shown in the provider
Vendor Properties
The grid contains the list of supported properties for the object type.
Click on the Apply button to apply the changes.
It’s possible to export a configuration and import it, using the Import/Export feature provider by Workbench.
Once the configuration is completed, it’s possible to upload it on a Gateway using the Deploy Device(s) Configuration action, right-clicking on the Gateway itself.
Deploy Device(s) Configuration Action
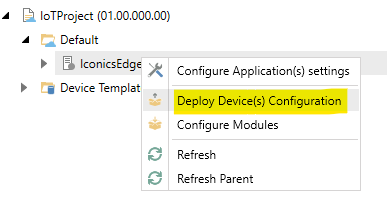
The system will export the configuration in the Template in a SQlite database. It will upload it to the device and it will import it in the target configuration database.
A task will be generated on the server to execute the action.
Running Task to Generate IoT Configuration

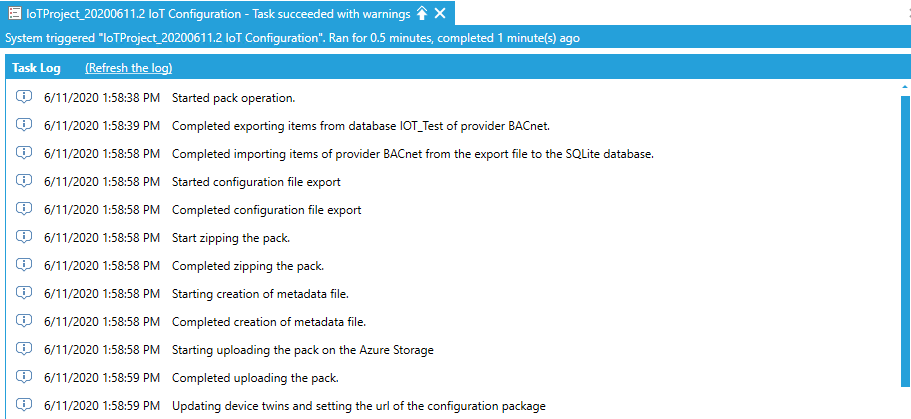
Once the task is completed, we can see the generated log file with all the details.
Task Log File
See Also:
BACnet Connectivity in IoTWorX Edge Devices