To Add an NT Event Trigger:
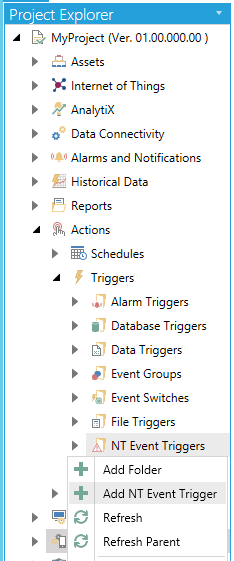
Open the Workbench and expand the Actions node and then the Triggers node. Right-click on the NT Event Triggers node then click on Add NT Event Trigger, as shown below.
Add NT Event Trigger from Project Explorer in the Workbench

-OR-
Select the NT Event Triggers node then click on the Add NT Event Trigger button, shown below, in the Edit section of the Home ribbon in the Workbench.
Add NT Event Trigger Button

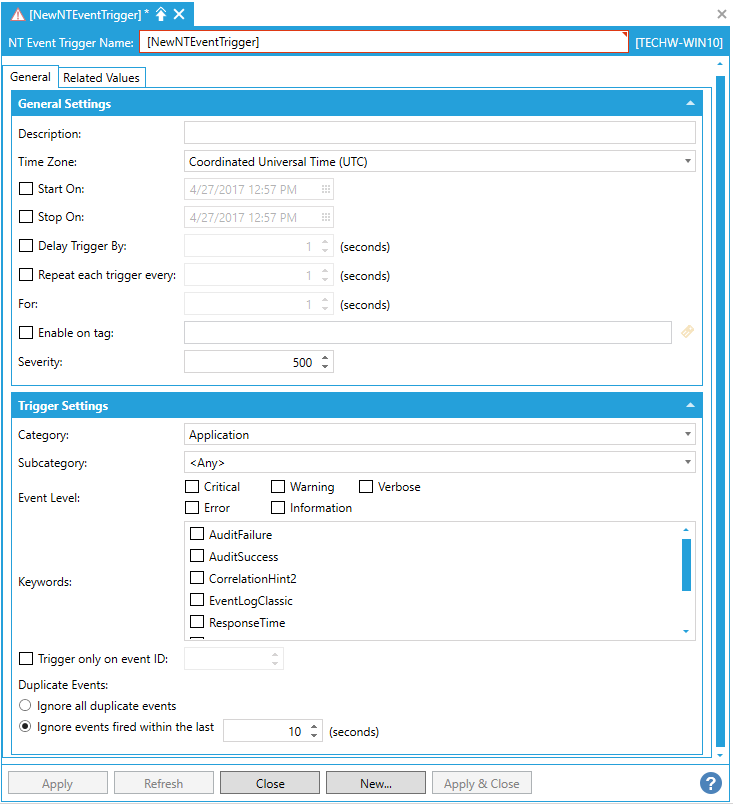
This opens the New NT Event Trigger Properties, shown below.
New NT Event Trigger Properties

Enter a name in the NT Event Trigger Name text entry field.
Description - Enter a description for the file trigger in the text entry field.
Time Zone - Use the pulldown menu to select a time zone from either Coordinated Universal Time (UTC) or Local Server Time.
Start On - Click this checkbox if you would like to set a starting date and time for trigger execution. Once checked, you can enter a date and time in the text entry field or click on the  button, which will open the date/time picker.
Stop On - Click this checkbox if you would like to set a stop date and time for trigger execution. Once checked, you can enter a date and time in the text entry field or click on the  button, which will open the date/time picker.
Delay Trigger By - Click this checkbox if you would like to set a delay time for the trigger execution. Once checked, you can enter a delay time, in seconds, in the text entry field or use the up/down arrows.
Repeat each trigger every - Click this checkbox if you would like to repeat the selected trigger. Once checked, you can set the amount of time, in seconds before the trigger is repeated in the text entry field or use the up/down arrows.
For - Enter a duration (in seconds) in the text entry field or click on the up/down buttons.
Enable on tag - Click this checkbox if you wish to enable your trigger based on a data tag. Once checked, you can enter a tag location in the text entry field or click on the  button to open the Data Browser and navigate to your selected tag.
Severity - Enter a number for severity in the text entry field or use the up/down arrows.
Category - Use the pulldown menu to select from Application, Security or System.
Subcategory - Depending on the Category selection, use the pulldown menu to select a subcategory from the selected Application, Security or System.
NOTE: To be able to view the list of the subcategories for the Security Category of the EventLog, you need to launch Workbench as an Administrator. [For more specific info, see (https://msdn.microsoft.com/en-us/library/system.diagnostics.eventlogpermission(v=vs.110).aspx].
If the event source that is specified by the EventLog.Source property for the event log does not exist, a new event source is created. To create an event source in more recent versions of Windows or Windows Server, you must have administrative privileges.
The reason for this requirement is that all event logs, including security, must be searched to determine whether the event source is unique. Users do not have permission to access the security log. Therefore, a SecurityException is thrown.
User Account Control (UAC) determines the privileges of a user. If you are a member of the Built-in Administrators group, you are assigned two run-time access tokens: a standard user access token and an administrator access token. By default, you are in the standard user role. To execute the code that accesses the security log, you must first elevate your privileges from standard user to administrator. You can do this when you start an application by right-clicking the application icon and indicating that you want to run as an administrator.
Event Level - Click the checkbox next to your preferred event level(s), including Critical, Error, Warning, Information, or Verbose. If no event level is selected then ALL levels will be included.
Keywords - Select from AuditFailure, AuditSuccess, CorrelationHint2, EventLogClassic, ResponseTime, Sqm, WdiContext, or WdiDiagnostic.
Trigger only on event ID - Check this box to filter events based on a specific Event ID. If checked, you can enter a specific Event ID to trigger on. All other will be ignored.
Duplicate Events
Ignore all duplicate events - Click this to only trigger on the first occurrence. All subsequent occurrences are ignored.
Ignore events fired within the last [ ] seconds - Click this to trigger on the first occurrence and then all subsequent occurrences are ignored for a specified period. If checked, enter the period (in seconds) in the text entry field or use the up/down arrows.
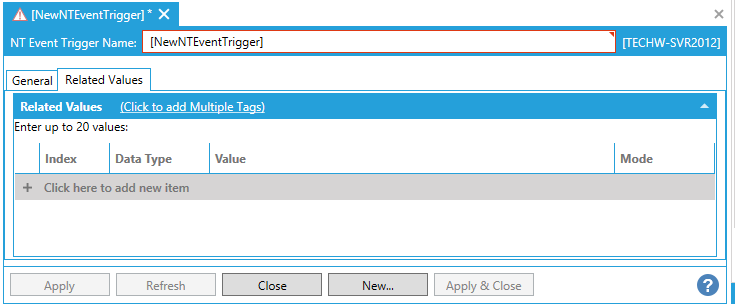
Related Values Tab

You can enter up to 20 values.
Click on the Click to add Multiple Tags link to open the data browser to navigate to your selected tags.
Or, click on +Click here to add new item to add individual tags.
Index - Enter a number to keep track of any new tags entered here.
Data Type - Use the pulldown menu to select from NATIVE, FLOAT, DOUBLE, BOOL, BYTE, WORD, DWORD, CHAR, SHORT, LONG, or STRING.
Value - Enter a value for the tag or click on the  button to open the Data Browser and navigate to your selected tag value source.
Mode - Use the pulldown menu to select from either Value or Tag.
Once you have completed your settings, click on Apply to save them and Close to return to the Workbench. Your configured NT Event Trigger will now appear in the Project Explorer.
See Also: