To Add a Configuration:
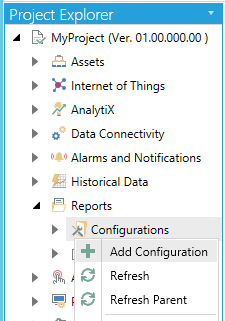
Open the Workbench and expand the Reports node and then the Configurations node. Right-click on the Configurations node or on a contained report folder, then click on Add Configuration, as shown below.
Add Configuration from Project Explorer in the Workbench

-OR-
Select the Configurations node, or on a contained report folder, then click on the Add Configuration button, shown below, in the Edit section of the Home ribbon in the Workbench.
Add Configuration Button

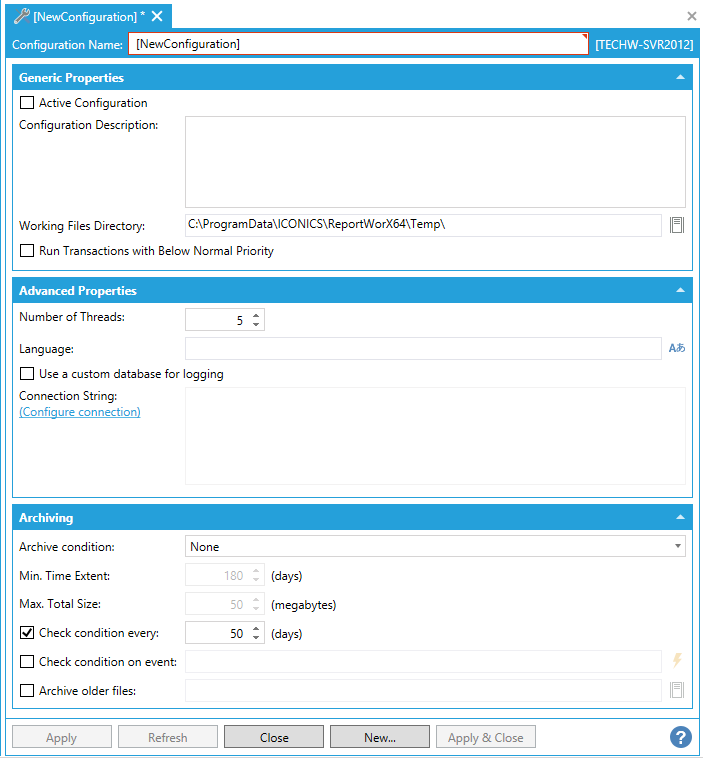
This opens the New Configuration Properties, shown below.
New Configuration Properties

Enter a name in the Configuration Name text entry field.
Active Configuration - You can create multiple report configurations, but only one report configuration can be active at a time. However, the active configuration can have many enabled reports. Clicking this button sets the report configuration as the active configuration. Any other report configurations in the database will therefore be deactivated.
Configuration Description - Enter a description for the configuration to distinguish it from others.
Working Files Directory - Enter a location for a working files directory in the text entry field or click on the  button, which opens the file/folder browser, allowing you to navigate to your selected location.
Run Transactions with Below Normal Priority - Transactions can be executed with either Below Normal or Normal priority levels. When this checkbox is checked, transactions will be executed with a Below Normal priority level.
Number of Threads - Enter the number of threads in the text entry field (or use the up/down arrows).
Language - Each configuration has a default language. You can set the default language for the configuration the text entry field or lick on the  button to open the Language Selector. This is the language to be used in creating reports. All language-aliased entries within the report template will be translated, and OPC values will be scaled using the language configuration default settings, unless you override the default language when configuring each individual report.
Use a custom database for logging - Click this checkbox to use a separate database for report logging. Checking this box will activate the Connection String properties.
Connection String - You can enter a location for the selected custom logging database in the text entry field or click on the Configure connection link, which will open the Select a logging database window, where you can select both the SQL Server and the database.
Archive Condition - Use the pulldown menu to select from None, Minimum Time Extent, or Minimum Time Extent and Maximum Total Size.
Min. Time Extent - If you set an Archive Condition other than None, you can enter a minimum time extent in the text entry field (in days) or click on the up/down arrows.
Max. Total Size - If you set an Archive Condition of "Minimum Time Extent and Maximum Total Size", you can enter a maximum total size (in megabytes) in the text entry field or click on the up/down arrows.
Check condition every - Click this checkbox if you wish to have the Archive Condition checked at a specific time interval. Once checked, you can set the time (in days) in the text entry field (or use the up/down arrows).
Check condition on event - Click this checkbox if you wish to have the Archive Condition checked when a specific event occurs. Once checked, you can enter an event in the text entry field or click on the  button, which opens the Data Browser, allowing you to navigate to your selected trigger (event).
Archive older files - Click this checkbox if you wish to archive older files. Once checked, you will be able to enter your desired file archive location in the text entry field or can click on the  button, which opens the file/folder browser, allowing you to navigate to your selected location.
Once you have finished making changes, click Apply to save them and Close to return to the Workbench. Your new configuration will now appear in the Project Explorer.
See Also:
About Reports in the Workbench