|
|
The features on this page require an add-on to work with GENESIS64 Basic SCADA. |
|
|
The features on this page require an add-on to work with GENESIS64 Basic SCADA. |
You can tell the server to convert device data value simply by setting the Conversion properties.
To Add a Conversion:
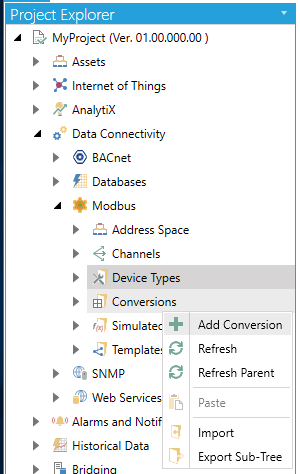
From the Project Explorer, click on Conversions, then Add Conversion, as shown below.
New Conversion from the Project Explorer

-OR-
Select the Conversions node in the Project Explorer, then click on the Add Conversion button (see below) in the Edit section of the Home ribbon in the Workbench.
Add Conversion Button

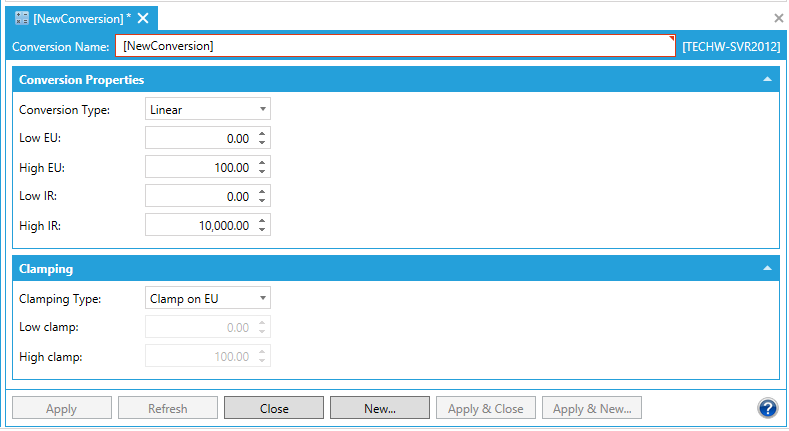
This opens New Conversion properties in the right side of the configurator, as shown below. Each Conversion has specific parameters, as shown below.
Conversion Properties

Conversion Name: Specifies the name of the conversion definition. The name can be up to 12 alphanumeric characters, including underscores ( _ ) and hyphens ( - ).
Conversion Type: For each conversion definition, select one of the following conversion types from the drop-down list:
None: Converts the data into float data type, but does not change the value itself. When this option is selected, the Low IR and High IR (Instrument Range) fields are disabled.
Linear: Keeps a linear relation between EU (Engineering Units) and IR (Instrument Range).
Square Root: Keeps a square root relation between EU and IR.
Low EU - Client scale; Specify the low value for the engineering units (if applicable).
High EU - Client scale; Specify the high value for the engineering units (if applicable).
Low IR - Device scale; Specify the low value for the instrument range (if applicable).
High IR - Device scale; Specify the high value for the instrument range (if applicable).
Note: Engineering units (EU) can be specified even with no conversion.
If clamping is enabled, the data value will be limited to its High Value/EU High Value when it exceeds the upper limit, and similarly to its Low Value/Low EU Value parameter when it exceeds the bottom limit. Select one of the following clamping types from the drop-down list:
Clamping Type: Use the pulldown menu to select from one of the following:
None: No clamping type is specified.
Clamp on EU: Clamps on the specified low and high engineering units (EU) values.
As specified: Clamps on a specified range of low and high values. This activates the nearby Clamping parameters section, described below.
Low clamp: Specify the low value for the clamping range.
High clamp: Specify the high value for the clamping range.
Once you have completed making your settings, click on the Apply (or Apply & Close) button to save your changes and return to the Workbench.
See Also: