|
|
The features on this page require a GENESIS64 Advanced license and are not available with GENESIS64 Basic SCADA . |

![]()
|
|
The features on this page require a GENESIS64 Advanced license and are not available with GENESIS64 Basic SCADA . |
![]()
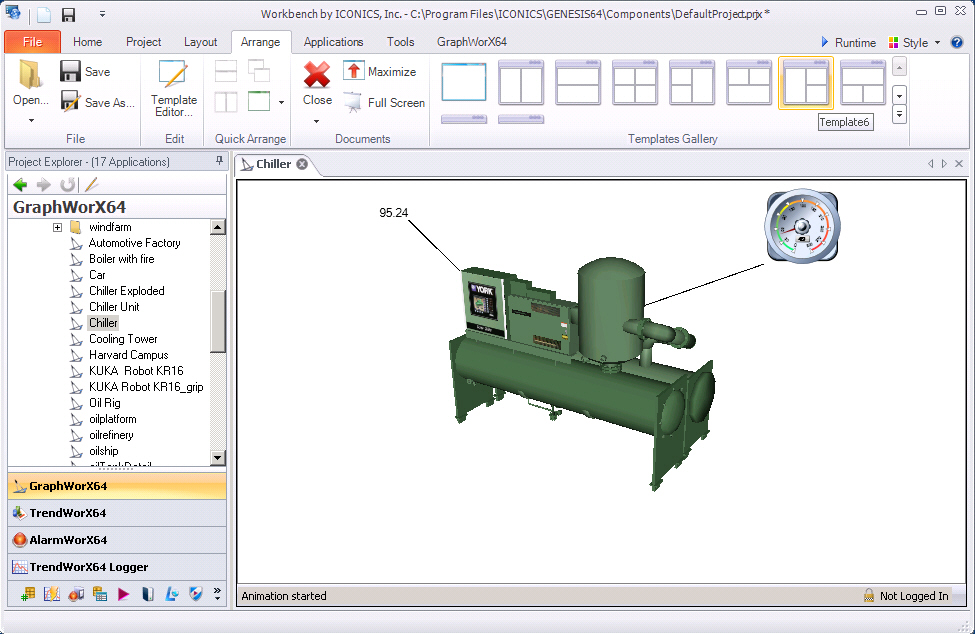
Templates are similar to layouts in that they populate your work surface with a specific arrangement of panes. A template gives you compartments in which to open your files; whereas a layout is the arrangement of specific files inside a template. You can use templates to arrange files easily on your work surface, or to add files to the work surface in the arrangement dictated by the template. You can create new templates, and save changes to templates. You work with templates using the Arrange ribbon. To access and use a template:
In the Workbench Classic, select the Arrange ribbon.
From the Templates Gallery, click the template you want to apply to your work surface. If you already have files open, the files will automatically arrange in the template's arrangement.
To open a new file, click the pane where you want the file to open. This makes the pane active.
Select the file from the Project Explorer you want to populate that pane.
Repeat steps 3 and 4 until you have opened the files you want opened.
When the panes are populated, use the Save As command to save the display as a new project with the name and at the path location you desire.
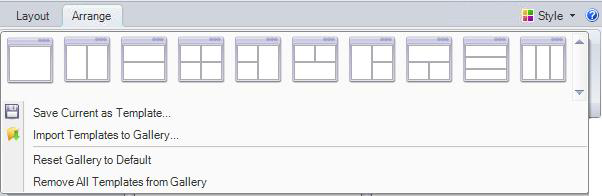
The Arrange ribbon contains the commands needed to open, save, and apply templates. Click the down arrow to display the list of the commands that are available.
|
|
Click to open a standard Open file dialog box that allows you to select WBTX Workbench Classic template file. The drop-down menu lists the last five template files that have been opened. You can also use the Open command on the File menu for this purpose. |
|
|
The Save button saves the current display and any changes you made to the template file. This function is duplicated in the Templates Gallery menu. Use the Save command on the File menu for the same effect. |
|
|
The Save As button saves the current display as a template file with a name you supply. The position and configuration is saved, but the contents of the panes are not. This duplicates the action of the Save As command on the File menu. |
|
|
The Template Editor button opens a dialog box that allows you to create new templates of your own design. |
Templates are stored as Workbench Classic template files with a file extension of .WBTX. You can import template files and add them to the Templates Gallery using the Import Templates to Gallery command. Should you want to return the gallery to the default state you can use the Reset Gallery to Template command. You can also remove all templates from the gallery using the Remove All Templates from the Gallery command. To create a new template or edit an existing template you open and work with the Template Editor, which is described in the section below.
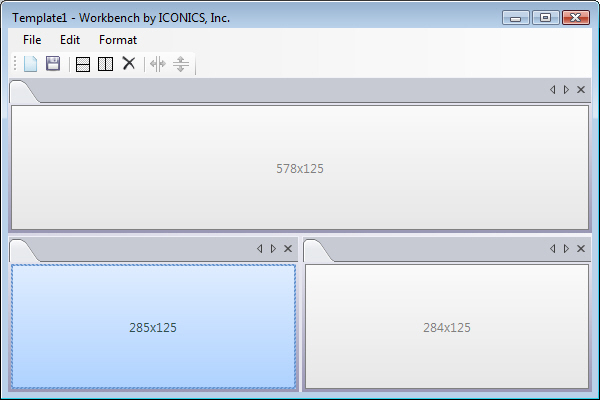
You can have and use any number of templates, either based on the ones you see in the Templates Gallery or by creating a new template from scratch. The Template Editor is a designer in which you can alter the configuration and properties of a template and save those changes to a new file.
On the Arrange tab, click the Template Editor button. The Template dialog box opens.
Click the New Template button to start with a blank template (if you are editing an existing template).
Click the Split Selected Panels Horizontally button ![]() to create the first pane.
to create the first pane.
Click either the Split Selected Panels Horizontally button ![]() or the Split Selected Panels Vertically button
or the Split Selected Panels Vertically button ![]() to create a set of panes. These two commands are also found in the Edit menu. Click here for an example.
to create a set of panes. These two commands are also found in the Edit menu. Click here for an example.
To resize a pane click on its border and drag it.
To make panes side by side of equal width, hold the Ctrl key and click on each pane; then click the Make Selected Panels of the Same Width button ![]() .
.
To make vertically stacked panes of equal height, hold the Ctrl key and click on each pane; then click the Make Selected Panels of the Same Vertically button ![]() .
.
To delete a pane select it and click the Delete Selected Panel button ![]() , or select Delete from the Edit menu.
, or select Delete from the Edit menu.
To save your template to a file, click the Save Current Template button ![]() , give it a file name and locate it where you desire.
, give it a file name and locate it where you desire.
Close the Template dialog box when you are done.
See also: