|
|
The features on this page require a GENESIS64 Advanced license and are not available with GENESIS64 Basic SCADA . |

![]()
|
|
The features on this page require a GENESIS64 Advanced license and are not available with GENESIS64 Basic SCADA . |
![]()
The TrendWorX64 Logger configurator provides a Configuration Database Wizard for creating new SQL Server and SQL Server Express configuration databases. When you install TrendWorX64 a default logger database is created for your use. However, you may wish to create additional logger databases for specific purposes or to run in multiple locations.
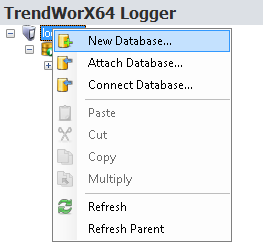
Right click the database node, then select the New Database command from the context menu. Or, select the database node, then select the Database, New Database command in the Edit group on the Home ribbon.
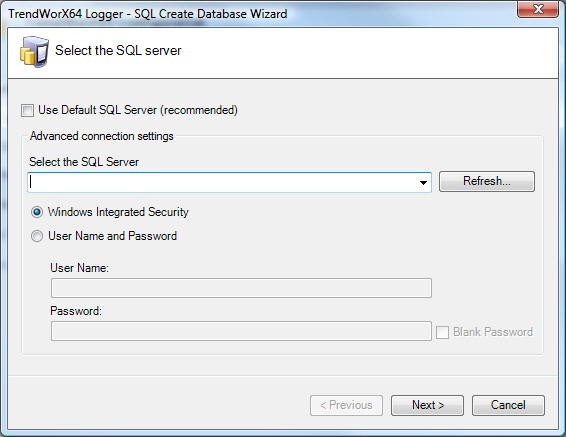
The SQL Database Wizard starts. By default the Use Default SQL Server (recommended) option is selected. If you want to use the Default SQL Server click the Next button and skip to step 4. Otherwise deselect the option and continue to step 3.
Select the SQL Server to which you wish to connect. Select the Security option to validate the login to the SQL database either Windows Integrated Security or User Name and Password. If necessary, enter a user name and password to log on to the SQL Server. It is recommended that you use Windows Integrated Security.
Click the Next button.
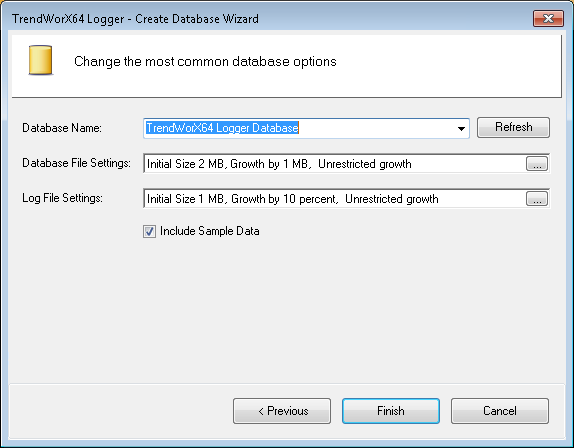
On the Change the most common database options step, click the Database Name field and enter the name of the database you wish to create.
To alter the size of the initial database file and log files as well as the manner in which they grow when filled, click the ellipsis button ![]() and select the options you desire. You can specify the initial size of each file, how each file will grow as it is filled, and whether the size of each file will be restricted.
and select the options you desire. You can specify the initial size of each file, how each file will grow as it is filled, and whether the size of each file will be restricted.
Click the Finish button.
TrendWorX64 Logger creates the new database file which should automatically appear in the TrendWorX64 Logger Configurator tree explorer. If the database name does not appear within a few seconds, click the Refresh button ![]() to refresh the tree explorer.
to refresh the tree explorer.
|
|
Note: There are several reasons why a database may not be created. If you don't have sufficient user privileges to create the SQL Server database, or if you have specified a database name that does not exist, then an error will occur. Check the user account and its privileges in the SQL Sever Management application you use (such as SQL Server Management Studio Express), as well as the existence, correct name, and path to troubleshoot the issue. |
Only one database can be active at a time. An Active database has a database symbol with a white arrow in a green filled circle ![]() while an Inactive database has a database symbol with a white square in a red filled circle
while an Inactive database has a database symbol with a white square in a red filled circle ![]() .
.
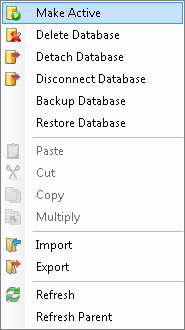
Right click the name of an inactive database and select the Make Active command from the context menu. You can also click the Database, Make Active command in the Edit group on the Home ribbon.
When you attach a local database to the TrendWorX64 Logger it appears in the TrendWorX64 Logger Configurator tree explorer where it is available to be used. You would need to make the database active to work with that database. If you want to move a database from one physical location to another, perhaps because it has run out of disk space, then you make an active database inactive and detach it.
The act of attaching and detaching a database applies to local databases only. Since the Workbench is a distributed .NET Framework application what you see in the TrendWorX64 Logger Configurator tree explorer is populated by an IIS web service, which can be either local or remote. Similarly, the databases you see in the tree explorer can be either local or remote. Therefore you should only attach and detach to databases you know are local, and be able to specify exactly the server instance and local database on which you wish to operate.
|
|
Warning: Detaching a database can cause your applications to stop running. Be certain that you want to perform this operation and that you are detaching and attaching the correct local databases. |
Right-click another database in the TrendWorX64 Logger Configurator tree explorer that will be the active database, and then Make Active from the context menu, if necessary.
Right-click the database to detach in the tree control and select Detach Database command. A confirmation message will appear.
Select Yes to confirm that you wish to detach the database.
Copy the database to its new location, if desired.
Right click the Local Server in the TrendWorX64 Logger Configurator tree explorer and select Attach Database. You can also select the Local server and click the Database, Attach Database... command in the Edit group on the Home ribbon.
The SQL Database Wizard starts. By default the Use Default SQL Server (recommended) option is selected. If you want to use the Default SQL Server click the Next button and skip to step 4. Otherwise deselect the option and continue to step 3.
Select the SQL Server to which you wish to connect. Select the Security option to validate the login to the SQL database either Windows Integrated Security or User Name and Password. If necessary, enter a user name and password to log on to the SQL Server. It is recommended that you use Windows Integrated Security.
Click the Next button.
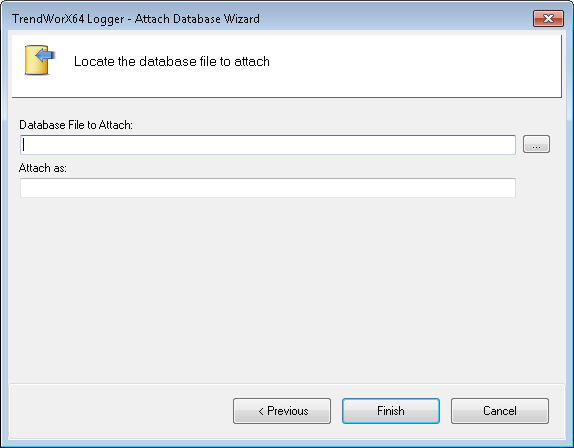
On the Locate the database file to attach step, click the ellipsis button ![]() to view a Select file dialog box. Select the database you wish to attach, then click Ok.
to view a Select file dialog box. Select the database you wish to attach, then click Ok.
Click the Finish button. The database name appears in the tree explorer as an inactive database.
To make the database active right click the database and select Make Active from the context menu.
See also: