|
|
The features on this page require a GENESIS64 Advanced license and are not available with GENESIS64 Basic SCADA . |
|
|
The features on this page require a GENESIS64 Advanced license and are not available with GENESIS64 Basic SCADA . |
MobileHMI lets you publish displays just as you publish them in GraphWorX64. MobileHMI has an additional feature that allows you to set one display as the "Landing Page" or default page.
|
|
Note: In standard GraphWorX64, the publishing wizard is only accessible from the file menu. MobileHMI lets you access the publishing wizard from either the File menu or the Phone tab on the toolbar. |
Complete the Following Steps:
On your computer, open an existing Phone display in GraphWorX64 (or create a new one from File>New Menu in GraphWorX64). Select the Phone tab and click the Publish Mobile Display button in the MobileHMI Configuration ribbon.
Publish Mobile Display Button Selected in the MobileHMI Configuration Ribbon

A 'Save As' dialog will appear simultaneously to the Web Publishing Wizard. You can use the 'Save As' dialog to optionally save the mobile display locally. The following shows the Web Publishing Wizard. Click 'Next' on the 'Publish Your Display on the Web' screen.
Web Publishing Wizard
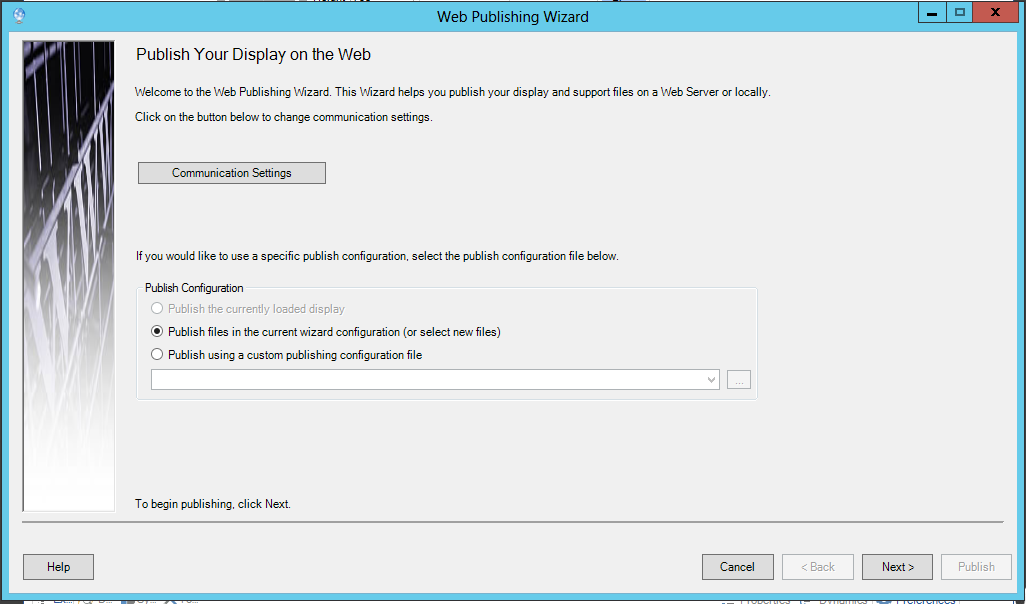
You have the option as to whether you wish to change the Communication Settings. If not and you would like to use the default settings, click 'Next' to proceed. If so, click on the Communication Settings button. This opens the following window.
Communication Settings Window
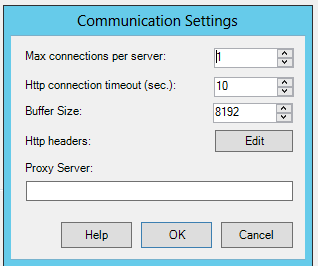
You can change the following settings:
Max connections per server: Specifies the maximum number of files to publish.
Http connection timeout (sec): Specifies the amount of time (in seconds) to wait for the Web server to respond.
Buffer Size: The publishing process breaks each file into smaller chunks of data. The Buffer Size represents the size of these data chunks. You will need to modify the default value only if the destination Web server or the underlying network imposes restrictions on the size of the data packets. The default value for this field is 8192.
Http headers: When a Web server sends HTML to a client browser, the server also sends other program information that is not displayed. One of these objects is called the HTTP header, which can contain information about the content that is being delivered to the browser. The header can be programmed by configuring the server or by a programming language such as ASP. Clicking the Edit button opens the HTTP Headers Editor dialog box, shown in the figure below, which enables you to specify the Names and Values for HTTP headers in the published display. When you have finished, click on OK to return to the Communication Settings window.
The Select File(s) to Publish screen appears. Use the Add/Remove Files button to add files to the Input File(s) section of the window. You also have the option as to whether and how to publish linked files.
Select File(s) to Publish Screen in the Web Publishing Wizard
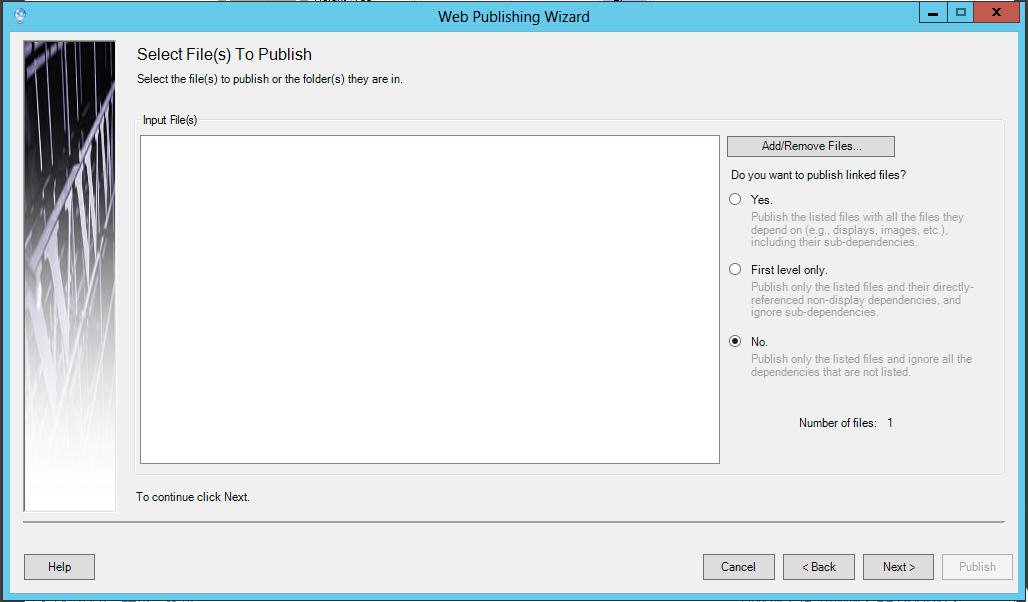
Click Next to proceed to the Publishing Options section of the wizard.
Publishing Options Section in the Web Publishing Wizard
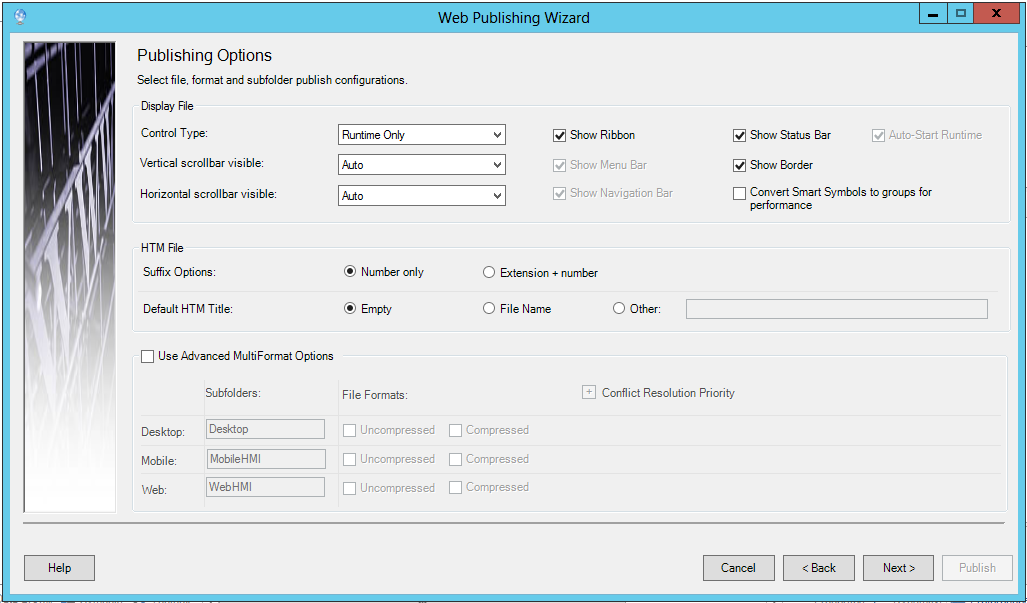
Display File
The Control Type dropdown list allows you to determine the level of configuration in the published display file that will be available to client-side users. Choose one of the following options from the drop-down list:
Runtime Only: The published display can be viewed only in Runtime mode. Users may not configure the display.
Configuration: The published display can be viewed in either runtime mode or configuration mode, and all configuration tools are available. A Configuration Control Type disables all options in the dialog box above.
The Vertical scrollbar visible and Horizontal scrollbar visible dropdown menu options include:
Disabled: No scrollbar is used in the published display.
Auto: A scrollbar appears in the published display, as needed when the display is re-sized.
Hidden: A scrollbar is included in the published display, but is initially hidden.
Visible: A scroll bar always appears in the published display.
When Runtime Only is selected from the Control Type drop-down list, the following options are also enabled.
Show Ribbon: Click this checkbox to ensure that the ribbon is used in the published display. If Show Ribbon is deselected, the Show Navigation Bar and Show Menu Bar options are enabled.
Show Status Bar: Click this checkbox to ensure that the status bar is used in the published display.
Show Menu Bar: Click this checkbox to ensure that the menu bar is used in the published display.
Show Border: Click this checkbox to ensure that the border is used in the published display.
Show Navigation Bar: Click this checkbox to ensure that the navigation bar is used in the published display.
Convert Smart Symbols to groups for performance - When checked, any Smart Symbols associated with the published files are published as normal objects. This option only applies to Desktop display formats.
HTM File
Suffix Options - Select Number only in order to use a number with increasing value to be added to the end of the HTM file name until an unused file name is found. Select Extension + number in order to add the display file extension to the end of the HTM file name. If an HTM file with this new name also exists, a number with increasing value is added to the end of the HTM file name until an unused name is found.
Default HTM Title - Select Empty to use a HTM page start with no title. Select File Name to use a HTM page start with the title equal to the file name it is associated with. Select Other for all HTM page titles set to the text entered in the text entry field to the right.
Advanced Multiformat Options
You have the option to publish in multiple formats. You can check the Use Advanced MultiFormat Options checkbox if you intend to publish files in anything other than a standard Desktop format.
Desktop - Publish files in standard Desktop (.gdfx) or Compressed Desktop (.gdfxz) formats. Use the text entry field to name the folder location for these file types. If you select either of these formats, you can also choose to Convert Smart Symbols to groups for performance. When checked, any Smart Symbols associated with the published displays in desktop format (gdfx, gdfxz) are converted to normal objects during the publishing process. The Smart Symbol conversion is only possible with displays in the desktop (GDFX and GDFXZ) formats.
Mobile - Publish files in standard Mobile (.gdfxp) or Compressed Mobile (.gdfxpz) formats. Use the text entry field to name the folder location for these file types.
Web - Publish files in standard Web (.gdfxs) or Compressed Web (.gdfxsz) formats. Use the text entry field to name the folder location for these file types.
Conflict Resolution Priority - Clicking the plus sign [+] shows the default order of conflict resolution priority (Desktop files first, then Mobile files, then Web files). The order of priority can be changed by entering a new priority number in the text entry field to the right of each file type or by using the up/down arrows.
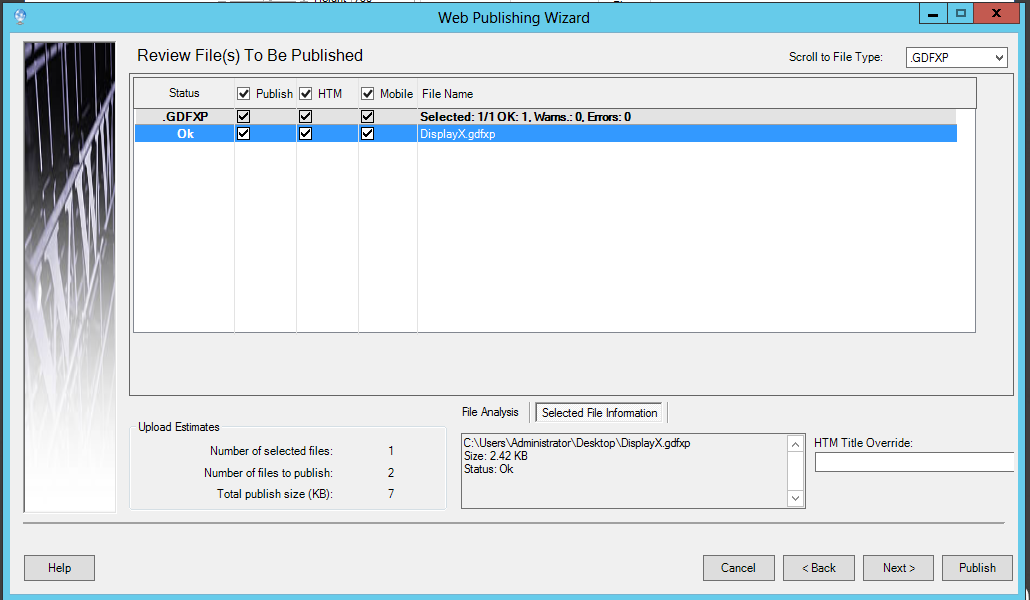
Click Next to proceed to the Review File(s) To Be Published section of the Web Publishing Wizard. Review the listed files. Use can use the pulldown menu in the top right of the Web Publishing Wizard to scroll to a particular file type, useful when there are multiple files to to be published.
Review File(s) To Be Published Section of the Web Publishing Wizard
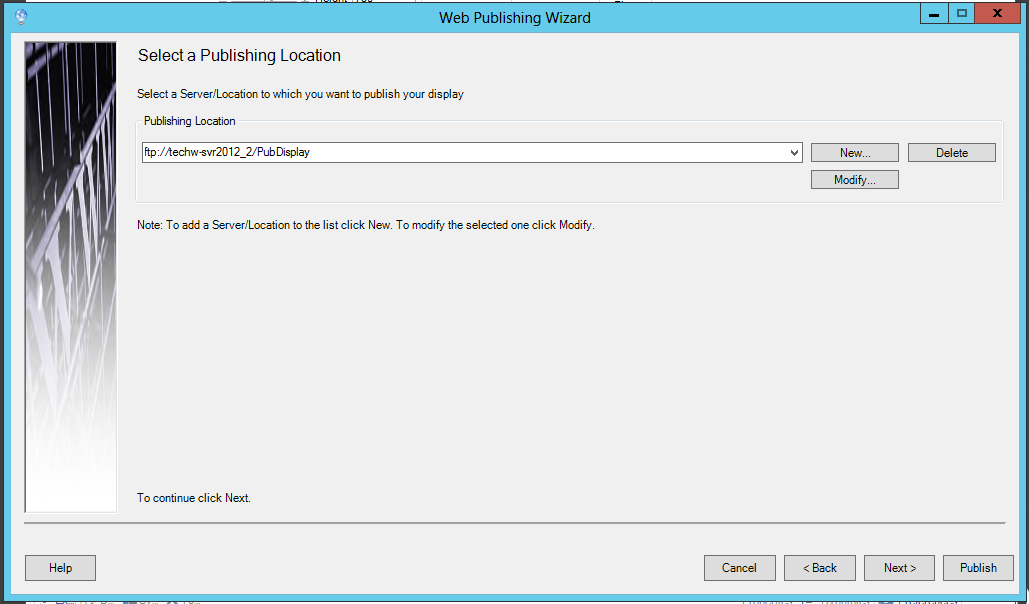
Click Next to proceed to the Select a Publishing Location section of the Web Publishing Wizard. Enter the information requested to access your Web Server.
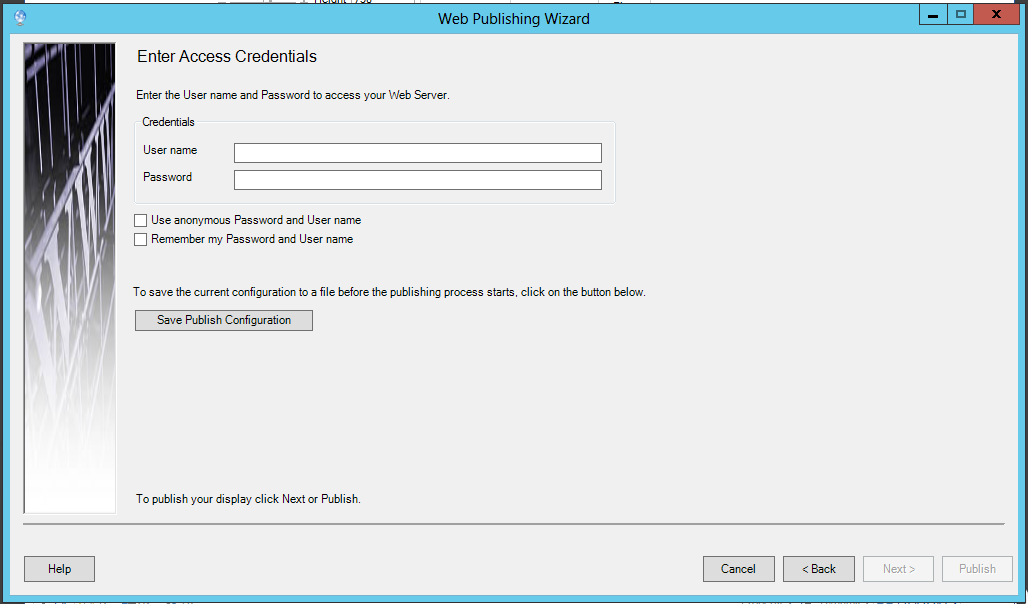
Click Next to proceed to the Enter Access Credentials section of the Web Publishing Wizard. Enter the information requested to access your Web Server. You will also have the option to Save Publish Configuration to a file before proceeding to web publishing.
Enter Access Credentials Section of the Web Publishing Wizard
Click Publish (or Next) to publish the selected files to the server. A message appears that the files have been published successfully to the server or provides information about any warnings or failures in the publishing process. You will also have the option to Save Publish Configuration.
Web Publishing Wizard - Publishing In Process
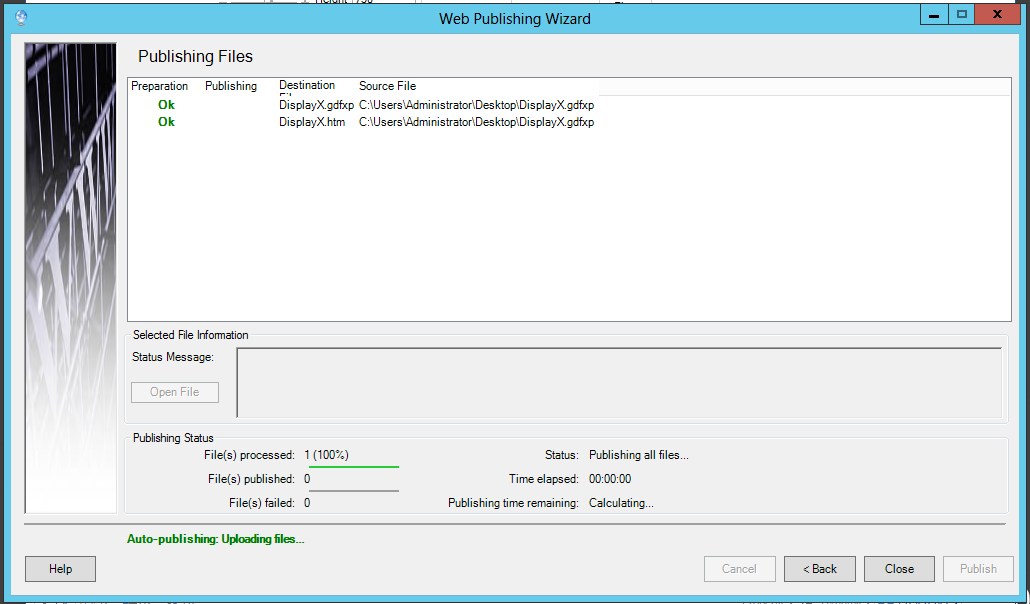
Click Close to close the Web Publishing Wizard. The selected page will appear as your default in MobileHMI.
See Also:
Downloading the Application from Windows Marketplace