|
|
The features on this page require a GENESIS64 Advanced license and are not available with GENESIS64 Basic SCADA . |

![]()
|
|
The features on this page require a GENESIS64 Advanced license and are not available with GENESIS64 Basic SCADA . |
![]()
When you install AlarmWorX64 , it creates a default SQL database for you to use. The Configurator provides a Configuration Database Wizard for creating new SQL Server and SQL Server Express configuration databases for AlarmWorX64 Server.
When you are creating a database for an Alarm Server, you can use an existing database as its basis or starting point if such a database already exists. To do this, you use the Import and Export features that are available in AlarmWorX64 Server. (For instructions, refer to Exporting and Importing AlarmWorX64 Server Components.) Otherwise, you must create the database from scratch.
To create a new database from scratch, follow these steps:
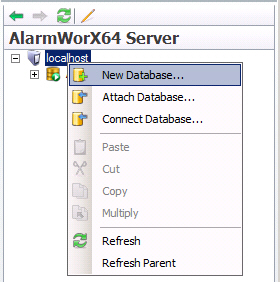
Right-click the database node, then select the New Database command from the context menu. Or, select the database node, then select the Database, New Database command from the Workbench Home ribbon. This launches a wizard.
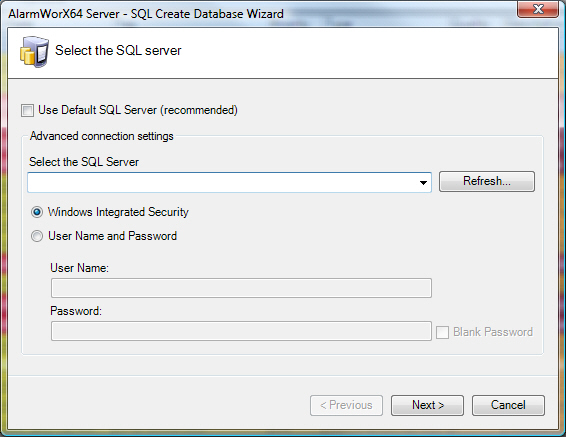
In the AlarmWorX64 Server - SQL Database Wizard Select the SQL Server step, select Use Default SQL Server (recommended) or deselect that option and Select the SQL Server from the drop-down list. If you select the Select the SQL Server you will need to select the security option for accessing the database either: Windows Integrated Security (which is recommended) or User Name and Password. If you choose User Name and Password enter the User Name: and Password: in the text boxes.
Click the Next button.
|
|
Note: Usually you have only one instance of SQL Server running on the local node. In this case, the drop-down list under SQL Server Name has only one option: localhost. However, it is possible to run multiple SQL Server instances on the local node, in which case the SQL Server field lists all those SQL Server instances: localhost for the default instance and Node_Name/Instance_Name for all others. The drop-down list may show SQL Server instances on other nodes as well. |
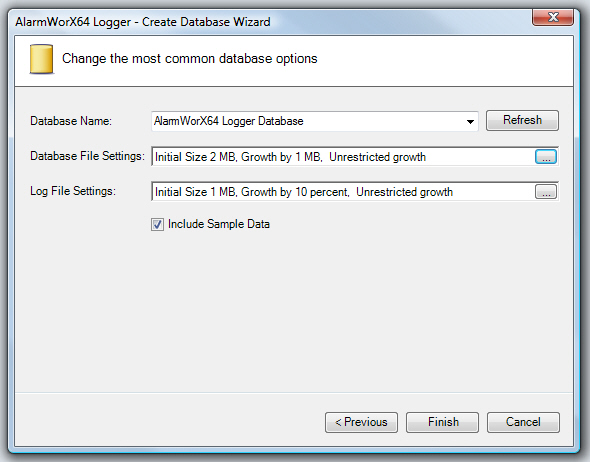
On the Change the Most Common Database Options step, click the Database Name field and edit the name of the database to the one you want to create.
To alter the size of the initial database file and log files as well as the manner in which they grow when filled, click the ellipsis button ![]() and select the method you desire. The file growth can be in terms of the number of megabytes added or a percentage of the file size; you can also specify the maximum size in MB or leave the maximum size unrestricted, if desired.
and select the method you desire. The file growth can be in terms of the number of megabytes added or a percentage of the file size; you can also specify the maximum size in MB or leave the maximum size unrestricted, if desired.
Click the Finish button.
AlarmWorX64 Server creates the new database file which should automatically appear in the tree control. If the database name does not appear within a few seconds, click the Refresh ![]() button to refresh the tree control.
button to refresh the tree control.
|
|
Note: There are several reasons why a database may not be created. If you do not have sufficient user privileges to create the SQL Server database, or if you have specified a database name that does not exist, then an error will occur. Check the user account and its privileges in the SQL Sever Management application you use (such as SQL Server Management Studio Express), as well as the existence, correct name and path to troubleshoot the issue. |
After a database is configured, you can attach it and make it active (as described in this topic, below) and define the alarm configuration where OPC alarm tags will be defined (refer to Database Configurations).
Only one database can be active at a time. Active databases have an icon with a green arrow ![]() ; while inactive databases have an icon with a red icon
; while inactive databases have an icon with a red icon ![]() .
.
To make a database active:
Right click the database name and select the Make Active command from the context menu.
When you attach a local database to the AlarmWorX64 Server it appears in the tree control where it is available to be used. You would need to make the database active to work with that database. If you want to move a database from one physical location to another, perhaps because it has run out of disk space, then you make an active database inactive and detach it. The act of attaching and detaching a database applies to local databases only. Since the Workbench is a distributed .NET Framework application what you see in the navigation tree control is populated by an IIS web service, which can be either local or remote. Similarly, the databases you see in the tree control can be either local or remote. Therefore you should only apply attach and detach to databases you know are local, and be able to specify exactly the server instance and local database you want to operate on.
|
|
Warning: Detaching a database can cause your applications to stop running. Be certain that you want to perform this operation and that you are detaching and attaching the correct local databases. |
To detach a local database:
Right click the database in the tree control that will be the active database, and then Make Active from the context menu, if necessary.
Right click the Database name in the tree control that you want to detach. The context menu will display.
Select Detach from the menu. The Detach Database confirmation message box displays.
Click Yes if the database named is the one you want to detach.
To attach a local database:
Right click the Database host (localhost). The context menu displays.
Select Attach Database... The AlarmWorX Server SQL Attach Database Wizard displays.
By default the Use Default SQL Server (recommended) is selected. If you want to use the Default option skip to step 5 otherwise deselect that option and continue to the next step.
Select the SQL Server from the drop down list. If you select the Select the SQL Server you will need to select the security option for accessing the database either: Windows Integrated Security (which is recommended) or User Name and Password. If you choose User Name and Password enter the User Name: and Password: in the text boxes.
Click the Next button.
Click the Ellipsis button at the end of the Database file to Attach box to locate the database. The Open database dialog box displays.
Locate and select the database you want to attach; then click the Open button.
Click the Finish button.
Right click the database and select Make Active from the context menu if you want to work with the database.