Connecting to Devices without Browsing Support
If a device does not fully support SNMP browsing (because of a different implementation) it is still possible to add the OIDs manually to SNMP Configurator. This topic describes how to setup SNMP devices that are not browseable using the Unified Data Browser. It also shows how to change the SNMP version manually, depending on the SNMP device version.
SNMP Service and PC Setup
Before you begin setting up SNMP devices in the ICONICS SNMP Configurator please follow the following steps to configure SNMP device that is not fully supported by Unified Data Browser for browsing.
- Install the SNMP Service to enable data gathering. For more details on how to setup SNMP Service, refer to the Setting up Windows to Support SNMP Connectivity topic.
- Set up the community on your device:
-
- public – read (e.g. for all in the subnet),
- private - read/write (for the specific IP).
- Launch the SNMP Configurator by going to Start > All Programs > ICONICS > Workbench.
- Once the Workbench opens, click on the “SNMP” button from the bottom tray of the Project Explorer.
-
There is a default configuration database. You can use this default or create a new configuration.
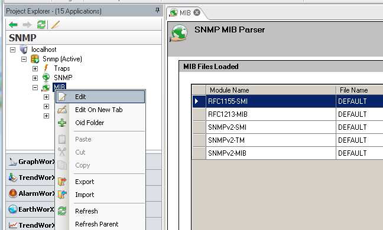
- Parse the MIB files that have been provided by your device vendor. Right-click on “MIB” in the Project Explorer and click on “Edit”.
Adding Custom MIB File to SNMP
-
You will MIB files load. Click on the “Add” button to the right and add files provided by your device vendor.
-
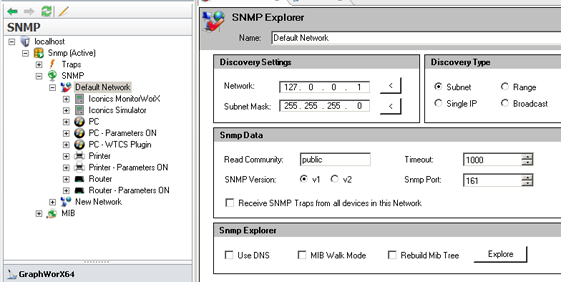
Check the SNMP version which is supported by the device and change it to the correct one in the SNMP Configurator, under SNMP > Default Network as shown below.
SNMP Version in SNMP Configurator
Using the Getif to Get OIDs Manually
If you are still not able to explore the device after setting the SNMP version, you need to add the OIDs to your SNMP Configurator manually.
Many utilities exist, but “Getif” is preferred for this purpose. You can download it from this site:
http://www.wtcs.org/snmp4tpc/getif.htm
Here are the steps on how to use the Getif utility to get and manually add the OID SNMP Configurator:
- Run the Getif utility from Start > Programs.
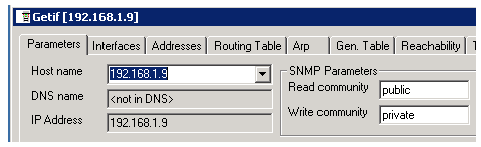
- Click on the Parameters tab, specify the Host name or IP address, and click on the Start button.
Host Name Tab in Getif Utility
- When you have the SysInfo variables from your device, navigate to the MBrowser tab.
- Browse for iso > org > dod > internet > mgmt (1.3.6.1) which is the root OID available on every SNMP device and try to resolve the data by clicking on Start. You should get results similar to the figure below.
Getting OIDs in MBrowser Tab of Getif Utility
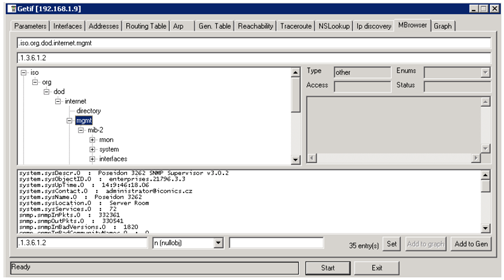
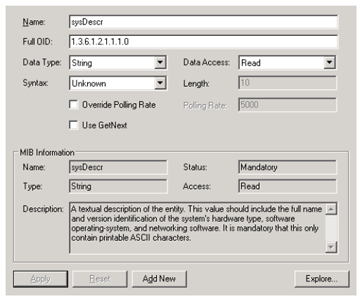
- Select the OID from the list (like sysDescr, which matches to 1.3.6.1.2.1.1.1) and copy this string to the clipboard by using CTRL+C. Don’t copy the “.” character from the beginning of the OID string.
- Switch back to the SNMP Configurator and create a new device by right-clicking on SNMP New Device.
- Specify the Name, Type and Host. Customize the Polling Rate (in sec.) depending on how often you want to poll the data.
- Create a folder structure if you need it and then select New Data Item and name it (e.g. sysDescr).
- Paste the OID to the Full OID field (e.g. 1.3.6.1.2.1.1.1).
- Select the Data Type (e.g. String), Data Access (e.g. read) and click Apply.
- You should now see the full MIB information like Name, Type, Status, Access and Description.
Data Item in SNMP Configurator
Test in GraphWorX64
Once you have successfully configured your device with the right IP and OID, you can confirm that the SNMP information is readable in GraphWorX32.
- Launch the GraphWorX64 by going to Start > Programs > ICONICS > GENESIS64 > GraphWorX64 > GraphWorX64.
- Click on Dynamics tab and add a new process point by clicking on the Process Point icon then drawing a process point on the canvas.
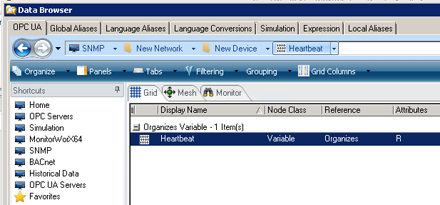
- Browse for the SNMP tag by clicking on the Data Source button.
- Click the SNMP tab in Unified Data Browser and browse for a Data Item that you just created in SNMP Configurator, then click OK.
Browsing for SNMP Data
- This GenBroker plug-in syntax will be used in the process point: @snmp64: @<device>\<folder>\<deviceitem>
- Click OK and go to runtime. You should now see the SNMP data on your display from the device.
