![]()
![]()
From time to time, you may need to move an ICONICS software license, such as when performing an upgrade to a new machine. This document will describe how to transfer a license using the ICONICS Web Licensing Utility.
If one or both of the machines does not have internet access you can still use the Web Licensing Utility. Simply perform the Web Licensing Utility steps on a machine that does have internet access. When asked to input your Site Key, Kill Code, and Site Code into the website you will need to write down those numbers and type them into the website manually instead of copying and pasting them. In the “Licensing Your New Machine” section you will need to download the GLIC file and use a transfer method (such as a USB stick) to move it to the destination machine.
"Killing" a license removes it from the software and credits the license to the website.
Select Software and log in with your email and password.
Once you have logged into the website, select the Kill License link at the top.
Open the ICONICS .NET License Utility (for 64-bit products or BizViz) or the Licensing32 License Utility (for GENESIS32).
In the ICONICS .NET License Utility, select thr Kill Current License button. In the Licensing32 License Utility, go to Actions > Authorize License and select Kill Current License.
A message will pop up asking you if you really want to kill the license. Select Yes.
You will see a License Killed confirmation dialog as shown in Figure 1.
Figure 1 - License Killed Dialog
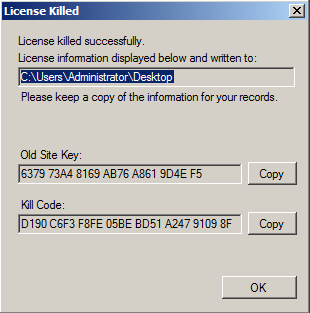
Copy the Old Site Key by selecting the Copy button next to it. Paste it into the Site Key field on the web page.
Copy the Kill Code by selecting the Copy button next to it. Paste it into the Kill Code field on the web page.
Once both fields are filled, select Remove Key on the website.
You will then get a message confirming that the license has been successfully removed. You will also receive an email with the killed license information.
IMPORTANT NOTE: The following steps assume that you are transferring a license to a machine that has no existing license. If your destination license already has a license and you would like to combine that with your transferred license, please see the application note entitled, Licensing – Using the ICONICS Web Licensing Utility for Software Key Licenses and follow the steps in the "Adding to an Existing Software License" section.
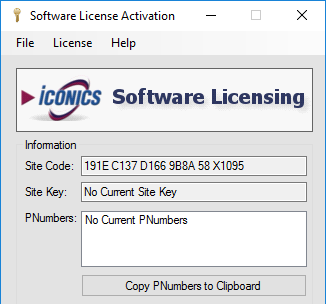
For 64-bit generation products (ICONICS Suite, GENESIS64, Hyper Historian, AnalytiX, or MobileHMI), on the machine where license will reside, open the ICONICS .NET License Utility.
You will see a dialog similar to Figure 2. Note the Site Code. We will need to enter this information into the web site later. You may leave this dialog open for later use.
Figure 2 – Software License Activation Utility
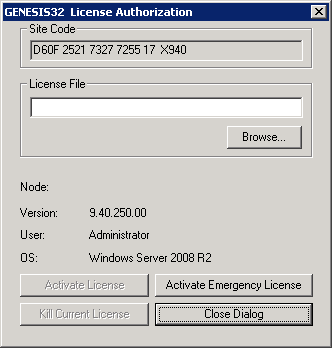
For GENESIS32, open the Licensing32 License Utility. Go to Actions > Authorize License. Note the Site Code. You will see a dialog similar to Figure 3. We will need to enter this information into the web site later. You may leave this dialog open for later use.
Figure 3 - GENESIS32 License Authorization
Select Software and log in with your email and password.
NOTE: If you do not have a login, you can register for one using the Create New Account link at the bottom. If you have forgotten your password, you can click on the Forgot Password link at the bottom.
Figure 4 – ICONICS Web Licensing Utility

Once you have logged into the website, select the New License link at the top.
Enter your Product Registration Number and Customer Key for the products. You may enter more than one set of numbers at a time.
NOTE: In case you do not already know your Product Registration Number and Customer Key you should have received this information in an email when you killed the license in the previous section.
Select Next once you have entered all of your Product Registration Numbers.
Choose an existing end user or enter new end user information. Select Next when done.
NOTE: The existing end user dialog may take a few moments to appear. Please be patient.
In the next screen, you will see a list of the products that are available for you to license. Check all the products that you would like to license on this machine. Select Next.
This page shows you a summary of what will be in your license. Check to make sure everything is correct, then select Generate Key. You should see a page similar to Figure 5.
Figure 5 – Generated License
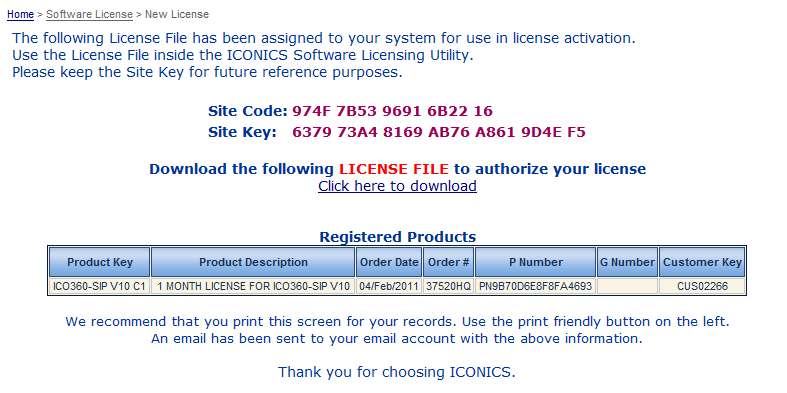
Select Click here to download to download the GLIC file and save it somewhere on your machine, such as your desktop. The exact location does not matter, as long as you will know where to find it for the next step.
NOTE: If you misplace the file after licensing it, you can use the View License link with your Product Registration Number to download it again. This link will also be emailed to you.
In the Software License Activation Utility or GENESIS32 License Authorization dialog, select Browse and look for the GLIC file that you downloaded in the previous step.
Once you have selected the file and the License File field shows the correct file path, select Activate License.
You should then receive a popup message indicating the status of the license activation. Select OK to close the dialog.
The License Utility should now show the current license information. At this point, your machine is licensed and ready to enter production.
NOTE: You may have noticed that the Site Code has changed. This is normal. The Site Code will change each time you activate, kill, or change your license.
See Also: