Using SMTP Server in IIS
With the SMTP mail agent, it is possible to install an SMTP server in IIS and send out your alarm notification via email using your local SMTP server. This topic walks through the necessary steps to configure your system to send and receive mail messages on your local machine using the SMTP server in IIS. Please note that it is up to you to set your SMTP server to allow emailing outside of your local machine; for more information, refer to the Multimedia Email Agents and Email Agent General Settings topics.
Installing SMTP Server
On most versions of Windows, you can install your own SMTP Server within IIS. The installation path is different for each version of windows. In general, you can find it in Add/Remove Components. For the simplicity, this topic covers only the installation of SMTP Server in Server 2008 64-bit. Note that IIS is automatically installed when you install GENESIS64 products, as it is one of the requirements.
- Go to Start -> Control Panel -> Programs and Features.
- Once the Programs and Features dialog opens, click on the “Turn Windows Feature On/Off” option on the left. This opens the “Server Manager” window.
Figure 1 - Windows Components Wizard: E-mail Services
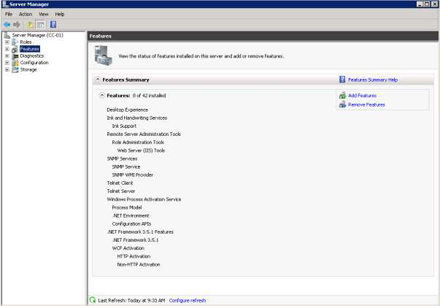
- Go to “Features” and select ‘Add Features’.
- In the “Add Feature Wizard”, select “SMTP Server”. If you don’t have the required roles yet to install this, a small window will ask if you want to install the required roles.
- The Add Features Wizard will then confirm your installation selections and you should see SMTP Server listed there. Click Install.
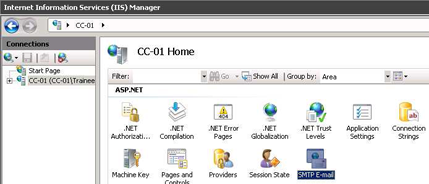
- Once the installation is finished, you can open the IIS Manager and see that it is installed.
Figure 2 - SMTP Server in IIS Manager
Setting up Pop3 Service (Windows Server 2003 64-bit Users, Only)
Note that Pop3 service is no longer supported in Windows Server 2008 or newer Server-class OS. You will need to use email client such as Outlook Express to receive emails in Server 2008. Follow these instructions only if you are using Windows Server 2003 64-bit.
To set up a POP3 server to receive emails from the Multimedia server:
- Go to Start -> Settings -> Control Panel -> Administrative Tools -> Services.
- In the Services Manager, look for a service named “Microsoft POP3 Service”.
- Once you find this service, look at the Startup Type. If it is set to Manual, double-click to bring up its properties and set the Startup Type to Automatic.
- Start this service if it is stopped and close the Services Manager.
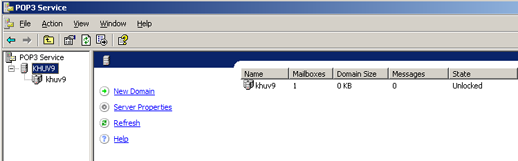
- Go to Start -> Settings -> Control Panel -> Administrative Tools -> POP3 Service.
- In the “POP3 Service” window, click on “New Domain” and give it a domain name in the popup dialog and click on “OK”.
Figure 3 - New Domain in POP3 Service
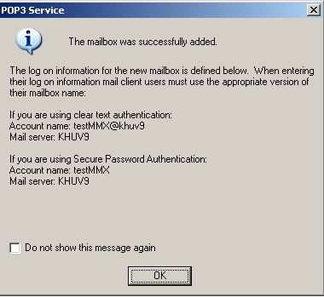
- Right-click on the new domain that you just created and select New -> Mailbox.
- Give the mailbox a name and a password and click on “OK”.
Figure 4 - New Mailbox in POP3 Service

- Once you are done, you should see a confirmation similar to the one in Figure 5. You may want to write down the email address for later reference.
Figure 5 - Mailbox Creation Confirmation
Testing Your SMTP Server
Before you test the SMTP Server with AlarmWorX Multimedia, you should test and make sure the SMTP server functions as expected with a mail client. In this section, you will set up Outlook as your client for a simple test.
- Go to Start -> All Programs -> Microsoft Office -> Microsoft Outlook 2007.
- If you have never setup Outlook before, the Internet Outlook 2007 Startup will come up. You can follow the on screen instructions to create an account.
- When it asks for your email address, you can use the email address that it gave you during your POP3 Service setup. If you do not have the POP3 service set up, you will need to use Exchange Server, Small Business Server, or other third party POP3 services, which will not be covered here.
- You can give the incoming and outgoing mail servers your computer name and click on “Next”.
Figure 6 - Configuring Outlook Express E-Mail Server
- Click on “Finish” in the next screen. We will now send an email to ourselves in outlook to make sure that its setup correctly.
- In Outlook, go to Tools -> Account Settings. In the E-Mail tab, select the account that you have just created and click on “Change”.
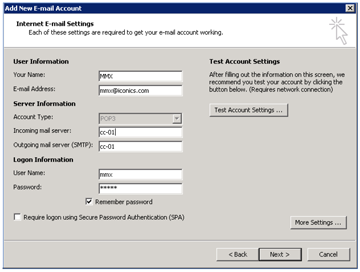
- It will open the email dialog and should similar to Figure 8.
- In Outlook, click on “New”. In the new message window, type in the email address that we just created (accountName@serverName).
- Send the email and look for it in your inbox.
Setting up AlarmWorX Multimedia
With the last test, you now know that emailing on the local server works. You can now set up AlarmWorX Multimedia to take advantage of your local SMTP server. Before you begin, make sure that UAC is turned off on your computer.
- Start AlarmWorX Multimedia configurator from Start -> Programs -> ICONICS AlarmWorX Multimedia -> Workbench.
- Once in the configurator, expand Alarm Configurations -> Multimedia Agents -> E-mail.
- On the right-hand pane, click on “General Settings…”.
- In the “ EmailCfg” dialog that appears, enter your computer name for the Mail Server in the SMTP section. Also enter your new email address and password and click “OK”.
Figure 7 - SMTP Setting in AlarmWorX Multimedia

- Right-click on E-mail and select New -> Multimedia Agent settings.
- Give this agent a name, a template (you can use the default Email), and the Sent To address (this should be the email address you created). Click on the “Apply” button to save the configuration.
- Once you have configured the agent, click on the “Test” button in the agent. You should then get a confirmation message.
NOTE: It is assumed that you are currently using the SMTP email agent. If that is not the case, you should switch to using the SMTP email agent to continue the test.
- You should then see a test email in Outlook.
You can now use your local SMTP server to send out emails alarm notifications.
See also:
Multimedia Email Agents
Email Agent General Settings