![]()
![]()
This topic describes how to configure a call-in agent. The steps provide an example to illustrate the process of setting up the following scenario:
When a user calls in, the Multimedia server picks up the phone and plays the Introduction Phrase. The server asks the user to enter his or her ID, then the server authenticates the user's entry against the Alias table. If the user's ID is authentic, the Multimedia server plays the Introduction Phrase of the options menu and makes the options available. Then, based on the user's key selection, the associated action happens.
Before you begin, you should make sure that UAC (User Account Control) is turned off on your computer. Also, note that default settings for the agent are set in the Telephony folder in the Multimedia Configurator. Refer to Telephony Agents for more information.
In the tree control on the left side of the Workbench, expand Alarm Configurations > Multimedia Agents > Telephony > Call-In Agent.
Right-click Call-In Agent and click Insert a New Call-In Menu group.
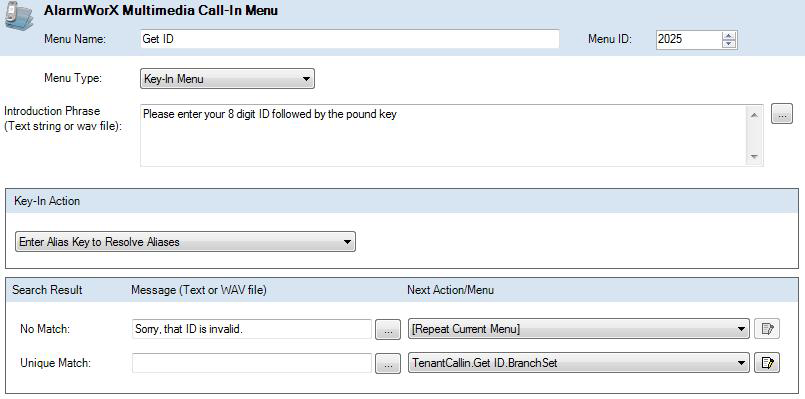
In the new Call-In group, add a Call-In menu. The AlarmWorX Multimedia Call-In Menu form appears. The following image shows a configuration of the call-in menu where a Key-In menu type is being defined. The Introduction Phrase will play when a user calls in to the Multimedia server.
Initial User ID Menu
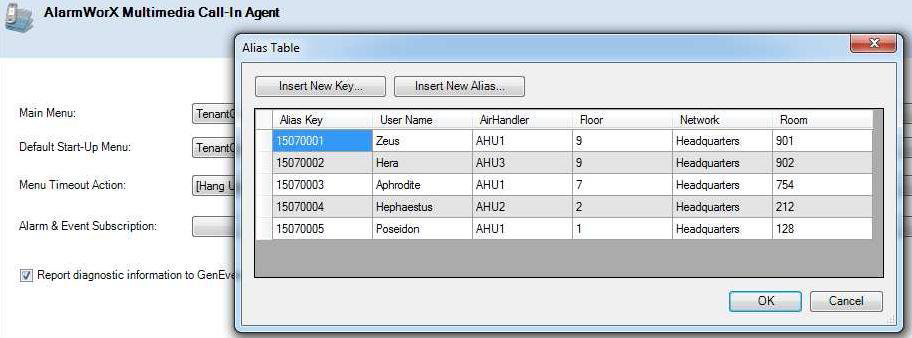
For the User IDs to be authenticated by the Multimedia server, an Alias File is provided. Configure the alias file by selecting Call-In Agent > Alias Table. The Alias Table dialog box, shown below, appears so you can configure aliases. Click OK when you are done.
Alias Table to Authenticate User IDs
With the alias table set up and the ID Code Menu in place, you can now designate this menu item to be the Main Menu, so that the Call-In agent starts off with this. Select the Call-In Agent, and on the Main Menu field select your ID menu.
Once a user enters his or her ID, the server authenticates the ID and then plays the menu that enables listening and acknowledging of the alarms. The next step is to create a main menu phrase.
Add a new Call-In menu and configure it as an Option Menu. An example is shown below.
Menu to Listen and Acknowledge Alarms

Make this new menu the default menu, so the user gets to the beginning of this menu as a default state under the Call- In agent. The Call-In agent is now configured and ready to be used.
|
|
Note: Call-In Agent Menu Templates MUST contain only Text-To-Speech. See Call-In Agent Menu Templates and Text-To-Speech. |
See also: