|
|
The features on this page require a GENESIS64 Advanced license and are not available with GENESIS64 Basic SCADA . |

![]()
|
|
The features on this page require a GENESIS64 Advanced license and are not available with GENESIS64 Basic SCADA . |
![]()
The Hyper Historian installation initializes the Node Setup and Redundancy configuration. Its default settings are for a non-redundant single workstation setup (that is, a non-redundant Hyper Historian Logger with one local Collector).
The Node Setup and Redundancy configuration forms are used to perform any of the following changes:
Change the name or description of a Collector or a Logger
Add or Delete Remote Collector(s) (Enterprise Edition)
Specify the redundancy settings for a Collector (Enterprise Edition)
Specify the redundancy settings for a Logging Server (Enterprise Edition)
Configure the memory cache size for each collector
NOTE: For additional information about Remote Collectors, refer to the Remote Collectors topic. For information about redundancy for OPC UA servers, refer to the Redundancy Setup Options in Hyper Historian topic.
To Configure Redundancy and Store-and-Forward Options for a Collector:
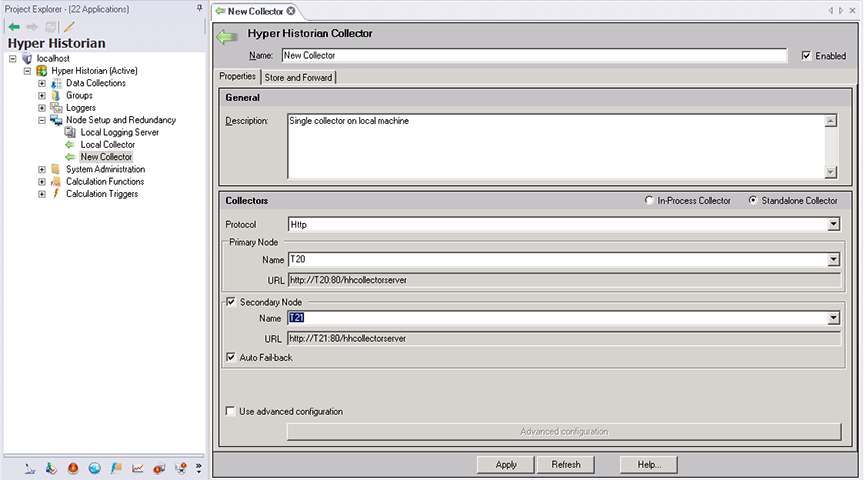
In the Hyper Historian provider's Project Explorer, expand the active Hyper Historian configuration database, then right-click Node Setup and Redundancy in the navigation tree and select Collector, or double-click an existing collector to edit it. The Hyper Historian Collector Form appears:
Hyper Historian Collector Form - Properties Tab
Enter the name for the Collector.
Ensure the Enabled check box is checked.
Enter a description, making it informative enough so that anyone maintaining the collector will understand its use.
Next, you select either In-Process Collector (to run the "local" collector) or Standalone Collector (to run the "remote" collector). Click the radio button next to your desired choice.
|
|
Note: Hyper Historian will not run with Standalone/Remote Collectors if used with a Standard License. Only users with an Enterprise License can use this type of collector. |
If you selected In-Process Collector, the local collector is used; you can go to step 8.
But if you selected Standalone Collector, now you must do the following:
Use the Protocol drop-down list to select either HTTP or TCP.
Enter a Name for the Primary Node or select one from the drop-down list. The URL field is pre-filled from your primary node selection.
You now have the option to click the check box next to Secondary Node to identify a backup node in case the primary node becomes unavailable. The following steps assume you have proceeded with configuring a backup node.
Enter a Name for the Secondary Node or select one from the drop-down list. The URL field is pre-filled from your backup node selection. (Alternatively, you can use the Advanced Configuration option at the bottom of the form to manually enter the URLs of the primary and secondary nodes. See step f. below.)
Click the check box next to Auto Fail-back if you want Hyper Historian to automatically switch from the backup (secondary) node to the primary node when the primary node becomes active again.
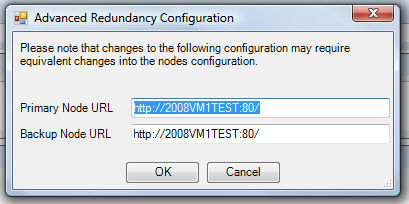
Click the check box next to Use advanced configuration to allow further configuration. Once the box is checked, click the Advanced Configuration button at the bottom of the window. This opens the Advanced Redundancy Configuration dialog box, which allows you to enter both the Primary Node URL and Back Node URL directly (rather than from the selection of the Primary/Backup Nodes in the main properties window). Note that changes to this configuration may require equivalent changes in the nodes configuration. Click OK to close the dialog box and proceed.
Go to the Store and Forward tab. The Store and Forward feature caches data if the connection to a collector is lost. When the connection to the collector is restored, the cache will be flushed, and the two (primary and secondary) databases will be automatically synchronized.
Hyper Historian Collector Form - Store and Forward Tab
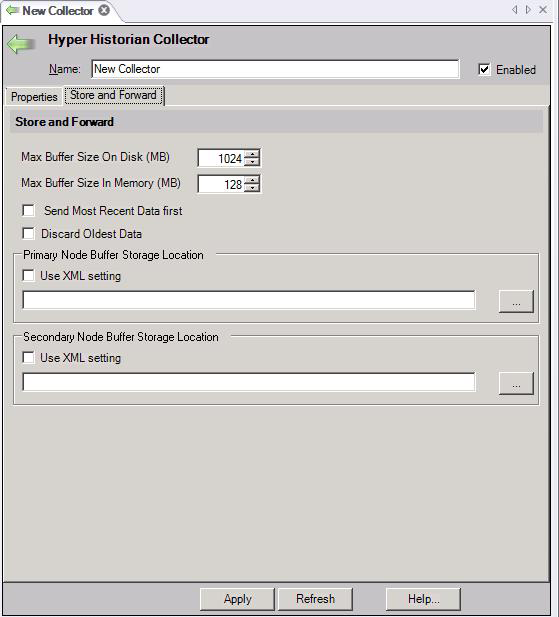
Enter your store and forward settings, which are:
The Maximum Buffer Size on Disk in megabytes
The Maximum Buffer Size in Memory in megabytes
If you want the most recently collected data to be stored and forwarded before all other data, click the check mark next to Send Most Recent Data first.
Check the Discard Oldest Data checkbox to discard the oldest data first; leave it empty to discard the newest data first (this is the default selection).
Specify the Buffer Storage Location for the Primary Node; this is the location where data will be queued for storage. You can click the ellipsis button [...] to select a folder of global settings from the Select Folder dialog box. Or you an use the settings define in an XML file by checking the XML Setting checkbox.
(Note that you can export setting to an XML file from any Hyper Historian configuration and make those settings available for other Hyper Historian configuration. For more information, refer to the Importing and Exporting Hyper Historian Configurations topic.
If you are using a Secondary Node, specify the Buffer Storage Location for it, too.
Click the Apply button to save your changes.
Note that, alternatively, you can import collector node configuration information from an Excel spreadsheet, an XML file, or a CSV file. For more information, refer to the Importing and Exporting Hyper Historian Configurations topic. Once imported, you can edit imported information as needed.
To Configure Redundancy and Store-and-Forward Options for the Logging Server:
In the Hyper Historian provider's Project Explorer, expand the active Hyper Historian configuration database, then expand Node Setup and Redundancy. Double-click the existing Logging Server. The Hyper Historian Logging Server Form appears:
Hyper Historian Logging Server Form
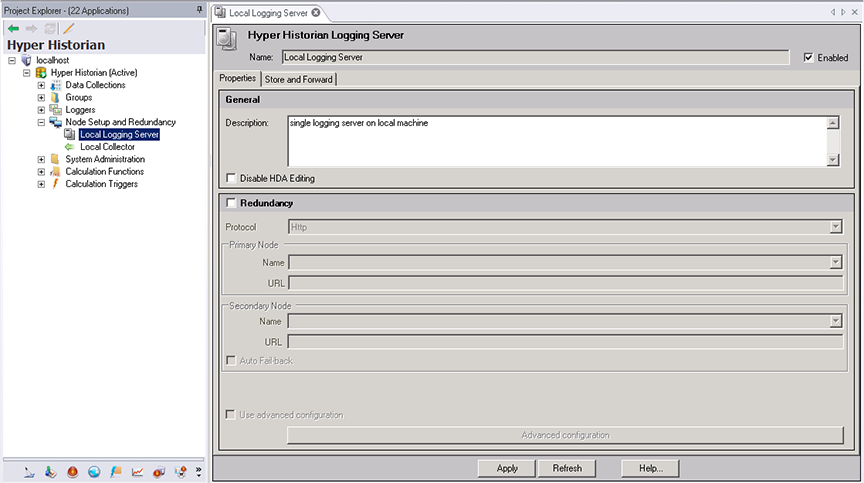
Edit the name for the Logging Server.
Ensure the Enabled check box is checked.
Enter the optional description in the top "General" section, if desired.
Optionally, to make the server's historical data read-only, put a check mark in the Disable HDA Editing check box. If you do this, you won't be able to edit any Historical data being logged on the server using any programmatic interfaces.
To use redundancy, click the check mark next to Redundancy to enable it, and follow these steps:
Use the Protocol drop-down list to select either HTTP or TCP.
Enter a Name for the Primary Node or select one from the drop-down list. The URL field is pre-filled from your primary node selection.
You now have the option to click the check box next to Secondary Node to identify a backup node in case the primary node becomes unavailable. The following steps assume you have proceeded with configuring a backup node.
Enter a Name for the Secondary Node or select one from the drop-down list. The URL field is pre-filled from your backup node selection. (Alternatively, you can use the Advanced Configuration option at the bottom of the form to manually enter the URLs of the primary and secondary nodes. See step f. below.)
Click the check box next to Auto Fail-back if you want Hyper Historian to automatically switch from the backup (secondary) node to the primary node when the primary node becomes active again.
Click the check box next to Use advanced configuration to allow further configuration. Once the box is checked, click the Advanced Configuration button at the bottom of the window. This opens the Advanced Redundancy Configuration dialog box, which allows you to enter both the Primary Node URL and Back Node URL directly (rather than from the selection of the Primary/Backup Nodes in the main properties window). Note that changes to this configuration may require equivalent changes in the nodes configuration. Click OK to close the dialog box and proceed.
Go to the Store and Forward tab. The Store and Forward feature caches data if the connection to a collector is lost. When the connection to the collector is restored, the cache will be flushed, and the two (primary and secondary) databases will be automatically synchronized.
Hyper Historian Logging Server Form - Store and Forward Tab
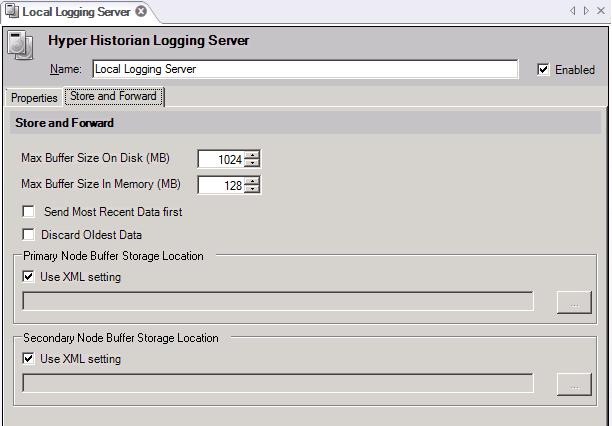
Enter your store and forward settings, which are:
The Maximum Buffer Size on Disk in megabytes
The Maximum Buffer Size in Memory in megabytes
If you want the most recently logged data to be stored and forwarded before all other data, click the check mark next to Send Most Recent Data first.
Check the Discard Oldest Data checkbox to discard the oldest data first; leave it empty to discard the newest data first (this is the default selection).
Specify the Buffer Storage Location for the Primary Node. You can use the node's XML Setting by checking the XML Setting checkbox; or you can leave the XML Setting checkbox unchecked and instead click the ellipsis button [...] to select a folder from the Select Folder dialog box.
If you are using a Secondary Node, specify the Buffer Storage Location for it, too.
Click the Apply button to save your changes.
Note that, alternatively, you can import logging server configuration information from an Excel spreadsheet, an XML file, or a CSV file. For more information, refer to the Importing and Exporting Hyper Historian Configurations topic. Once imported, you can edit imported information as needed.
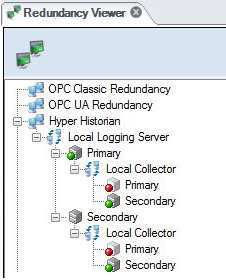
In the GENESIS64 Workbench, use the Redundancy Viewer (shown below) to see the status of your local logging server and its collectors. To see the viewer, from the File menu, select Tools > Redundancy.
In the example below:
Redundancy Viewer in the Workbench