![]()
![]()
To insert a Fault Viewer control into a display, begin by selecting the Controls tab. This will expose all of the available controls, including the Fault Viewer control.
GraphWorX Controls Ribbon

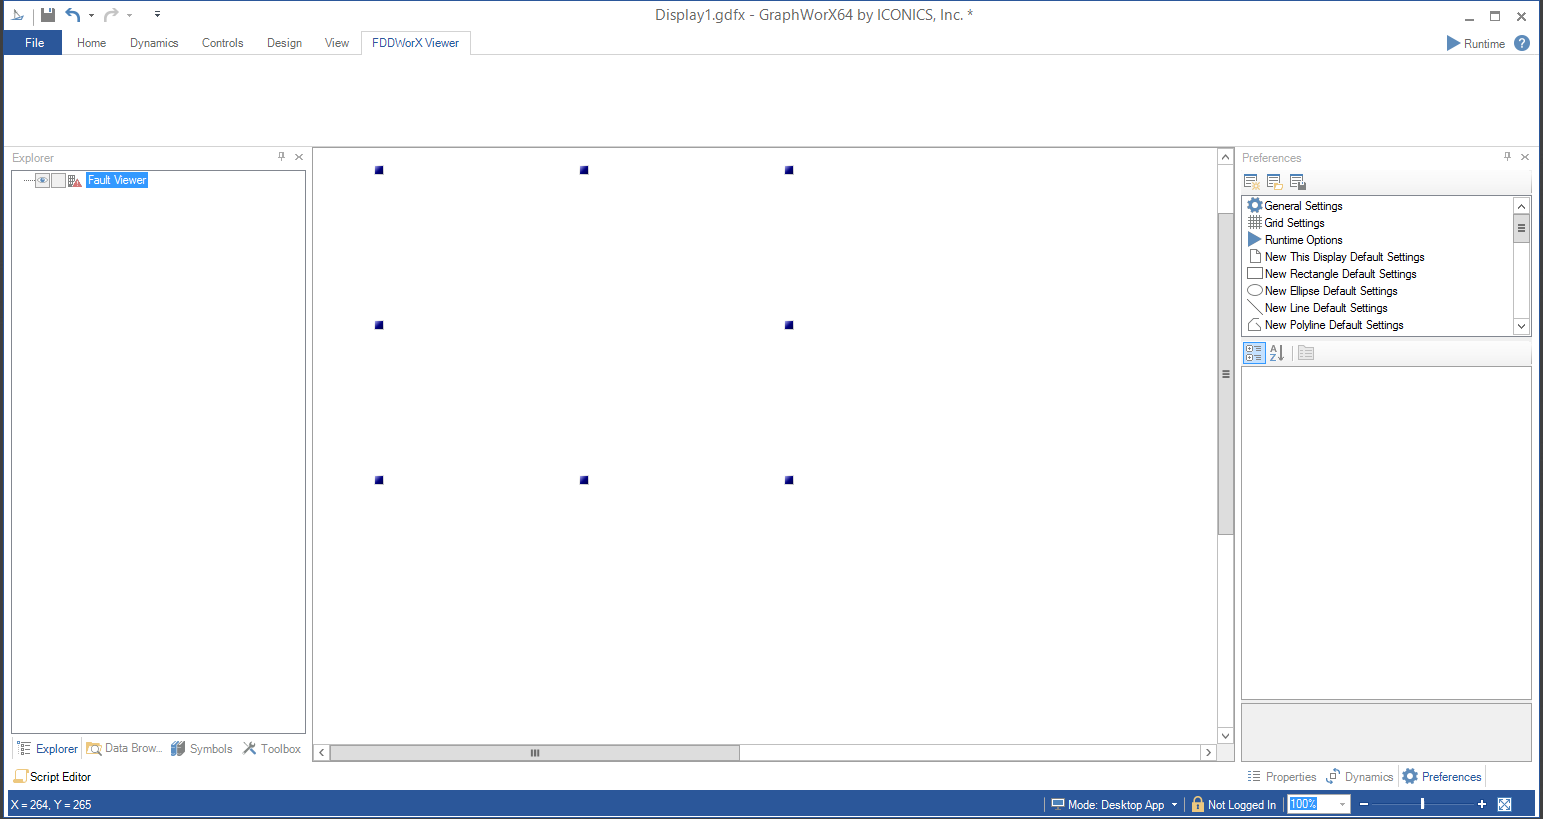
Selecting the Fault Viewer control option will transform the cursor into a cross. Use the cross to draw the desired size of the Fault Viewer control on the canvas. This will insert a Fault Viewer control onto the canvas.
Fault Viewer Control in a Display
Fault Viewer Ribbon

Fault Viewer
Configure - Opens the Configuration window.
Views - Select one of predefined views or create your custom view (Clean, Fault Statistics, Fault Incidents).
Include Child Assets - When the parent source is an asset, this returns also the faults on its child assets.
Read Time Range - Read the Time Range from specified data source.
Grid
Header/Subheader/Footer/Status Bar/Row Header - Enable to show these features in the grid.
Gridlines -Select displayed gridlines (None, Vertical, Horizontal, Both).
Selection
Write Selection - Enable to write selected row to configured datasource.
Write Data - The information about selected row that gets written to the datasource (Asset, Fault, Incident).
Style
Alternate Styling - Enables alternate background and foreground on every other row.
Style - Expand this section to select a theme from Light Themes, Dark Themes, Gray Themes, or Basic Themes (including Light Style [Default], Dark Style, or Custom Style).
The Fault Viewer control has a number of properties that can assist the user in customizing it. It can be accessed by double-clicking the drawn item within the canvas, as shown below.
Fault Viewer Configuration Window
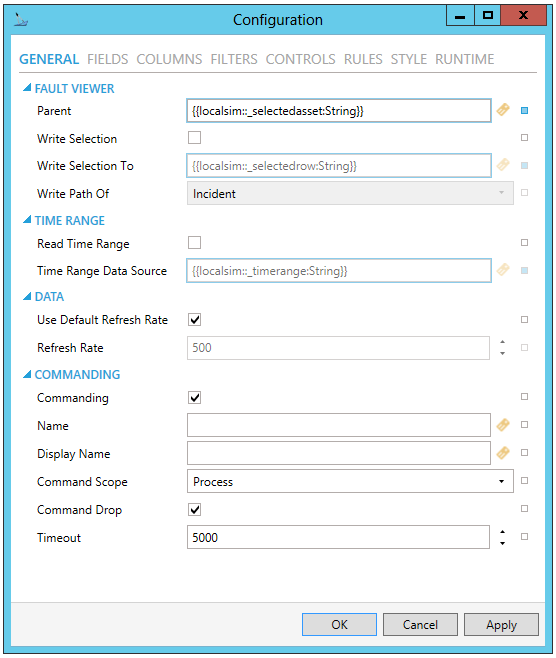
The following Properties can be set for the Fault Viewer control:
FAULT VIEWER
Parent - Enter a dynamic tag that will resolve into valid fault or asset path or enter this as a static path. Enter the tag in the text entry field or click on the  button to open the Data Browser and navigate to your selected dynamic tag. - Please note that Root Asset property in user's Security settings may cause the Parent to be looked up on a remote machine.
Include Child Assets - When the parent source is an asset, this returns also the faults on its child assets.
Write Selection - Enable to write selected row to configured datasource.
Write Selection To - (If enabled) Data source used for writing of selected fault. Enter a data source in the text entry field or click on the button to open the Data Browser and navigate to your selected data source.
Write Data - The information about selected row that gets written to the datasource.
Client-side caching - If enabled, raw data is cached on client to allow faster manipulation.
TIME RANGE
Read Time Range - Read the Time Range from specified data source.
Time Range Data Source - (If enabled) The data source that will be used to read the Time Range values. Enter a data source in the text entry field or click on the button to open the Data Browser and navigate to your selected data source.
Time Zone Alignment - Set to true to align the requested time range from other time zones to local time. This option doesn't affect the configured fields.
DATA
Use Default Refresh Rate - Use default refresh rate or refresh rate inherited from parent container.
Refresh Rate - Data refresh rate of data sources defined for properties, in milliseconds. Do not modify if you intend to use local variables for sharing data with other controls, e.g. selected asset or current time range. Enter the rate in the text entry field or use the up/down arrows.
Maximum Buffer Size -Maximum amount of samples each chart in this control can hold.
Maximum String Size - Maximum size of displayed strings.
COMMANDING
Commanding - Determines whether commands are enabled for this display. Use the CommandingName setting to specify a registration name. See Commanding for more info on setting Command properties in GraphWorX64.
Name - Name used for registering the control for commanding. Enter a name in the text entry field or click on the  button to open the Data Browser and navigate to your selected name.
Display Name - User friendly control name. Enter a display name in the text entry field or click on the button to open the Data Browser and navigate to your selected tag.
Command Scope - Indicates whether commands sent and received by this display affect the current process only (Process) or all processes that are currently open (Machine). For inter-process commanding, use the Machine option. Use the pulldown menu to select from either Process or Machine.
Command Drop - True to enable receiving commands by drag and drop.
Timeout - Timeout period in milliseconds for resolving command parameters and command execution. After this period, command will be cancelled. Enter a timeout in the text entry field or use the up/down arrows.
FIELDS
Fields - Collection of data fields used in this control. Click on the plus button [+] to add a field (of the same Fields type selected in the Fields section of the window), which you can then edit via the properties listed below. You can also remove a selected field via the minus button [-], move it up or down within a list of fields (via the up/down arrows) or duplicate it via the  button.
Data Column - Select a column that will be requested on the server. Use the pulldown menu to select from available column names associated with the selected Field. Available Data Columns can include Incident ID, Asset Icon, Asset Name, Asset Path, Fault ID, Fault Name, Fault Description, Active, Activation Time, Deactivation Time, Source Activation Time, Source Deactivation Time, Source Activation Time, Source Deactivation Time, Acknowledged, Resolved, Duration, Severity, Quality, Cost, Cost Info, Time Zone, Lost Opportunity, Timeline, Last Comment, Last Comment ID, Last Comment User, Last Comment Timestamp, Last Comment Origin, or Related Value (1-20).
Name - Unique name that is used to reference this field in configuration of columns, filters, context variables, etc.
Display Name - Display name that is used to reference this field in runtime configurations.
Data Type - The associated Data Type for the selected Data Column will appear here automatically.
Group By - Group items by values in this field.
Linked Aggregate - Allows to specify another field that will be used for aggregation. Supported aggregates are Min and Max and supported type is only DateTime for now.
Aggregate - If Aggregate By is not selected, this is the Aggregate used when the field is in an aggregated view. Use the pulldown menu to select from associated aggregate types depending on the selected Column and Data Type.
Sort - Use the pulldown menu to set a sort of None, Ascending, or Descending.
GRID COLUMNS
Edit Columns - Edit visible columns. Click on the plus button [+] to add an Unnamed column, which you can then edit via the properties listed below. You can also remove a selected column via the minus button [-], move it up or down within a list of columns (via the up/down arrows) or duplicate it via the button.
Field - Select a field from the list of configured fields to be displayed. Use the pulldown menu to select from listed Fields. The Column Field has be set to one of the Fields configured in this control.
Content Type - The Content Type will automatically be determined by the selection of the Field. Use the pulldown menu to select a content type (Text, DataSource, MicroChart, Icon, Button, Hyperlink and Image Button). The available Content Types listed will be based on the selected field.
Expression Formatting - Check to format the cell values using an expression.
Display Name - Name of this column visible in header in runtime.
Automatic Width - True to automatically expand the width of this column based on its content.
Width - Sets the width of the column. When activated, enter a width in the text entry field or use the up/down arrows.
Minimum Width - Sets the minimal allowed width of the column. Enter a minimum width in the text entry field or use the up/down arrows.
Text Alignment - Select (via button) the text alignment from Left, Center, Right, or Justified.
Margin - Inner margin of cells in this column.
Visibility - Uncheck to hide this column from view. Can be toggled using the Set Visibility command.
Styling Rules - Configure rules for dynamic styling. Click on the plus button [+] to add a Styling Rule. You can also remove a Styling Rule via the minus button [-], move it up or down within a list of styling rules (via the up/down arrows) or duplicate it via the button.
Name - Name of the Styling Rule. Configuration-only property to easily distinguish the rule in the collection. Enter a name in the text entry field.
Condition - Configure the expression that serves as a condition for this rule. Use @@self as alias for current asset to access its properties. Enter the Condition in the text entry field or click on the  button to open the Expression Editor. The Condition field is required.
Background - Background color, gradient or pattern of this object. You can enter a color code (if known) in the text entry field or click on the  button to open the Brush Picker window and set the properties for your background.
Foreground - Foreground color, gradient or pattern of this object. You can enter a color code (if known) in the text entry field or click on the button to open the Brush Picker window and set the properties for your foreground.
DATA
Page Size - Enter the number of rows per page in the text entry field or use the up/down arrow buttons.
Incremental Loading - Enables loading of next page when scrolling reaches the bottom of the scrollable area.
Show Pager - Enables or disables pager when incremental loading is off.
STYLING RULES
Styling Rules - Configure rules for dynamic styling. Click on the plus button [+] to add a Styling Rule. You can also remove a Styling Rule via the minus button [-], move it up or down within a list of styling rules (via the up/down arrows) or duplicate it via the button.
Name - Name of the Styling Rule. Configuration-only property to easily distinguish the rule in the collection. Enter a name in the text entry field.
Condition - Configure the expression that serves as a condition for this rule. Use @@self as alias for current asset to access its properties. Enter the Condition in the text entry field or click on the button to open the Expression Editor. The Condition field is required.
Background - Background color, gradient or pattern of this object. You can enter a color code (if known) in the text entry field or click on the button to open the Brush Picker window and set the properties for your background.
Foreground - Foreground color, gradient or pattern of this object. You can enter a color code (if known) in the text entry field or click on the button to open the Brush Picker window and set the properties for your foreground.
Configure rules for filtering. Click on the plus button [+] to add a rule, which you can then edit via the properties listed below. You can also remove a selected rule via the minus button [-], move it up or down within a list of rules (via the up/down arrows) or duplicate it via the button.
Name - Enter a filter name in the text entry field.
Enabled - Click the heckbox to enable the selected filter.
Expressions - Click on the plus button [+] to add a filter expression. The expression can be either Field Comparison or Custom Expression. You can combine both types of filter expressions in a single filter. You can then edit the expressions via the properties listed below. You can also remove a selected filter expression via the minus button [-], move it up or down within a list of filter expressions (via the up/down arrows) or or duplicate it via the button.
Field Comparison - This type of filter expression compares a selected Field to a static or dynamic value.
And/Or - After adding an initial filter expression, you can edit the filter expression further by selecting And/Or from an activated pulldown menu.
Field - Use the pulldown menu to select a field to use for the filter expression.
Operator - Use the pulldown menu to select an Operator from the list including: Less Than, LessThanOrEqual, Equal, NotEqual, GreaterThanOrEqual, StartsWith, EndsWith, Contains, DoesNotContain, or ContainedIn.
Value - Enter a value to filter by in the text entry field or click on the button to open the Data Browser and navigate to your selected Value.
Custom Expression - This type of filter expression offers more options and possibilities than Field Comparison, but it has to be built from the group up, using the expression editor. These expressions offer a limited subset of functions. The functions that are not offered in the editor (but that are available in generic ICONICS expressions) will not work.
Context variables are necessary for using Field values, for example if somebody wants to compare the values of two Field expressions.
Configurable Comments - Select to allow configuration of predefined comments and display them in comment-related dialogs.
Users can configure a predefined list of comments that the user can choose from when commenting on a fault. To configure the predefined comments, check the Configurable Comments box, then use the Add button to add a new comment. Each configured comment must have a Display Name, which is the text that will be displayed when the user is choosing, and a Comment, which is the actual text that will be used in the comment. Both the Display Name and Comment fields support aliases and expressions. In runtime, when this option is enabled, the Add Comment dialog includes a new dropdown box called Select Comment. The user can optionally choose a predefined comment from this list, and it replaces the text in the Comment field. The user can then further modify the comment before submitting, if needed.
DIALOGS
Show Current User - Enables showing of current user in dialogs for FDD operations (Comments, Acknowledge, Resolve, Deactivate).
Allow Custom User - Allows the user to enter a custom user name when he's not logged in as a Security User.
HEADER
Show - True to show header of the grid.
Options - Configure runtime features of grid header. Options include [Allow reordering columns by drag&drop in grid header; Allow resizing columns in grid header using column splitters; Allow sorting by clicking on grid header and show sorting options in grid header menu; Show filtering options in grid header menu; and Show grouping options in grid header menu.]
Background - Background brush of grid header. You can enter a color code (if known) in the text entry field or click on the button to open the Brush Picker window and set the properties for your background.
Foreground - Foreground brush of grid header. You can enter a color code (if known) in the text entry field or click on the button to open the Brush Picker window and set the properties for your foreground.
Border - Border brush of grid header. You can enter a color code (if known) in the text entry field or click on the button to open the Brush Picker window and set the properties for your border.
Border Thickness - Border thickness of grid header. Enter a thickness in the text entry field.
Font Family - Specifies the name of the font used to render text in the header.
Size - Specifies the size of the font used to render text in the header.
Italic - Specifies the style of the font used to render text (italic) in the header.
Bold - Specifies the thickness of the font used to render text (bold) in the header.
Stretch - Specifies whether the header font appears with a typical width (Normal), narrower than usual (Condensed), or wider than usual (Expanded).
SUBHEADER
Subheader - Check to show subheader with chart axis.
Background - Background brush of grid subheader.
Foreground - Foreground brush of grid subheader.
Border - Border brush of grid subheader.
Border Thickness - Border thickness of grid subheader.
HORIZONTAL GRIDLINES
Show - True to show horizontal grid lines, otherwise false.
Color - Color of horizontal grid lines. You can enter a color code (if known) in the text entry field or click on the button to open the Brush Picker window and set the properties for your horizontal gridlines.
Thickness - Thickness of horizontal gridlines. Enter a thickness in the text entry field.
VERTICAL GRIDLINES
Show - True to show vertical grid lines, otherwise false.
Color - Color of horizontal grid lines. You can enter a color code (if known) in the text entry field or click on the button to open the Brush Picker window and set the properties for your vertical gridlines.
Thickness - Thickness of vertical gridlines. Enter a thickness in the text entry field.
SELECTION
Multiple Selection - Enables multi-selection in the table. Multiple rows can be selected using Ctrl and Shift keys.
MouseOver Background - Background of item under mouse cursor. You can enter a color code (if known) in the text entry field or click on the button to open the Brush Picker window and set the properties for your mouseover background.
MouseOver Foreground - Foreground of item under mouse cursor. You can enter a color code (if known) in the text entry field or click on the button to open the Brush Picker window and set the properties for your mouseover foreground.
MouseOver Border - Border of item under mouse cursor. You can enter a color code (if known) in the text entry field or click on the button to open the Brush Picker window and set the properties for your mouseover border.
Selection Background - Background brush of selected item. You can enter a color code (if known) in the text entry field or click on the button to open the Brush Picker window and set the properties for your selection background.
Selection Foreground - Foreground brush of selected item. You can enter a color code (if known) in the text entry field or click on the button to open the Brush Picker window and set the properties for your selection foreground.
Selection Border - Border brush of selected item. You can enter a color code (if known) in the text entry field or click on the button to open the Brush Picker window and set the properties for your selection border.
Item Border Thickness - Border thickness of items. Enter a thickness in the text entry field.
STYLE
Background - Background color, gradient or pattern of this object. You can enter a color code (if known) in the text entry field or click on the button to open the Brush Picker window and set the properties for your background.
Foreground - Foreground color, gradient or pattern of this object. You can enter a color code (if known) in the text entry field or click on the button to open the Brush Picker window and set the properties for your foreround.
Border - Color, gradient, or pattern of the border surrounding this object. You can enter a color code (if known) in the text entry field or click on the button to open the Brush Picker window and set the properties for your border.
Border thickness - Width of the border surrounding this object. Enter a thickness in the text entry field.
Alternate Styling - Enables alternate styling applied to every other row.
Alternate Background - Background applied to every other row if Alternate Styling is enabled. You can enter a color code (if known) in the text entry field or click on the button to open the Brush Picker window and set the properties for your background.
Alternate Foreground - Foreground applied to every other row if Alternate Styling is enabled. You can enter a color code (if known) in the text entry field or click on the button to open the Brush Picker window and set the properties for your foreground.
FONT
Font Family - Specifies the name of the font used to render text. Use the pulldown menu to select from installed fonts.
Size - Specifies the size of the font used to render text. Enter a font size in the text entry field or use the up/down buttons.
Italic - Specifies the style of the font used to render text (italic). Select "N" for Normal or "I" for Italic.
Bold - Specifies the thickness of the font used to render text (bold) Select "N" for Normal or "B" for Bold.
Stretch - Specifies whether a font appears with a typical width (Normal) narrower than usual (Condensed), or wider than usual (Expanded). Use the pulldown menu to make your selection.
CHILD CONTROLS STYLE
Background - Background brush of child controls. You can enter a color code (if known) in the text entry field or click on the button to open the Brush Picker window and set the properties for your background.
Foreground - Foreground brush of child controls. You can enter a color code (if known) in the text entry field or click on the button to open the Brush Picker window and set the properties for your foreground.
Border - Border brush of child controls. You can enter a color code (if known) in the text entry field or click on the button to open the Brush Picker window and set the properties for your border.
Border Thickness - Border thickness of child controls. Enter a thickness in the text entry field.
MouseOver Background - Background brush of child controls under mouse cursor. You can enter a color code (if known) in the text entry field or click on the button to open the Brush Picker window and set the properties for your mouseover background.
MouseOver Foreground - Foreground brush of child controls under mouse cursor. You can enter a color code (if known) in the text entry field or click on the button to open the Brush Picker window and set the properties for your mouseover foreground.
MouseOver Border - Border brush of child controls under mouse cursor. You can enter a color code (if known) in the text entry field or click on the button to open the Brush Picker window and set the properties for your mouseover border.
Selection Background - Background brush of selected child controls. You can enter a color code (if known) in the text entry field or click on the button to open the Brush Picker window and set the properties for your selection background.
Selection Foreground - Foreground brush of selected child controls. You can enter a color code (if known) in the text entry field or click on the button to open the Brush Picker window and set the properties for your selection foreground.
Selection Border - Border brush of selected child controls. You can enter a color code (if known) in the text entry field or click on the button to open the Brush Picker window and set the properties for your selection border.
Window Background - Background brush of child control windows. You can enter a color code (if known) in the text entry field or click on the button to open the Brush Picker window and set the properties for your background of child control windows.
Window Foreground - Foreground brush of child control windows. You can enter a color code (if known) in the text entry field or click on the button to open the Brush Picker window and set the properties for your foreground of child control windows.
Window Border - Border brush of child control windows. You can enter a color code (if known) in the text entry field or click on the button to open the Brush Picker window and set the properties for your border of child control windows.
Hyperlink - Foreground brush of hyperlinks.
Hyperlink MouseOver - MouseOver foreground brush of hyperlinks.
Hyperlink Underline - True to show underline for the hyperlink text.
CONTEXT MENU
Enable - True to enable context menu on right click.
Tooltips - Enables tooltips on hover in context menu items.
Invalid Menu Items - Display mode for context menu items that are invalid (e.g. no command target).
Group - Select context menu group for editing. Use the pulldown menu to select from Table Control or Table Row.
Items - Allows users to add items to a collection based on the selected Context Menu Group. Click on the plus sign [+] to add an item to the list. Click on the minus sign [-] to remove a listed item. Click on the up arrow to move a selected item higher in the list. Click on the down arrow to move a selected item lower in the list. Click on the  button to duplicate a selected entry in the list.
Table Control
Separator - Horizontal separator to separate groups of context menu items.
Custom Command - Custom command that can be configured to run any command with custom parameters.
Command - Use the pulldown menu to select the Command you wish to include as a Context Menu Item. Click HERE for more info on Commands in GraphWorX64.
Set Runtime Filter - Action that allows configuration of one runtime-only filter.
Add Comment - Action to add comment to single or multiple incidents. Requires IncidentID field.
Acknowledge Incidents - Action to acknowledge single or multiple incidents. Requires IncidentID field.
Resolve Incidents - Action to resolve single or multiple incidents. Requires IncidentID field.
Deactivate Incidents - Action to set single or multiple incidents to inactive. Requires IncidentID field.
Copy from - This selection gives you the option of copying all applicable items from your selected Context Menu Group.
Table Row
Separator - Horizontal separator to separate groups of context menu items.
Custom Command - Custom command that can be configured to run any command with custom parameters.
Command - Use the pulldown menu to select the Command you wish to include as a Context Menu Item. Click HERE for more info on Commands in GraphWorX64.
Add Comment - Action to add comment to single or multiple incidents. Requires IncidentID field.
Acknowledge Incidents - Action to acknowledge single or multiple incidents. Requires IncidentID field.
Resolve Incidents - Action to resolve single or multiple incidents. Requires IncidentID field.
Deactivate Incidents - Action to set single or multiple incidents to inactive. Requires IncidentID field.
Copy from - This selection gives you the option of copying all applicable items from your selected Context Menu Group.
Display Name - Set the name displayed in configuration collection. Enter a Display Name in the text entry field. Click on the  button to open the Data Browser to set any required Language Alias. You can also click on the
  button to reset the current setting.
Description - Set the description displayed in tooltip in configuration collection. Enter a Description in the text entry field. Click on the button to open the Data Browser to set any required Language Alias. You can also click on the button to reset the current setting.
COMMANDS ON EVENTS
The Fault History control is one of many controls that now supports executing commands on events. These events vary per control, but for the Fault History control, they include:
Busy
Ready
Row Click
Row Selected
Started
To configure the command to be executed when this event occurs, go to Runtime tab. Find the Commands on Events section, check Enable Commands on Events, then configure the form below.
Enable - True to enable configuring actions and commands for control events.
Event - Select a control event and configure actions to fire when the event occurs. Use the pulldown menu to select from Asset Clicked, Asset Selected, Ready, or Started.
Commands - List of actions to perform when selected control event occurs. Click on the plus sign [+] to add an item to the list. Click on the minus sign [-] to remove a listed item. Click on the up arrow to move a selected item higher in the list. Click on the down arrow to move a selected item lower in the list. Click on the button to duplicate a selected entry in the list. For any Custom Command selected in the list, you can then select a specific Command and then complete the associated properties for that command. Click HERE for more info on Commands in GraphWorX64.
Click on the Apply button to save your recently made settings. Click OK to close the Configuration window and return to GraphWorX64 display configuration.
You can use the Query Interface by many controls that display datasets, such as the Fault Viewer.
The Query Interface is an ICONICS protocol for retrieving datasets. You can use it if you want to modify the original dataset, such as if you sort, calculate aggregates, or if you want to display only a subset of the columns.
The Query Interface allows the server to process those modifications more efficiently before you send the data to your client.
If you want to see data from the Hyper Alarm Logger in the table control,
1) Configure the table control.
2) For Query, select type.
3) For Data Source, browse under Alarms and Notifications > Hyper Alarm Logger Query Interface and select .Query.
4) For Table, select the desired Hyper Alarm Logger collection.
5) Go to the Fields page
6) Select the refresh ![]() button.
button.
7) Go to the Columns page.
8) Select the refresh ![]() button.
button.
9) Make further updates to Fields or Columns as desired.
10) Select OK.
11) Go into runtime to see your data.
See Also:
Controls Ribbon in GraphWorX 2D