|
|
The features on this page require an add-on to work with GENESIS64 Basic SCADA. |

![]()
|
|
The features on this page require an add-on to work with GENESIS64 Basic SCADA. |
![]()
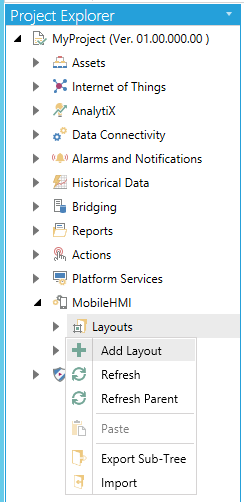
To Create a New Layout:
Expand the MobileHMI node in the Project Explorer to reveal the Layouts branch. Right-click on the Layouts branch within the MobileHMI provider (in the Project Explorer) in the Workbench and then on Add Layout, as shown below:
Adding a Layout from the Project Explorer in the Workbench
-OR-
You can also add a layout by clicking on the Layouts branch and then clicking on the Add Layout button (as shown below) in the Edit section of the Home ribbon at the top of the Workbench window.
Add Layout Button
![]()
This will open the Layout properties window, as shown below.
Layout Properties Window
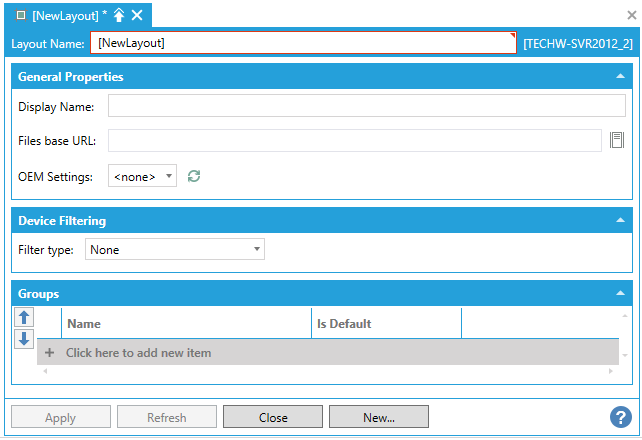
You will need to provide a name for this particular layout, and can then proceed to filling out the General Properties, Device Filtering and Groups sections of the Layout properties.
In the General Properties section, you can provide a Display Name - either similar to or distinct from the Layout name.
Next, you can provide the folder location in the Files base URL text entry field (as shown below) for your intended files created from ICONICS mobile display-compatible components (GraphWorX64, TrendWorX64, AlarmWorX64, etc.).
Files base URL Text Entry Field with Highlighted Example Folder Location
![]()
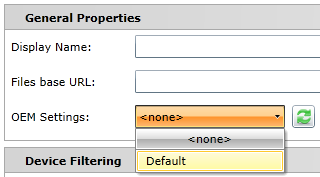
For those who wish to change ICONICS product branding and nomenclature for OEM purposes, you can use the OEM Settings pulldown menu to select a pre-specified setting. Upon installation of MobileHMI, the single existing selection within the pulldown menu is for 'Default', which uses an Application Title of "MobileHMI" and no replacement Application Icon. You can create your own settings via the OEM Settings sub-branch within the Configuration branch of the MobileHMI Provider's Project Explorer in the Workbench.
Selecting OEM Settings via the Pulldown Menu
In the Device Filtering section, you can set a filter to ensure compatibility with a selected device/device type. The Filter type pulldown menu options include None, Common Filter, Specific Devices and Custom Filter.
Filter type Pulldown with No Filter Selected

Selecting Common Filter adds the Filter pulldown menu to the Device Filtering section. You can choose from <No Filter>, Tablet, Phone, 16:9 Tablet, 4:3 Tablet, Windows Tablet, Windows Phone, Apple iPad, Apple iPhone, Android Tablet and Android Phone.
Common Filter Type with 'Tablet' Filter

Selecting Specific Device adds the Device pulldown menu to the Device Filtering section. You can choose from any device that you add to the Devices sub-branch beneath the Configuration branch in the MobileHMI provider's project explorer. Some devices will appear by default upon installation of MobileHMI.
Specific Device Filter Type with 'Microsoft Surface Pro' Device

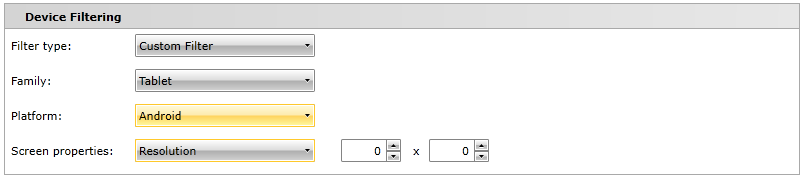
Selecting Custom Filter adds a Family pulldown menu (where you can select from No Filter, Tablet or Phone), a Platform pulldown menu (where you can select from No Filter, Windows, iOS or Android), and a Screen properties pulldown menu. The Screen properties pulldown menu allows you to set either the Resolution or Aspect Ratio via the context-sensitive text entry fields or up/down arrows to the right of the pulldown.
Custom Filter Filter Type with Tablet Family, Android Platform and Resolution Screen Properties
Groups Section of the Layout Properties

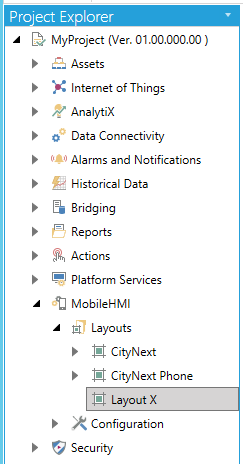
Once you have completed making your changes to the Layout Properties, click on the Apply & Close button at the bottom of the screen. Your new layout will now appear within the Layouts branch in the MobileHMI provider's project explorer, as shown below.
New Layout Added to MobileHMI Provider
See Also: