Setting Default FrameWorX Server Locations
To make the FrameWorX Server remote (and optionally redundant), use FrameWorX Server setup tool from Workbench Tools:
-
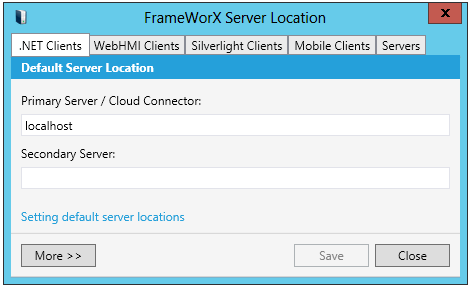
Open Workbench, then click on the Tools ribbon, then on the FrameWorX Server button. The following dialog opens:
FrameWorX Server Location Window
The window allows you to configure settings for your default FrameWorX Server location with use by the following clients:
Default Server Location - .NET Clients
- In the Default Server Location section, in the Primary Server/Cloud Connector default server node text field, type the node name of the FrameWorX Server. Enter localhost to specify the local computer.
- If you wish to enable redundancy, specify the Secondary FrameWorX Server location in the Secondary Server text field. The secondary server will take over if the primary server becomes unavailable. (Leave this field empty to switch off redundancy.)
- If you specified a Secondary default server same, for the optimal use of resources, (and once you expand the dialog via the "More>>" button) you can put a check mark in the Enable Load Balancing check box. For a complete description of important load balancing information, refer to the Platform Services Configuration topic.
- Also, if you specified a Secondary default server name, you can put a check mark in the Auto Switch Back to Primary check box if you want the clients to automatically switch back to the primary server when the primary server becomes available again. If you leave this option unchecked, it will not automatically switch back to the primary server. Instead, you will have to switch it back manually when the server is available. (For instructions for manually switching over, refer to the Monitoring Redundancy Using MonitorWorX topic.) Enter a Heartbeat Rate (in seconds) in the text entry field. Enter an Allowed Missed Heartbeats (the number of signals lost in a row that should be considered as a connection failure) in the text entry field. See Configuring Heartbeat Detection for more information.
- In the Transport section, select the Transport Protocol (choose either HTTP, HTTPS, WS HTTP or NET.TCP).
- Depending on the Transport protocol selected, you can also opt to Use WebSockets or Use REST API.
- Note that a proper Port number is selected for each protocol. If you change the port number here, you must also change it for the FrameWorX Server. This must be done manually.
- In the Client Authentication pulldown, you can decide whether to select Integrated Windows Authentication or Client Certificates.
Integrated Windows Authentication
When selected, if you selected HTTP or HTTPS, the Server identity pulldown will default to "Not specified (falls back to NTLM)".
If WS.HTTP or NET.TCP were selected, you can use the Server identity pulldown to select from either "Not specified (falls back to NTLM)", "SPN Service Class", or "UPN".
Client Certificates
Selecting HTTPS or WS HTTP transport protocols allows you to select Client Certificates as Client Authentication.
An additional pulldown menu, Select client certificate by, appears, where you can select from either Thumbprint, Subject Distinguished Name, Issuer Distinguished Name, or User popup. If Thumbprint, Subject Distinguished Name, or Issuer Distinguished Name is selected, you can click on the ellipsis button (...) to either Browse local machine certificates or Browse current user certificates. Note: When searching for the certificate, the client will look for this value on the specified field on each certificate to find a matching one.
- Click Save when you are done.
- Restart all client applications for these settings to take effect.
Default Server Location - WebHMI Clients
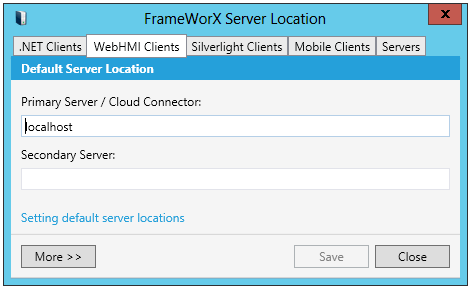
- In the Default Server Location section, in the Primary Server/Cloud Connector default server node text field, type the node name of the FrameWorX Server. Enter localhost to specify the local computer.
- If you wish to enable redundancy, specify the Secondary FrameWorX Server location in the Secondary Server text field. The secondary server will take over if the primary server becomes unavailable. (Leave this field empty to switch off redundancy.)
- If you specified a Secondary default server same, for the optimal use of resources, (and once you expand the dialog via the "More>>" button) you can put a check mark in the Enable Load Balancing check box. For a complete description of important load balancing information, refer to the Platform Services Configuration topic.
- Also, if you specified a Secondary default server name, you can put a check mark in the Auto Switch Back to Primary check box if you want the clients to automatically switch back to the primary server when the primary server becomes available again. If you leave this option unchecked, it will not automatically switch back to the primary server. Instead, you will have to switch it back manually when the server is available. (For instructions for manually switching over, refer to the Monitoring Redundancy Using MonitorWorX topic.) Enter a Heartbeat Rate (in seconds) in the text entry field. Enter an Allowed Missed Heartbeats (the number of signals lost in a row that should be considered as a connection failure) in the text entry field. See Configuring Heartbeat Detection for more information.
- In the Transport section, select the Transport Protocol (choose either HTTP, HTTPS, WS HTTP or NET.TCP).
- Depending on the Transport protocol selected, you can also opt to Use WebSockets or Use REST API.
- Note that a proper Port number is selected for each protocol. If you change the port number here, you must also change it for the FrameWorX Server. This must be done manually.
- In the Client Authentication pulldown, you can decide whether to select Integrated Windows Authentication or Client Certificates.
Default Server Location - Mobile Clients
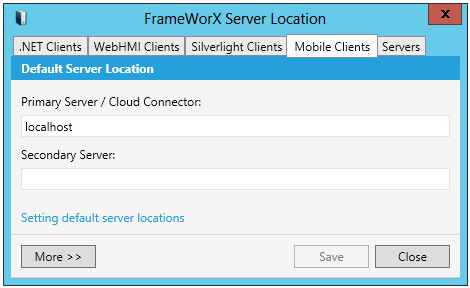
- In the Default Server Location section, in the Primary Server/Cloud Connector default server node text field, type the node name of the FrameWorX Server. Enter localhost to specify the local computer.
- If you wish to enable redundancy, specify the Secondary FrameWorX Server location in the Secondary Server text field. The secondary server will take over if the primary server becomes unavailable. (Leave this field empty to switch off redundancy.)
- If you specified a Secondary default server same, for the optimal use of resources, (and once you expand the dialog via the "More>>" button) you can put a check mark in the Enable Load Balancing check box. For a complete description of important load balancing information, refer to the Platform Services Configuration topic. Enter a Heartbeat Rate (in seconds) in the text entry field. Enter a Heartbeat Count Timeout (the number of signals lost in a row that should be considered as a connection failure) in the text entry field.
- In the Transport section, select the Transport Protocol (choose either HTTP or HTTPS).
- Depending on the Transport protocol selected, you can also opt to Use WebSockets or Use REST API.
- Note that a proper Port number is selected for each protocol. If you change the port number here, you must also change it for the FrameWorX Server. This must be done manually.
- Click Save when you are done.
- Restart all client applications for these settings to take effect.
Default Server Location - Servers
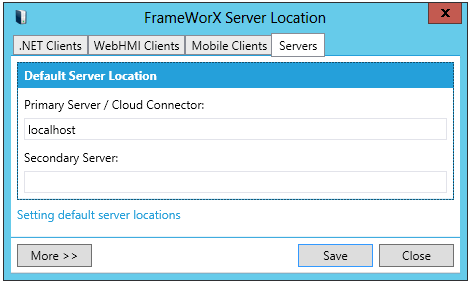
- In the Default Server Location section, in the Primary Server/Cloud Connector default server node text field, type the node name of the FrameWorX Server. Enter localhost to specify the local computer.
- If you wish to enable redundancy, specify the Secondary Server location in the Secondary Server text field. The secondary server will take over if the primary server becomes unavailable. (Leave this field empty to switch off redundancy.)
- If you specified a Secondary default server same, for the optimal use of resources, (and once you expand the dialog via the "More>>" button), you can put a check mark in the Enable Load Balancing check box. For a complete description of important load balancing information, refer to the Platform Services Configuration topic. Enter a Heartbeat Rate (in seconds) in the text entry field. Enter a Heartbeat Count Timeout (the number of signals lost in a row that should be considered as a connection failure) in the text entry field.
- Also, if you specified a Secondary default server name, you can put a check mark in the Auto Switch Back to Primary check box if you want the clients to automatically switch back to the primary server when the primary server becomes available again. If you leave this option unchecked, it will not automatically switch back to the primary server. Instead, you will have to switch it back manually when the server is available. (For instructions for manually switching over, refer to the Monitoring Redundancy Using MonitorWorX topic.) Enter a Heartbeat Rate (in seconds) in the text entry field. Enter a Heartbeat Count Timeout (the number of signals lost in a row that should be considered as a connection failure) in the text entry field. See Configuring Heartbeat Detection for more information.
- In the Transport section, select the Transport Protocol (choose either HTTP, HTTPS, WS HTTP or NET.TCP).
- Depending on the Transport protocol selected, you can also opt to Use WebSockets or Use REST API.
- Note that a proper Port number is selected for each protocol. If you change the port number here, you must also change it for the FrameWorX Server. This must be done manually.
- In the Client Authentication pulldown, you can decide whether to select Integrated Windows Authentication or Client Certificates.
Integrated Windows Authentication
When selected, if you selected HTTP or HTTPS, the Server identity pulldown will default to "Not specified (falls back to NTLM)".
If WS.HTTP or NET.TCP were selected, you can use the Server identity pulldown to select from either "Not specified (falls back to NTLM)", "SPN Service Class", or "UPN".
Client Certificates
Selecting HTTPS or WS HTTP transport protocols allows you to select Client Certificates as Client Authentication.
An additional pulldown menu, Select client certificate by, appears, where you can select from either Thumbprint, Subject Distinguished Name, Issuer Distinguished Name, or User popup. If Thumbprint, Subject Distinguished Name, or Issuer Distinguished Name is selected, you can click on the ellipsis button (...) to either Browse local machine certificates or Browse current user certificates. Note: When searching for the certificate, the client will look for this value on the specified field on each certificate to find a matching one.
- Click Save when you are done.
- Restart all client applications for these settings to take effect.