![]()
![]()
AlarmWorX Multimedia adds multimedia capabilities to your OPC Alarm & Event Servers. Alarm notifications can be sent by different multimedia methods such as email, sound, text to speech, marquee windows, phone, etc.
The AlarmWorX Multimedia Server subscribes to any OPC Alarm and Event compliant servers, and filters those alarms on which multimedia alarming is required. The Multimedia Server then triggers the appropriate multimedia agent, which performs the actual notification.
AlarmWorX Multimedia provides the following capabilities:
Multimedia alarm notification
Configurable media templates
Configurable personnel schedules
Alarms subscription to OPC Alarm and Event servers on the local computer or the intranet/internet
Alarms notification to multimedia agents on the local computer or to agents on the intranet/internet
Remote configuration through the Workbench
This topic describes how to set up a Popup Media Agent to be displayed when an alarm occurs.
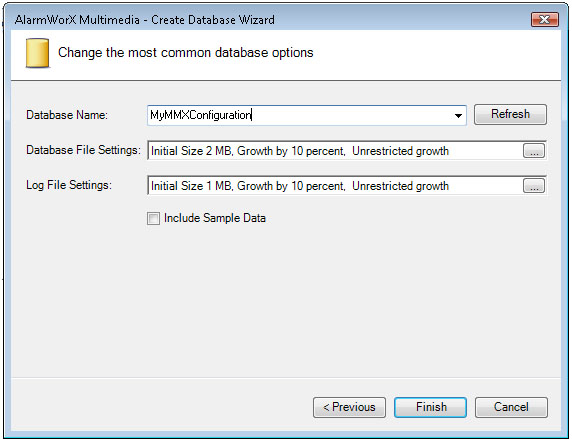
To configure a new AlarmWorX Multimedia configuration, please start by creating a new configuration database by performing the following. For more information, refer to the Multimedia Configuration Wizard topic.
Open the Workbench from Start > Programs > ICONICS GENESIS64 > Workbench.
Select the AlarmWorX Multimedia icon from the list of provider. Then from the Project Explorer, right-click on localhost and select New Database.
Follow the instructions for the Create Database Wizard, and make sure the “Include Sample Data” check box is not checked.
Right-click on your new configuration database and select “Make Active”.
Create Database Wizard
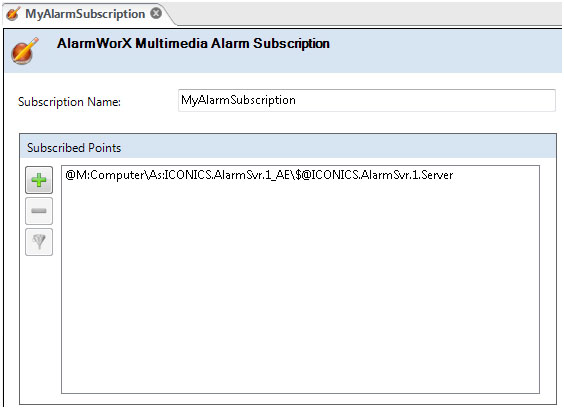
A subscription identifies connections to OPC Alarm and Event servers. It specifies which alarms the multimedia component should use during runtime. For more information, refer to the Creating a Subscription topic.
Expand your configuration database and select Alarm Inputs > Alarm Subscriptions.
Right-click on Alarm Subscriptions and select “Alarm Subscription” to add a new subscription.
Enter a name for the Alarm Subscription.
Click the + button to add a new Event Point. This will launch the OPC UA browser. If you already have a point subscribed as shown in Figure 2, then you can skip this part and go to step 6.
Select OPC Servers > My Server > AlarmWorX64 and then click OK.
Click the Apply button to save your changes.
Subscription to ICONICS AlarmWorX64 Alarm Server
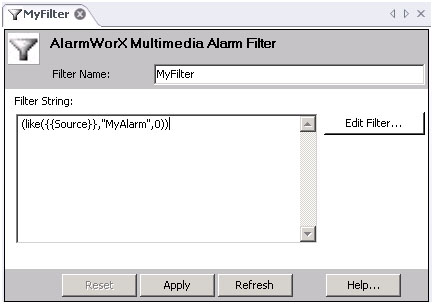
Filters allow you to retrieve a specified subset of alarms from your Subscription. This will allow later on certain agents to be trigger based on a specific alarm or group of alarms, as needed. For more information, refer to the Multimedia Alarm Filters topic.
Expand your configuration database and select Alarm Inputs > Alarm Filters.
Right-click on Alarm Filters and select “Alarm Filter”.
Enter a name for the Alarm Filter.
Click the “Edit Filter…” button to open the Filter Wizard dialog.
Check the box next to “Source” and enter the name of the alarm. Select OK to confirm and close the wizard.
Click the Apply button on the Filter creation page to save your changes.
Alarm Filter for an Alarm Called "MyAlarm"
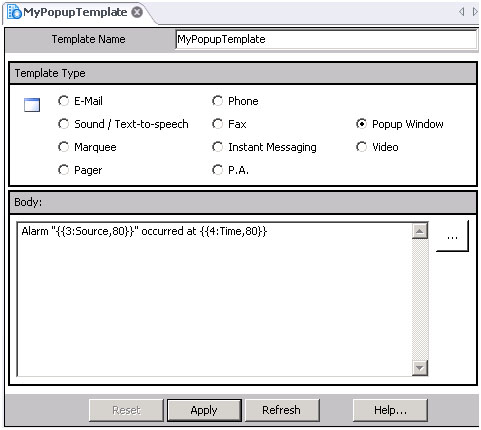
Media Templates define the content that will be used in the different Media Agents. For more information, refer to the Media Templates topic.
Expand your configuration database and select Configurations > Templates.
Right-click on Templates and select “Multimedia Template”.
Enter a name for the Template.
Select the appropriate Template Type. In the sample in the figure below, “Popup Window” is selected.
In the Body field, you can click the ellipsis button to open the “Template Definition Wizard”. This wizard allows you to insert attributes of the alarm it is applied to.
Select “Alarm Field” in the Select Field Type, and from the Field Name drop down select “Message”.
Click “Insert” and you should see {{3:Source,80}} added to the Body field.
Repeat this process and add the “Time” field.
Adding in some plain text to the body. For example, you could have a Body of Alarm "{{3:Source,80}}" occurred at {{4:Time,80}}.
Click the Apply button to save your changes.
Example Popup Template
Media Agents perform the actual notification using an assigned media template. For more information, refer to the Add New Multimedia Agent topic.
This example uses a Popup agent.
Expand your configuration database and select Configurations > Multimedia Agents > Popup.
Right-click on Popup and select “Multimedia Agent Setting”.
Enter a name for the Popup Agent.
Leave the “Node” field empty so the Popup Agent will run locally on your PC.
From the “Media Template” drop-down, select the Template you created in the previous section. In the example below, “MyPopupTemplate” is selected.
You can leave the “Scheduling” and “Role” drop-downs empty for this example.
Click the “TEST” button to get an idea of what your Popup Agent will look like.
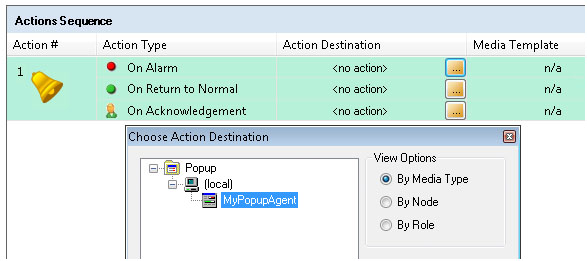
Assigning an Action Destination
Alarm Action Sets tie the previous components together. Using a configuration-wide subscription, they are triggered based on the Filter that is applied. Alarm Action Sets can also execute several Media Agents, and can define how often this occurs.
Expand your configuration database and select Configurations.
Right-click on Configurations and select “Configuration” to add a new Configuration.
Enter “Default” in the Name field.
Select your Alarm Subscription you created near the beginning from the “Alarm and Event OPC Subscription to be used in this configuration” drop-down. In this example, “MyAlarmSubscription” is selected.
Click the Apply button to save the changes.
NOTE: If you use a name other than Default you will have to link this configuration to a node from the “Nodes” section at the bottom of the tree.
Right-click on the newly created configuration and select “Action Set”.
Enter a name for the Action Set. In this example, “MyActionSet” is selected.
Select the previously created Alarm Filter from the “Alarm Filter to use:” drop-down. In this example, “MyFilter” is selected.
Set the Action Destination for the “On Alarm” Action Type to locate the Popup Agent that was already created.
Click the Apply button to save the changes. You can leave the other settings alone for this example.
For more information, refer to Creating an Alarm Action Set.
Click on the traffic light icon on the ribbon to start the AlarmWorX Multimedia Server Runtime. The green light indicates that the server is running. The server can also be setup to be an automatic Windows Service from GenTray.
When you trigger the alarm it should generate a pop-up window with information on it.
AlarmWorX64 Multimedia provides a Journal Log, which can be useful during operation of the AlarmWorX64 Multimedia application. The Journal Log is accessible from the Workbench at all times. It provides detailed information about the runtime engine including:
Alarms detected
Action Sets triggered
Agents triggered
Success/Failure of Agents
Action Sets completed
To view the Journal Log and its contents, expand System Tools (found in your AlarmWorX64 Multimedia configuration tree), right-click on Server Journal Log, and select View Multimedia Server Log. If you triggered your Popup alarm earlier, there should be some entries in the Journal Log as shown below.
Journal Table
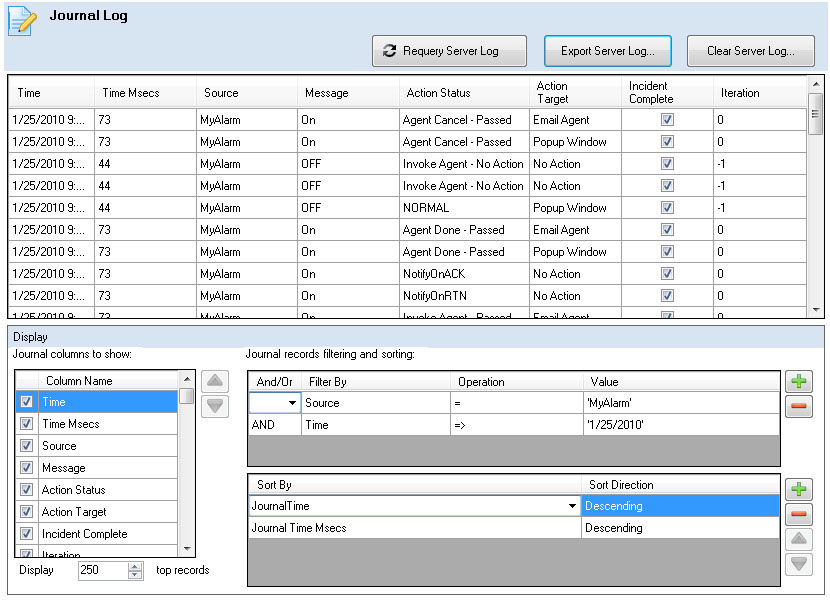
If there is too much information shown in the Journal Log, you can modify what is shown by using the following features:
Journal Columns to show – Add/Remove columns displayed in the log.
Display XXX top records - Only show the top number of records defined by XXX.
Journal records filtering and sorting - Apply different combinations of filters to only show logs for a certain Source, or Action Target for example. Sorting can also be applied to the log to order events in descending order so the most recent are on top for example.
For more information, refer to the Server Journal Log topic.
See also:
Running Multimedia Agents on Remote Nodes
Multimedia Configuration Wizard
Adding the Multimedia Configuration to an Existing Database