![]()
![]()
GENESIS64 Security allows you to set individual rights and access based on users and groups, create named policy settings that can be applied to users and groups, control access to individual applications, features, systems, and more based on time settings if you wish.
One feature that is integrated into GENESIS64 Security and GraphWorx64 is the ability to query the level of access the logged-in user has on a Data Point, Alarm, File, etc. This functionality lets you secure GraphWorX64 further and even incorporate these values into expressions or dynamics.
This topic describes several advanced features of GENESIS64 security including showing the logged-in user through a GraphWorX64 Local Simulation variable, retrieving the level of access the current logged in user has on a Data Point, Alarm, and File, as well as show you how to verify the custom string against the logged in user.
We will create one user in GENESIS64 Security that will be used in the examples for the rest of this topic.
Figure 1 - Security Points Configuration

Figure 2 - Security Files configuration

NOTE: The * (asterisk) wildcard is used to represent zero or more characters. For more information, refer to Wildcards and Performance Optimization.
For more information on setting up, refer to the GENESIS64 Security - Quick Start topic.
There is a local simulation variable available in GraphWorX64 that retrieves the current logged-in user.
Figure 3 - localsim::currentUser in a PPT
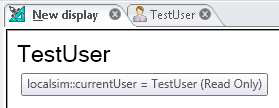
You could then retrieve the logged-in User from a script by getting the value of this Process Point. Please refer to the Scripting - Quick Start topic for more information on scripting.
Once you have security configured, you can view what level of access the current user has by using a special syntax available to GENESIS64. The syntax is:
?Category:comparison string
The Category can be any of the following
The “comparison string” is basically any text that follows such as an OPC tag or a simple string. For example the following are valid ways to retrieve the level of security for an alarm called “LowPressure” and an OPC tag from the ICONICS Simulator OPC Server:
?Alarm:LowPressure
?DataPoint:@ICONICS.Simulator.1\SimulatePLC.OUTPUTS.FLOAT1.Value
With the proper syntax in place, the following truth table shows the possible values this special security syntax can return. The resulting values are the decimal representation of the binary bits being true.
Table 1 - Permission Results
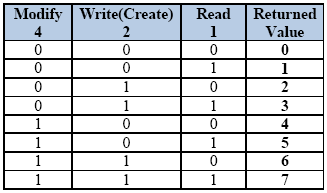
NOTE: Depending on the category you are trying to access (DataPoint, Alarm, File, etc.) the Modify and Write/Create may not apply.
Let's now bring the above topics together with an example we started to configure in the previous section.
?DataPoint:localsim:TankSetPointLow
?Alarm:PumpStatus
?File:MaintenenceSupervisorControl
Figure 4 - Results in GraphWorX64 Runtime
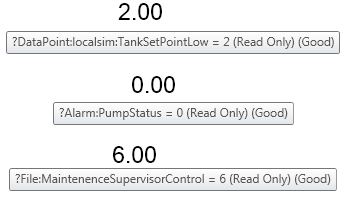
Keep in mind that the Deny permissions take precedence over the Allow when manually calculating these values. If you have been following this example, then there should be an * in the allow fields of each tab to allow everything by default. Feel free to experiment further with different combinations of Read, Write, and Modify permissions.
If you are familiar with GraphWorX64 scripting you should be able to easily see if the current logged in user by trying the steps below. Please refer to the GraphWorX64 Scripting topics for help; for example, refer to Scripting - Quick Start.
var result : Boolean = ThisWindow.IsCustomSecurityAllowed("customString");
MessageBox.Show(result);
See also:
GENESIS64 Security - Quick Start