|
|
The features on this page require an add-on to work with GENESIS64 Basic SCADA. |
|
|
The features on this page require an add-on to work with GENESIS64 Basic SCADA. |
The OEM Settings sub-branch underneath the Configuration branch of the MobileHMI provider Project Explorer allows users to change various ICONICS branded product names/branding/nomenclature and images with those specific to their own company or organization.
To Configure OEM Settings:
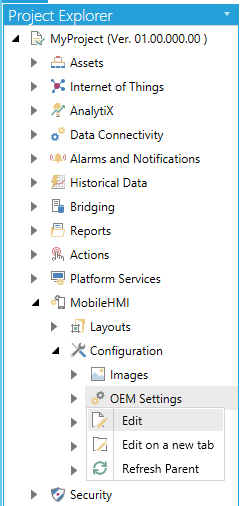
Click on the OEM Settings sub-branch beneath the Configuration branch of the MobileHMI provider Project Explorer. This should automatically open the OEM Settings properties window in the right side of the Workbench window. You can also right-click on the OEM Settings sub-branch and select 'Edit' as shown below.
Selecting Edit from the MobileHMI Project Explorer
-OR-
You can also click on the OEM Settings sub-branch and then on the 'Edit' button in the Edit section of the Home ribbon at the top of the Workbench window.
Edit Button
![]()
This will open the OEM Settings properties window, as shown below.
OEM Settings Configuration Properties

The OEM Settings properties contains the Layouts OEM Settings section.
Within the Layouts OEM Settings section, a 'Default' item is included after installation of MobileHMI. You can click on 'Click here to add new item' to add an additional line of settings. You can then add or edit the following within each individual cell:
Name
Application Title
Application Icon URL- This field must be either an http or https URL and point to a .png or .jpg file. You can also click on the  button to browse for your selected location.
Background Image URL- This field must be either an http or https URL and point to a .png or .jpg file. You can also click on the  button to browse for your selected location.
Foreground Color - Sets the foreground color of the application. The pulldown menu allows you to immediately select from Theme colors or Standard colors or you can click on the More Colors... option, which will open the separate Pick a Color window. You can select from CMYK, HLS, HSV, or RGB color entry options, as well as use either the # text entry field or click directly on the color block/sliders to the left of the window.
Background Color - Sets the background color of the application via pulldown menu. See description in Foreground Color above.
Accent Color - Sets the accent color within the application via pulldown menu. See description in Foreground Color above.
Highlight Color - Sets the highlight color within the application via pulldown menu. See description in Foreground Color above.
Once you have completed making your edits, click on Apply then Close to save your changes and return to the main the Workbench window.
You can then utilize your newly added OEM Settings within the OEM Settings pulldown menu in the General Properties section of a Layout.
See Also: