|
|
The features on this page require a GENESIS64 Advanced license and are not available with GENESIS64 Basic SCADA . |

![]()
|
|
The features on this page require a GENESIS64 Advanced license and are not available with GENESIS64 Basic SCADA . |
![]()
First, go to https://signup.sendgrid.com/ and sign up for a SendGrid account. You can choose different packages based on your requirements. Go to https://app.sendgrid.com/settings/api_keys create and copy the APIKey. We will need this in step 4.
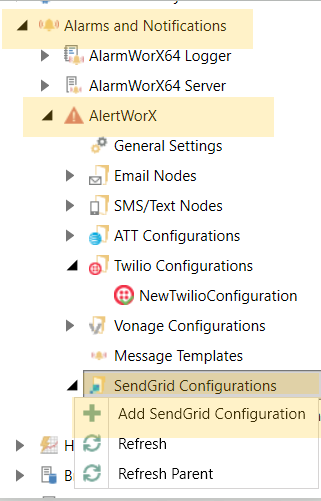
In the Workbench Project Explorer, go to Alarms and Notifications > AlertWorX > SendGrid Configurations. Right-click and choose Add SendGrid Configuration, as shown below.
Adding SendGrid Configuration from the Project Explorer in the Workbench
Check the “Is Default Configuration” box at the top to set the configuration as default.
Add a Description (optional).
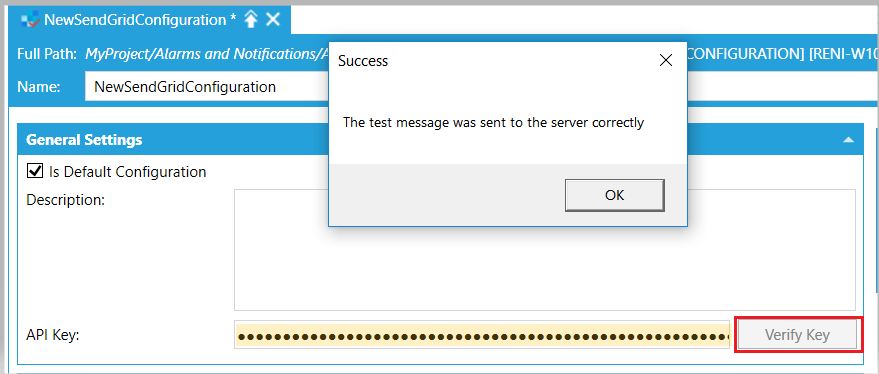
Copy the initially created API Key to the API Key field. Ensure that the AlertRest service is running and click on the Verify Key button. The Verify Key button should become disabled if it is successfully verified. This process ensures that the integration with SendGrid is done successfully.
Note: SendGrid recommends that you use an APIKey with all permissions for proper verification of your Key. You may otherwise get error saying:Forbidden.
Success Notification
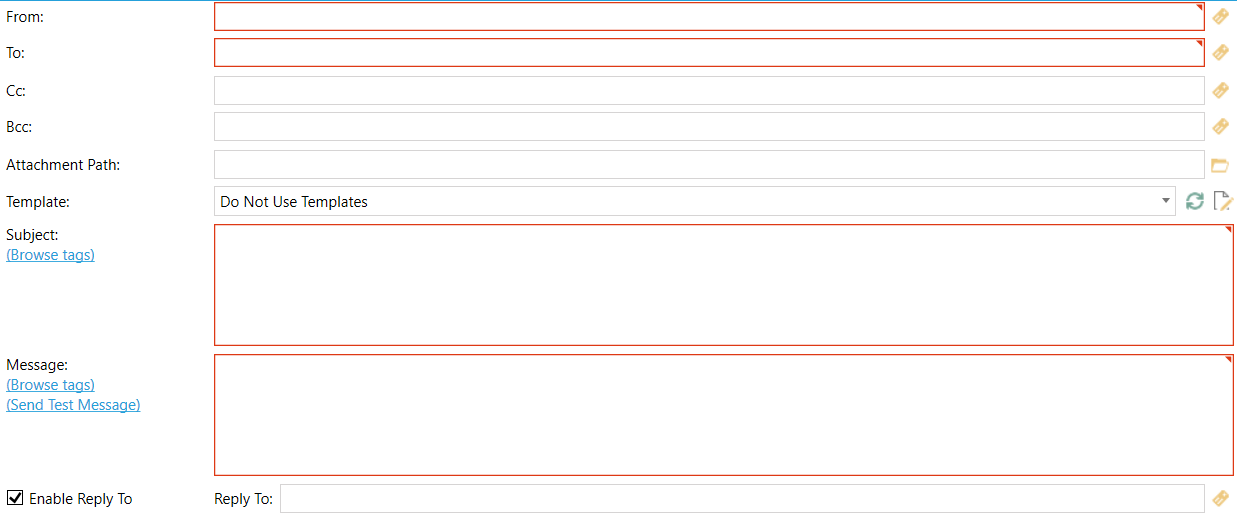
Set up the From address, To address, Subject, and Message, along with optional fields Cc, Bcc, Attachment Path, Reply To, etc in the Notification Message tab. You may have to verify the From address before you can use it. See https://sendgrid.com/docs/ui/sending-email/sender-verification.
You can add multiple recipients using a ‘;’ delimiter. You can also mention the name of the recipient with a ‘,’ delimiter. For example, ‘user1@domain.com,User1Name;user2@domain.com, User2Name’ This is possible in the To, Cc and Bcc fields.
Multiple attachments are also supported (up to 10) by use of a ‘;’ delimiter. The service should have permission to access the file and if any one of the attachments cannot be attached by process, the email will not get sent. The whole file name should be present for identifying purposes.
Message Properties
You can either use Templates or Message and Subject fields in-order to test if the setup is working correctly.
You can check the Enable Reply To check box and provide a different email ID for the recipients to reply to. This is especially useful if you want to set up a new domain which will parse acknowledgements. By default the ‘Reply To’ field is set to be the From address itself.
You can use the ‘Send Test Message’ link in the form to test that a message gets sent successfully.
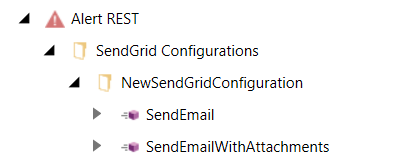
Apply the changes. Now, in the Data Browser, you can see the methods supported by SendGrid
SendGrid Supported Methods
SendGrid logs the emails sent out in the Alert_EmailLog table. The status of these emails get updated if IcoWebAPIService is set up and running Setting Up WebAPI REST
Provide the webhook in SendGrid: https://app.sendgrid.com/settings/mail_settings
> Event Webhook as Authorization method: None
> Webhook: https://username:password@yourdomain/fwxapi/sendgrid/email
Note: When constructing the URL above, "username” and “password” should match the values of the Ico_Sendgrid_Username and Ico_Sendgrid_Password environment variables respectively, and “domain” is the domain where the WebAPI service is running.
Enable the setting for the deliverability and engagement data you wish to receive. The latest status will be recorded in the log based on a predetermined order.
The username and password should be the same as the one you set up below.
Set up environment variables Ico_Sendgrid_Username (username used above) and Ico_Sendgrid_Password (password set above).
Set up Environment Variables. For this, open Settings, as shown below.
Selecting Settings
In the search box, type ‘environment variables’, as shown below and choose the highlighted one.
Selecting Environment Variables
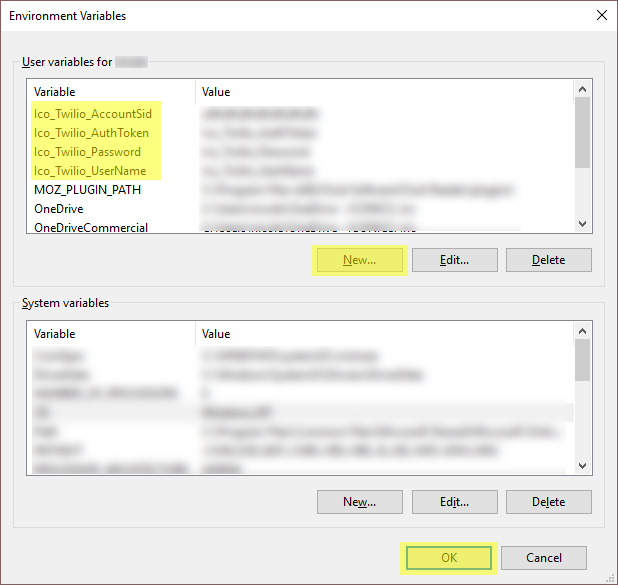
Set up the below environment variables in the dialogue under ‘User Variables ‘.
Note: These Environment Variables are case-sensitive, so make sure that they are spelled correctly.
Setting Environment Variables
Create a new user in Workbench -> Security. The User credentials (username and password) must match with the environmental variable values and the SendGrid webhook username and password. This is necessary if you want to get status updates of email and receive incoming email for acknowledgement.
Note: You can additionally use a single username password for all your plugins (Twilio, Nexmo, SendGrid) under the environment variable Ico_Cfs_Username and Ico_Cfs_Password.
For this newly created user, you should give permissions in the Method Tab of Security for the following two methods, so it is more secure.
arpm:/ReplyManagerEmail
arpm:/StatusManagerEmail
Methods Tab in Security

And under the Stations tab, you should give the station a name.
Make sure to restart the ICONICS Alert REST Service and the ICONICS Web API Service after setting environment variables.
To Enable Acknowledgement via Email:
Have a default SendGrid Configuration set up.
Ensure that ‘Enable Email Alert ID’ is checked.
Enable Email Alert ID Setting

In the SendGrid dashboard, go to: https://app.sendgrid.com/settings/parse and click Add Host and URL. Clicking on this will ask you to add Domain Authentication. You can read more about this here: https://sendgrid.com/docs/for-developers/parsing-email/setting-up-the-inbound-parse-webhook/. You can set up a new domain for this purpose or subdomain your existing domain for inbound parse. You should never use the existing mail domain for this because this would parse the entire e-mails coming to this domain, which probably includes confidential emails and should be avoided.
Once domain authentication is done, you can add the subdomain and set reply webhook under Destination URL as https://username:password@yourdomain/fwxapi/sendgrid/email/inbound
Note: When constructing the URL above, "username” and “password” should match the values of the Ico_Sendgrid_Username and Ico_Sendgrid_Password environment variables respectively, and “domain” is the domain where the WebAPI service is running.
The Reply To field should have an email id with the subdomain you set up in your parse setting above. For example, if your subdomain was “sub” and main domain was “mainDomain”, the Reply To email would look something like abc@sub.mainDomain.com or rst@sub.mainDomain.com.
The reply format expected is AlertID AcknowledgeID OptionalComment followed by a carriage return or new line. The new line after the reply format is important to process acknowledgement.
Note: Acknowledge Code could be the default Acknowledge Code configured for the workflow configuration of CFSWorX or BridgeWorX, in case the worker does not have an acknowledge code assigned. BridgeWorX does not currently support the Worker Lookup activity so it will always need to use the default Acknowledge Code.
For example:
23 A123Z Acknowledging alarm at pump house 1
Make sure to use the CFSWorX workers list for acknowledge by using the 'Worker Lookup’ activity in CFSWorX before using 'Send SendGrid Email' activity.
See Also: