|
|
The features on this page require a GENESIS64 Advanced license and are not available with GENESIS64 Basic SCADA . |

![]()
|
|
The features on this page require a GENESIS64 Advanced license and are not available with GENESIS64 Basic SCADA . |
![]()
CFSWorX can optionally support location data from Dynamics 365. This makes it easy to import field technician’s location information which can be used to determine the closest worker.
You can enable field technician location tracking feature in Dynamics 365 for Field Service by using Geofencing for mobile. The following link describes how to set up mobile configuration for location tracking: https://docs.microsoft.com/en-us/dynamics365/field-service/geofencing.
The steps below summarize setting up mobile configuration for location tracking. Please refer to the link above for pictorial representations and references.
Login to your Dynamics instance and open Field Service app.
Check if Geofence solutions are installed. Go to Settings > Solutions and check if following solutions are installed.
Geofence Alerts
Geofence Management
Geofencing for Field Service
Activate Geofence processes for location tracking. Go to Settings > Processes and activate the following processes.
Update Resource Location from Resco Audit
DeleteGeofenceWhenBookingIsCompletedOrCanceled
GenerateGeofenceWhenBookingIsCreated
NOTE: The process, Update Resource Location from Resco Audit, is the main process required for location tracking, the other 2 processes listed above are optional and you can ignore this if you are only configuring for location tracking. All 3 processes would be required if you are configuring for geofencing.
Enable Location Auditing and background location tracking for Field Service Mobile App
Go to Settings > Woodford > MobileCRM Woodford HTML5.
NOTE: If you do not see MobileCRM Woodford HTML5, click on Woodford.
If you already have a mobile project, enter the mobile project that has your Field Service Mobile customizations.
NOTE: The official documentation page for Geofencing recommends importing a mobile project template and deriving from it and making customizations to the child derivation. The latest mobile project template can be downloaded at : https://aka.ms/fsmobile-project.
Enable Location Auditing: Go to Auditing section of the mobile project and ensure the following boxes are checked:
Enabled
Include GPS Position
Log synchronization event
You can choose to configure additional Auditing options based on your requirements. For location tracking, you can enable Track GPS position changes and can set the delay and distance of the GPS position. This controls position recording when the device moves specified distance and after the time interval expires.
Enable background location tracking: Go to Location Tracking section of the mobile project and select Enable background GPS monitoring.
If you already have a Field Service Mobile license, choose ‘I Confirm this Organization has the appropriate license’. Location tracking does not require an additional license and is included in Field Service Mobile.
Deselect Enable real-time position flushing via Resco web service.
Next, Save and publish all projects.
NOTE: On publishing the project, 30-day trial period for Resco MobileCRM starts. Resco and Woodford are included in the Field Service license of Dynamics without an extra cost if you are using Field Service entities and related to your Resco application.
Activation of Woodford can be done within 30 days before the trial period ends, at no extra cost. Submit a request on this page to activate a license: https://aka.ms/fsmlicense. You are not entitled to use Resco’s application with this license, it requires a separate license.
Next, download and install Field Service Mobile app on field technician’s mobile phone. Log in to Dynamics 365 and synchronize the data.
NOTE: CFSWorX for importing worker location data requires that the signed-in user be a bookable resource with appropriate permissions to access mobile application.
Please refer to the link Configuring Dynamics 365 for creating a role used for CFSWorX.
Assign the following permission in addition to the permissions already mentioned in Configuring Dynamics 365 to a newly created/or an existing security role.
- Custom Entities Tab
o Mobile Audit
Read
Please refer to Adding a Dynamics 365 Source to add a Dynamics 365 source and import workers. The following instructions will assist you with setting CFSWorX configuration to receive worker location from Dynamics 365.
Open Workbench.
Expand Connected Field Workers.
Under Field Workers, add a Dynamics 365 Source.
Expand the Dynamics 365 source added in the previous step.
Right-click on the worker name who has mobile configuration setup in Dynamics 365 and Field Service Mobile App installed, as shown below:
Right-click on Worker Name

Next, configure a security user in Workbench. Please refer to Security > Users and Groups to add a ICONICS security user.
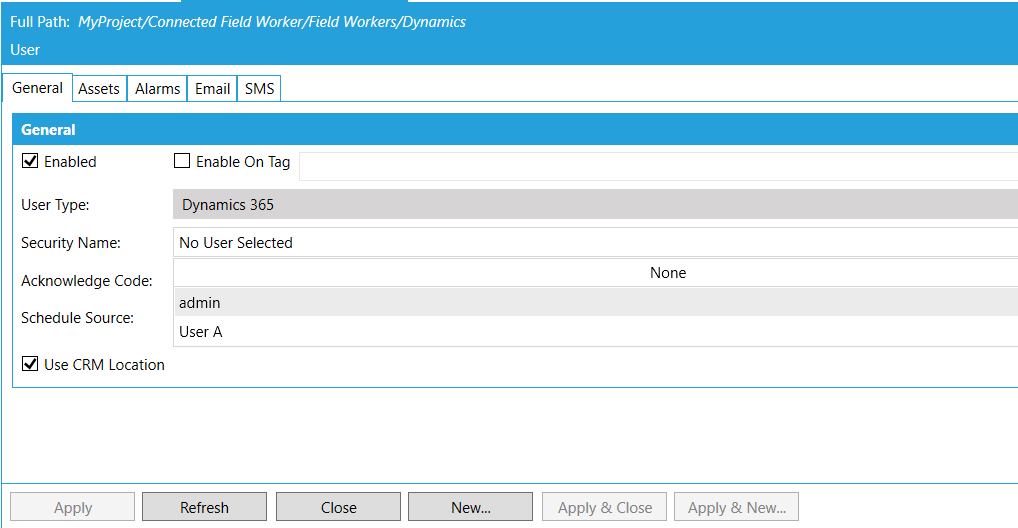
Assign a security name to the user and enable Use CRM Location, as shown below:
Assign Security Name to User and Enable 'Use CRM Location'
See Also:
Obtain Worker Location from Dynamics 365