|
|
The features on this page require a GENESIS64 Advanced license and are not available with GENESIS64 Basic SCADA . |

![]()
|
|
The features on this page require a GENESIS64 Advanced license and are not available with GENESIS64 Basic SCADA . |
![]()
TrendWorX64 Logger may store data for many different kinds of tags from a particular data source at the same time. Some tags might be from light sensors, others from security sensors, while still others might monitor or control the physical plant. In order to control the way in which each different category of tags are handled, you can use a set of logging groups. Each database group may have one or more logging groups, and it is the logging group that serves as the container object for the individual tags that you add to your trending plots.
With a logging group you can control:
Data Collection rates and refreshes
Automatic or manual start/stop times for data collection
Automatic or manual start/stop times for logging
Manage the database tables that contain the logged data
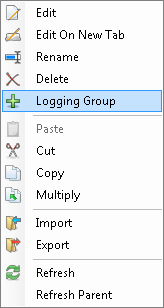
Right-click the database group to which you wish to add a logging group.
Select the New Logging Group command from the context menu.
You can also edit existing logging groups using the Edit or Edit on New Tab buttons in the Edit group on the Home ribbon.
There are four logging group attributes tabs:
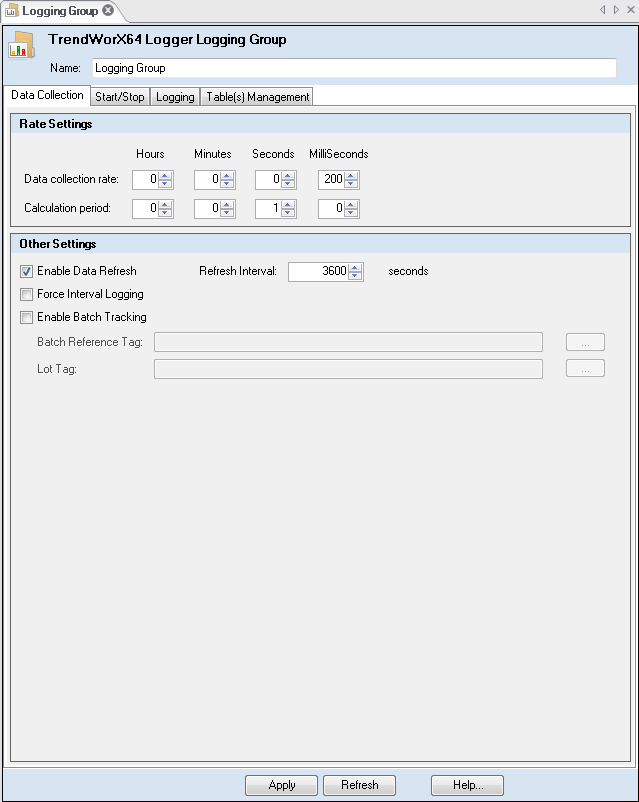
On the Data collection tab you are able to set the rate for gathering data along with how often calculations will be performed.
Data collection rate: Set the period between samples in hours, minutes, seconds, and/or milliseconds. The default is 200 milliseconds (5 samples per second).
Calculation period: This factor determines how often trending data such as aggregates are calculated. You can set intervals in hours, minutes, seconds, and/or milliseconds. The default is 1 second.
|
|
Note: Data collection rate and calculation period play a major role in consuming system resources within TrendWorX64 Logger and your data source(s) (SQL server). If you find that your server(s) are sluggish, consider taking fewer samples or lengthening your calculation period and supporting fewer updates. |
Enable Data Refresh/Refresh Interval: Used to refresh the data used for historical trend logging. If you enable data refreshing, you can also select the interval of time between refreshes (in seconds). Usually, you should specify a refresh interval that is much larger than the data collection rate. This longer interval is necessary to have responsive performance during historical replay. The default value is 3600 seconds (or 1 hour).
|
|
Warning: The refresh interval should never be less than the data collection interval and never more than 86,400 seconds (24 hours). |
Force Interval Logging: When enabled, this feature uses the TrendWorX64 Logger to provide a historical tag value at a sampling rate that is the same as the data collection rate. The last known value for the tag is provided to the client that is using the trending data, even if the value has not changed during the data collection interval.
Enable Batch Tracking: TrendWorX64 supports batch and lot tracking. You can enable this support on a per-data logging group basis and define OPC string signals that store the current batch and lot information. These values may be automatically retrieved through a bar scanner or manually entered through a graphics screen within GraphWorX64 .
For example, if you have a tag that serves to identify the manufacturing run for a paint of a certain color, that could serve as the batch number or string. Another tag might evaluate the specific manufacture of this color paint so that each manufacturing run would be unique; and that tag would serve as the lot number or string.
Click the Apply button to save your changes. If you do not want to save the changes you made, click the Refresh button.
Back to Create New Logging Group
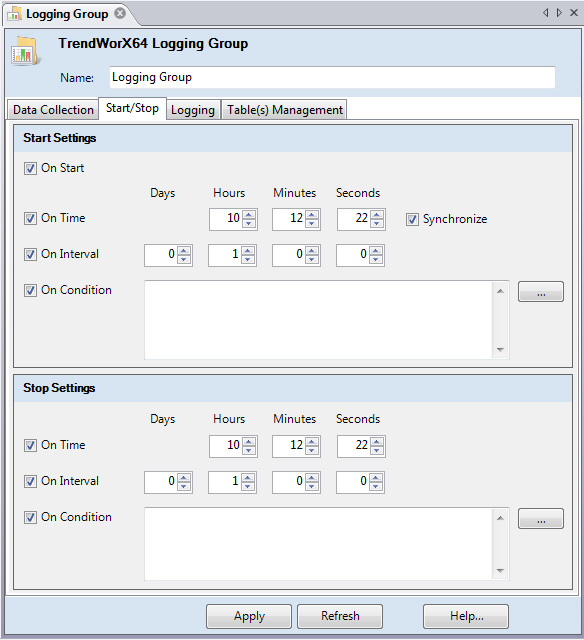
On the Start/Stop tab you can set the time that data collection begins and ends. Data collection reads OPC UA tags into memory but does not write them to disk. If you want to set the time or condition for logging the data to your database, then you set those properties on the Logging Tab, which is described below.
The options for configuring the data collection process include:
Starting data collection immediately when the logger starts up.
Setting a time delay after which data collection is started or stopped.
Define specific times of the day at which data collection is occurring.
Create an expression that evaluates to a Boolean True or False that defines the starting or stopping of data collection.
To have data collection begin immediately upon TrendWorX64 Logger start up:
To start or stop data collection at a specific time of your choosing:
Enable the On Time check box in either the Start Settings and Stop Settings sections.
|
|
Note: Use hours 0 - 11 for AM (midnight to up to noon) and 12 - 23 for PM (noon to up to midnight). |
Enter the hours, minutes, and seconds into the respective boxes in the Start Settings and Stop Settings sections.
To have data collection synchronized to the beginning of the next start time:
Enable the Synchronize check box in the Start Settings section.
Data collection starts at the beginning of the next time period. For example, if the desired start time is 10:00:00 AM, the data-collection rate is 1 hour, and the data logger enters runtime mode at 10:15:00 AM, the data-collection and data-logging activity for the selected logging group will start at 11:00:00 AM.
To set a time period for data collection to start or stop:
Enable the On Interval check box.
Enter the days, hours, minutes, and seconds into the Days, Hours, Minutes, and Seconds boxes in the Start Settings and Stop Settings sections.
For example, assume you set the On Interval in the Start Settings section to 2 hours, and the On Interval in the Stop Settings section to 30 minutes and the logger starts up at 1:00 PM. Data collection begins at 3:00 PM and then ends at 3:30 PM. If you had left the On Interval to stop disabled, then logging would continue until you stopped it, or until a logical condition for On Condition evaluated to False.
To define a condition that starts or stops data collection:
Enable the On Condition check box in either the Start Settings or Stop Settings section.
Click the ellipsis button ![]() next to the On Condition text box. The Expression Editor opens.
next to the On Condition text box. The Expression Editor opens.
Build your expression, which must be a Boolean that evaluates to True or False.
|
|
Warning: The Expression Editor will evaluate your expression for syntactical (logical) correctness, but cannot determine if the expression will function correctly. You should test the expression to see if it functions correctly. |
Click OK to close the Expression Editor.
Click the Apply button to save your changes. If you do not want to save the changes you made, click the Refresh button.
Typically you build an expression in the Expression Editor that looks at an OPC tag and evaluates it as part of the expression. When you click the Variables button in the Expression Editor it opens the Data Access dialog box where you can select available OPC UA data sources.
Back to Create New Logging Group
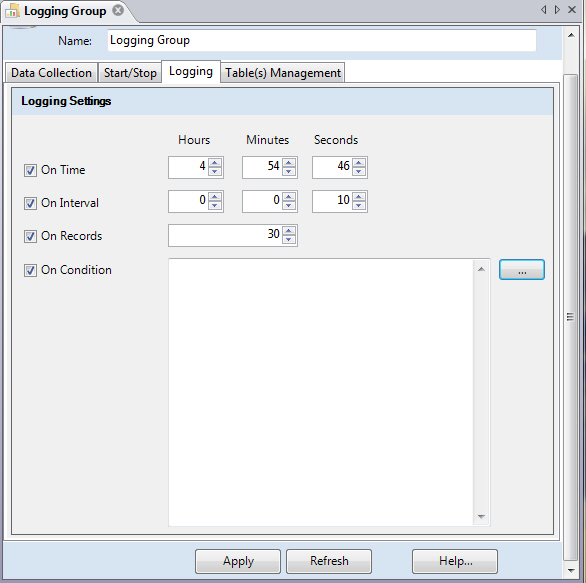
The Logging tab in the Logging Group dialog box determines the settings and conditions for storing historical information into the database for the selected logging group. It provides the means necessary to control the logging operation only. If you wish to set the conditions for data collection you should set those properties on the Start/Stop tab, which is described above.
The options for configuring the logging process include:
On Time: Enable this check box to specify a specific time of day at which logging occurs. Enter the hours, minutes, and seconds into the respective boxes.
On Interval: Enable this check box to enter an interval between data logging operations (for example, every 30 minutes). Enter the hours, minutes, and seconds into the respective boxes.
|
|
Note: Use hours 0 - 11 for AM (midnight to up to noon) and 12 - 23 for PM (noon to up to midnight). |
On Records: Enable this check box to set the number of data samples that TrendWorX64 Logger will collect from any of the tags in the logging group before logging the data.
On Condition: Enable this check box to enter a Boolean expression using the provided text box or open the Expression Editor by clicking the ellipsis ![]() button. In the Expression Editor, you can click the Variables button to open the Data Access Dialog Box and select OPC UA tags to use in the expression. TrendWorX64 Logger will log data when this expression evaluates to TRUE.
button. In the Expression Editor, you can click the Variables button to open the Data Access Dialog Box and select OPC UA tags to use in the expression. TrendWorX64 Logger will log data when this expression evaluates to TRUE.
Click the Apply button to save your changes. If you do not want to save the changes you made, click the Refresh button.
Back to Create New Logging Group
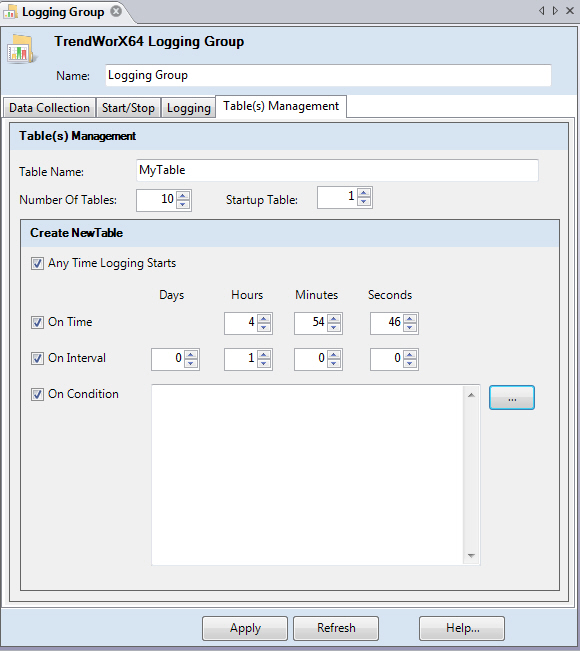
When you log data to your historical trend database you are storing data in tables. This allows a better overview of the data than a continuous stream of data would. The Table Management tab in the Logging Group dialog box allows you to configure how the data will be stored in terms of the number of tables and when a new table will be started
You can set up the data-logging configuration for a logging group so that the data is stored to multiple tables in a sequential order. Doing so has the following benefits:
Faster trend data access: Trend clients can be configured so that they retrieve data from the most recently created tables, while the other tables are maintained for reporting and comparison to the data in the most recently created table.
Database Optimization: Although historical information is retrieved by combining information from various historical tables, the ability to store data in multiple (sequential) tables can be helpful in providing a means for performing database optimization, eliminating old and unneeded tables.
Improved Load Balancing: A cyclical set of tables is also an aid in designing a configuration for system load balancing, as you can write tables to different SQL servers. By controlling the size of each historical table, you can avoid creating extremely large tables, which may degrade overall data logging and database performance. To accelerate data retrieval, TrendWorX64 SQL Server creates the necessary database schema to maintain updated information with respect to the time interval for which table logs data.
The number entered in the Number of Tables field determines the maximum number of tables that will be created. When that number of tables is reached and filled, the SQL server deletes the table with the oldest stored data to create the next new table.
To name your table(s):
Enter a name in the Table Name text box. The SQL server appends the number of the table in the sequence to the end of the table name automatically. For example, if you entered the name "MyTable" into this text box, the first table created would be called "MyTable1," the second table would be called "MyTable2," and so on.
To create tables at startup:
Enter the number of tables desired into the Number of Tables box. The maximum number of tables that you can create is 3,000. You can also specify the number that TrendWorX64 Logger should assign to the first table using the Startup Table box.
To set the conditions under which a new table is created, complete at least one of the following steps:
Enable the Any Time Logging Starts check box to create a new table every time data logging starts operation.
Set a specific time of day during which TrendWorX64 Logger creates a new table for logging data by enabling the On Time check box and entering the time into the Hours, Minutes, and Seconds boxes.
Set a time interval after which TrendWorX64 Logger creates a new table for logging data by enabling the On Interval check box and entering the length of time into the Days, Hours, Minutes, and Seconds boxes.
Enter a Boolean expression by using the provided text box or by opening the Expression Editor by clicking the ellipsis ![]() button. In the Expression Editor, you can click the Variables button to open the Data Access Dialog Box and select OPC UA tags to use in the expression. TrendWorX64 Logger creates a new table for logging data when this expression evaluates to TRUE.
button. In the Expression Editor, you can click the Variables button to open the Data Access Dialog Box and select OPC UA tags to use in the expression. TrendWorX64 Logger creates a new table for logging data when this expression evaluates to TRUE.
Back to Create New Logging Group
See also: