![]()
![]()
Hyper Historian is separated into two parts: data collection and data logging. While you can only have one logging server for non-redundant setup, multiple collectors can sample data for you.
Using a remote collector could potentially cut down on your network traffic. Consider a scenario where you are collecting data every second and using a calculation period of one minute to find the maximum value for the minute. If your OPC server is remote, then, it will have to forward a sample to the local collector every second. However, if you put the collector on the remote machine where the OPC server resides, it would only need to send the calculated value to the logger once a minute. With this setup, the amount of network traffic decreases to one value per minute as opposed to one value per second.
You can take advantage of this type of setup if you have Hyper Historian Enterprise Edition licensing. This document walks you through the steps to setting up a remote collector.
In order for a remote collector to work properly, the time on all computers in question must be synchronized. This means the computer running the collector should have the same time as the computer that is running the logger.
There are a couple of ways to synchronize the time on your machines. If the machines are running in a domain, you can set the domain controller as the time keeper and synchronize the machines in the domain to that time. Alternatively, you can synchronize the time using the internet by pointing the machine to a time server. You can find more information on how to synchronize the time on different machines in the application note called GENESIS64 – Synchronizing Machine Time.
To make sure the computers can communicate with each other, you can temporary turn off the firewall or create an exception on your firewall for the ports that the collector is using. You may also want to turn off UAC, as it could also hinder application communication.
With these general settings applied, you should be ready to start configuring your remote collector.
For Hyper Historian Logger, a complete Hyper Historian installation must be installed on the machine. There can be only ‘local’ Loggers.
For a remote Hyper Historian Collector, you can use a standalone Hyper Historian Collector installation, which is available on the Hyper Historian DVD. You can also use a remote collector on a complete Hyper Historian installation.
Click HERE for "Hyper Historian Collector System Requirements".
It is quite simple to setup a local collector configuration. Let’s see how the Local Collector is set up.
Open Hyper Historian in the Workbench and expand the local configuration and then Node Setup and Redundancy.
Right-click on Local Collector and select Edit on New Tab. This opens the Local Collector configuration in a new tab. The configuration should look like the example in Figure 1.
Figure 1 - Hyper Historian Local Collector
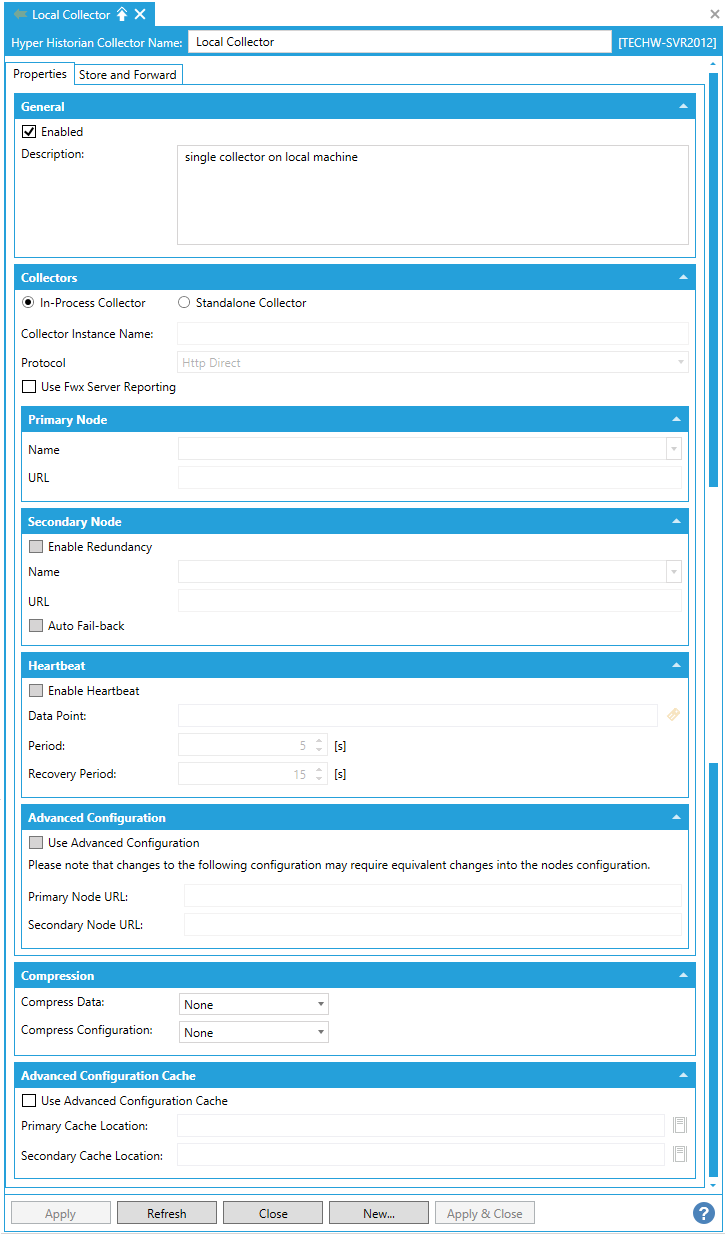
In the Collectors section, make sure the Local (In-Process Collector) option in the Collectors section is selected. This will configure a Local collector and no additional configuration is required. [Note: For more information on setting up Collectors, see Collector.]
In the Workbench, expand your active configuration so you can see Node Setup and Redundancy.
Right-click Node Setup and Redundancy and select + Collector.
A new collector configuration opens in a new tab with the default local collector endpoint information.
Figure 2 - Remote Logger Configuration
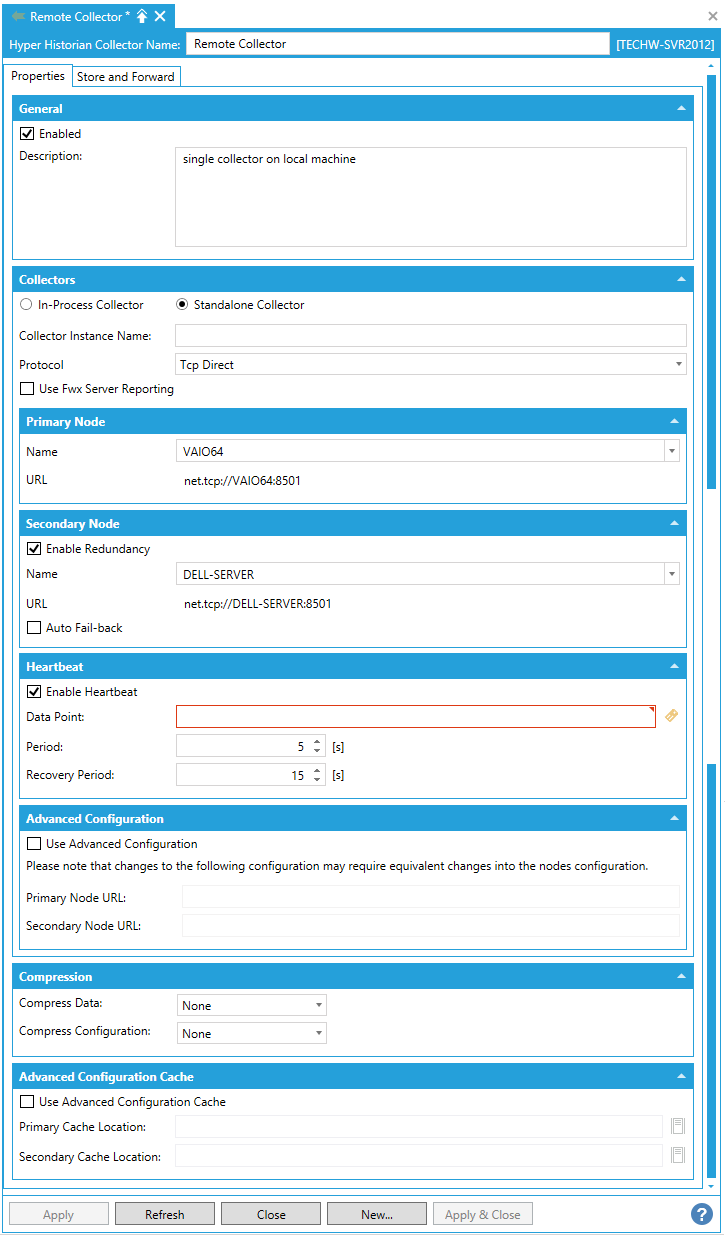
Give the collector a name. (e.g., “MachineName Collector”, where the MachineName is the name where the remote logger is located).
Select the Standalone Collector option in the Collectors section.
Use the Protocol drop-down list to select either HTTP or TCP.
Enter a Name for the Primary Node or select one from the drop-down list. The URL field below is pre-filled from your primary node selection.
If a backup collector is required, then click the checkbox next to Secondary Node. Enter or select the name of the Secondary Node.
You may also click the checkbox next to Use Advanced Configuration to allow further configuration. You can then enter both the Primary Node URL and Secondary Node URL directly (rather than from the selection of the Primary/Secondary Nodes in the main properties window). Note that changes to this configuration may require equivalent changes in the nodes configuration. Click OK to proceed.
[Note: For more information on setting up Collectors, see Collector.]
To use the remote collector, you will need to create a collector group that uses it. Once this is done, you can configure the rest like any other collector group.
Expand your active Hyper Historian configuration -> Groups -> Logging Group.
NOTE: This document uses a preconfigured logging group called “Logging Group” in the sample Hyper Historian configuration. You can choose whatever logging group you want to use.
Right-click your selected Logging Group and select + Collector Group.
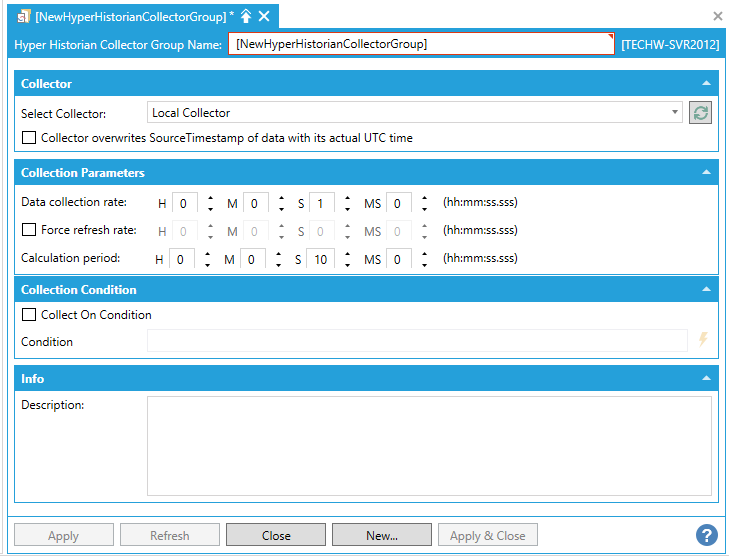
The new Collector Group configuration opens in a new tab.
Give the Collector Group a name and in the Collector section, select the remote collector you just created. If you don’t see the collector in the drop down list, click the Refresh Collectors button and try looking in the drop-down list again.
Configure the Collection Parameters, set a Collection Condition and enter a Description, if you wish.
Click Apply to save your settings when you are done. Your configuration should look similar to Figure 3.
Figure 3 - Collector Group Configuration
Now that you have a collector group configured to use the remote collector, you can add tags to it like you would for any other collector groups.
You can also view remotely-collected data the same way you would for locally-collected data in the Trend Viewer.
The remote collectors load the configuration that is set on the logger machine. The configuration information for the tags that are added to a Collector Group are automatically sent to the appropriate collectors by the Hyper Historian when it starts up or when there is a change in the configuration.
Once you are done with your configuration, you can start the Hyper Historian service by clicking the traffic light in the Home ribbon to turn it green. If it is already green, refresh the configuration database so that the new settings apply. Also, start the Hyper Historian service on the remote collector to start data collection.
If you look in the services manager, you will notice there are a few Hyper Historian services.
Figure 4 - Hyper Historian Services
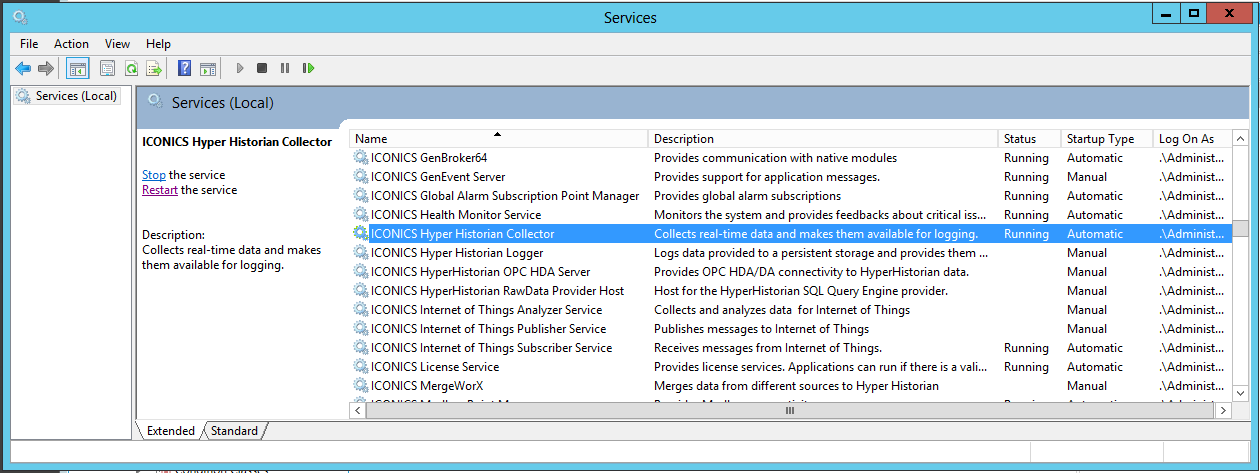
When you click the traffic light to start the Hyper Historian service, it actually starts two services: the ICONICS Hyper Historian Collector and the ICONICS HyperHistorian Core.
Generally speaking, if you are using remote collectors, you do not need both services running. You can simply run just the ICONICS Hyper Historian Collector service on the remote collector machines. If on the logger machine there are no local collectors, you can simply run the ICONICS HyperHistorian Core service on that machine to log the data.
Note: If you start the Hyper Historian Collector Service without starting the Hyper Historian Logger, no license is required.
See Also:
Hyper Historian Collector System Requirements
Hyper Historian Collector Installation