|
|
The features on this page require an add-on to work with GENESIS64 Basic SCADA. |

![]()
|
|
The features on this page require an add-on to work with GENESIS64 Basic SCADA. |
![]()
NOTE: The following describes how to configure BACnet settings via the Workbench.
GENESIS64’s BACnet implementation is an out-of-the-box solution that does not need configuration by default. BACnet devices in a local network are discovered automatically, together with their specific settings and address spaces (provided objects and their properties), which are used for connection.
The steps described below are useful in cases where you need to:
Override settings of a specific, automatically discovered device, or
Override objects and/or property names exposed by specific devices, or
Add a new device that has not been automatically discovered (e.g. because it is in a different IP network subnet).
BACnet Settings for Devices
It is important to realize that this BACnet Configuration Provider is used for the configuration of Global BACnet runtime settings; for providing the BACnet runtime connection with information for specific BACnet devices and for driving what information is exposed by BACnet runtime (device, object and property names).
You'll see the BACnet node of the Tree Explorer, as shown below.
BACnet Provider in the Workbench

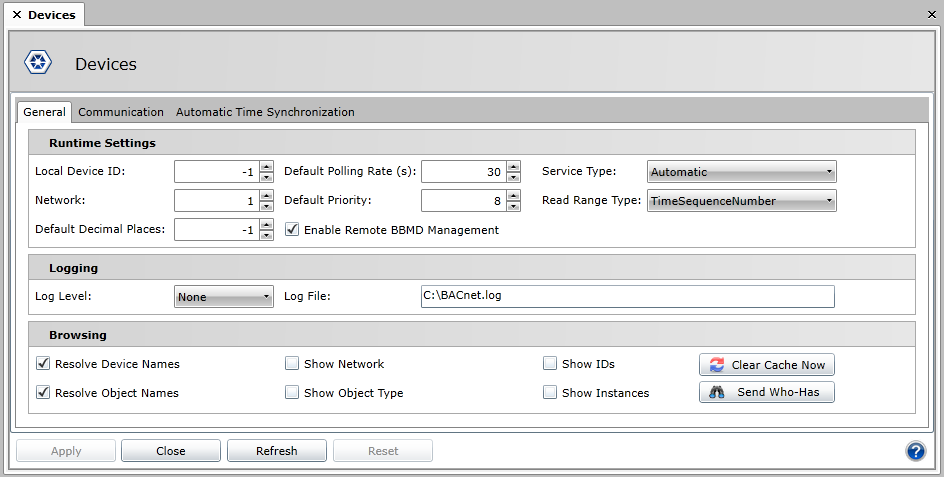
Expand the BACnet node in the Workbench project explorer to show the Devices node. Double-click on the Devices node and go to the ‘Communication’ tab, then you will see the settings for your devices.
Devices - Communication Tab
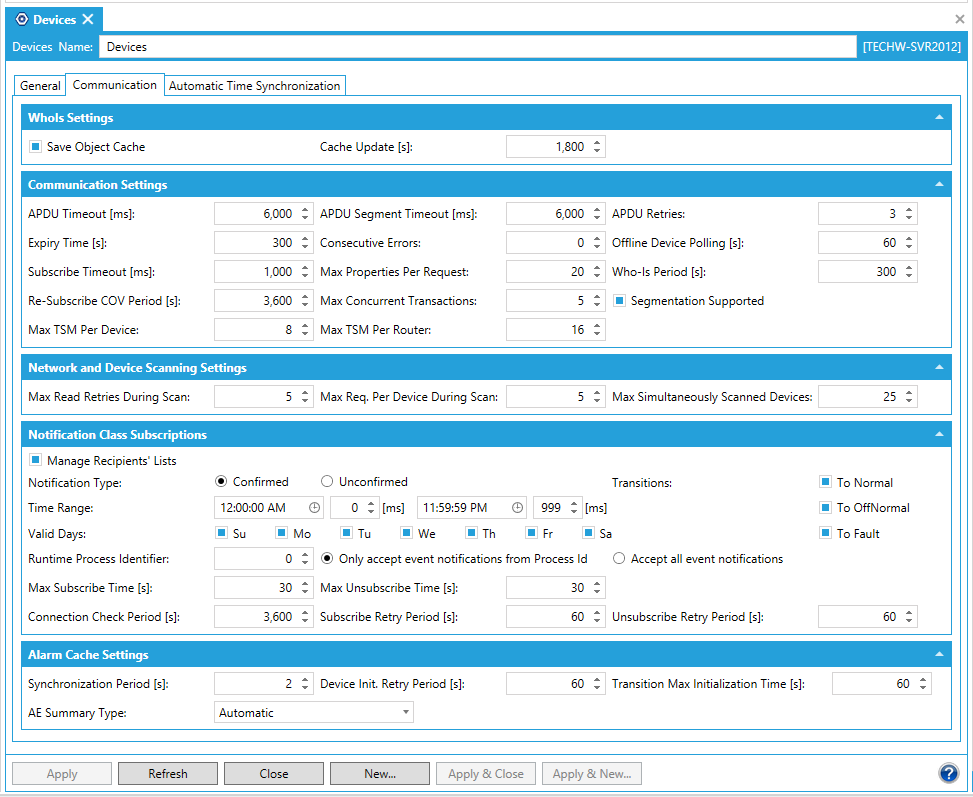
Enter the settings for: APDU Timeout, APDU Segment Timeout, and APDU Retries in the ‘Communication’ tab and Default Polling Rate and Default Priority in the ‘General tab’.
APDU Timeout [ms]: The APDU_Timeout property, of type Unsigned, shall indicate the amount of time in milliseconds between retransmissions of an APDU requiring acknowledgment for which no acknowledgment has been received. The default value for this property shall be 3,000 milliseconds for devices that permit modification of this parameter. Otherwise, the default value shall be 60,000 milliseconds. This value shall be non-zero if the Device object property called Number_Of_APDU_Retries is non-zero.
APDU Segment Timeout [ms]: The APDU_Segment_Timeout property, of type Unsigned, shall indicate the amount of time in milliseconds between retransmission of an APDU segment. The default value for this property shall be 2000 milliseconds. This value shall be non-zero if the Device object property called Number_Of_APDU_Retries is non-zero. See 5.3. If segmentation of any kind is supported, then the APDU_Segment_Timeout property shall be present.
APDU Retries: The Number_Of_APDU_Retries property, of type Unsigned, shall indicate the maximum number of times that an APDU shall be retransmitted. The default value for this property shall be 3. If this device does not perform retries, then this property shall be set to zero. If the value of this property is greater than zero, a non-zero value shall be placed in the Device object APDU_Timeout property.
Expire Time [s]: Specifies the time when the unused values are removed from the BACnet cache (in seconds). This should be set large enough to avoid thrashing of the system. For example if a person is paging through graphics the system will be subscribing to object/properties. If he leaves the graphic , if this parameter was set to zero, the BACnet engine would cancel COV subscription to the device if COV, stop polling, and then delete from the subscription cache. If he paged immediately back to the same page then the system would have to re-establish connections to the data, poll it, and re-add to subscribe cache. This should be set high enough, so that object/properties stay in the cache and subscribed until the user session is finished.
Subscribe Timeout: This is actually the Subscribe Cycle time. - The BACnet engine will only process requests, any request including COV subscriptions and Read Property requests, based on a cycle as determined by this setting. For example if this is set at 5000, (5 seconds), all requests will be accumulated for 5 seconds, and at the end of this period all requests will be sent to protocol stack for processing.
Re-Subscribe COV Period [s]: This is actually the Subscribe Cycle time. - BACnet requires that all COV subscriptions have a timeout. It is not possible to create a permanent subscription. This parameter sets how often all COV subscriptions will be re subscribed. Resubscription cause a significant load on the controllers and on the IO server. Consequently the setting of this parameter should be as infrequent as possible, but allowing for the fact that if there is any failure within the controller that causes it to loose a subscription, the IO server will not attempt to reestablish until this defined time. Note that this operation only applies to device that have been previously discovered, and are in the IO Servers device cache. New devices will require the discovery process to be activate.
Offline Device Polling: Once the IO server detects a device is offline, it stops all attempts to communicate with this device or any object in that device. Periodically based on this setting the IO server will re-attempt to establish communications with this device. It successful the device will be placed online and all required communications to objects in that device will attempt to re-establish.
Max TSM Per Device: The maximum number of BACnet Transactions (ReadProperty, COV Subscribe, WritePropery), that can simultaneously be in active (in a non null state), to a device. When this number is reached, no further transactions will be processed to the device, until one or more transactions are closed. This can be used to throttle activity to a device.
Max TSM Per Router: The maximum number of BACnet Transactions (ReadProperty, COV Subscribe, WritePropery), that can simultaneously be in active (in a non null state), and sent through a specific BACnet router. When this number is reached, no further transactions will be sent through that router, until one or more transactions are closed. This can be used to throttle activity through a router. Please note that some devices, such as Automated Logic LGR’s, are acting simply as BACnet routers, so that all requests are going directly to the underlying MSTP serial bus. This feature can be used to control the amount of activity being imposed on these busses.
If you made changes, click the Apply button.
Now, you need to Add a New Device. Right-click on Devices in the Project Explorer and choose Add Device to Database OR click the Add Device to Database button in the Edit section of the Home ribbon. The Device properties will display.
BACnet Device

Type a name in the Device Name textbox.
Type a description in the Description textbox. This is optional.
Type a device ID in the Device ID box.
You can leave the default polling rate as it is unless you want to override it. If so, then select the ‘Override Default Polling Rate(s)’ checkbox and enter the value (in seconds) in the text entry field. The same goes for 'Override Default Priority'.
Enable Static Binding (optional).
Type a Network number.
You can select a MAC (hex) ID, IP Address or Port number and then enter the required info in the respective text entry field.
Click on the Apply button when you are satisfied with the configuration.
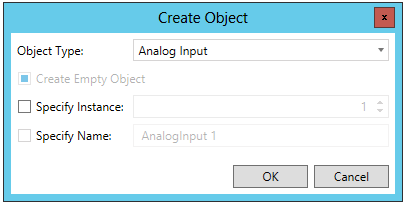
Now, you are going to Create a New Object under your device. Right-click on your Device and select Add Object or Add Object to Database OR click the Add Object or Add Object to Database button in the Edit section of the Home ribbon. A 'Create Object' window may open, requesting you to select the type of object you'd like to create, as well as create an empty object, specify an instance and/or specify a name. If this occurs, make your selections, then click OK. If not, the Object properties will display.
BACnet Object
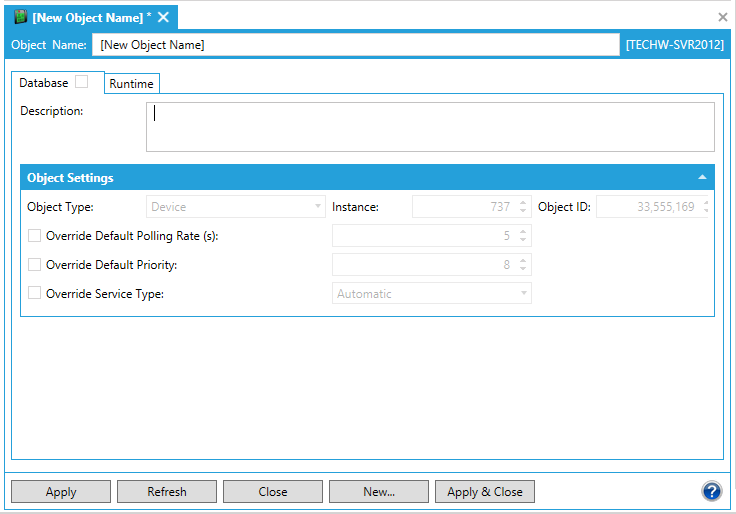
Type a name in the Object Name textbox and provide a Description (optional).
Specify the Object Type in the dropdown menu (Analog Input by default) and specify the right Instance # (usually 1). The Object ID should be generated automatically.
You can leave the default polling rate as it is unless you want to override it. If so, then select the ‘Override Default Polling Rate (s)’ checkbox and enter the value in seconds. The same goes for 'Override Default Priority' and 'Override Service Type'.
Click the Apply button.
Now, you are going to Create a New Property under your object. Right-click on your Object and choose Add Property OR click the Add Property button in the Edit section of the Home ribbon. The Property settings will display.
BACnet Property
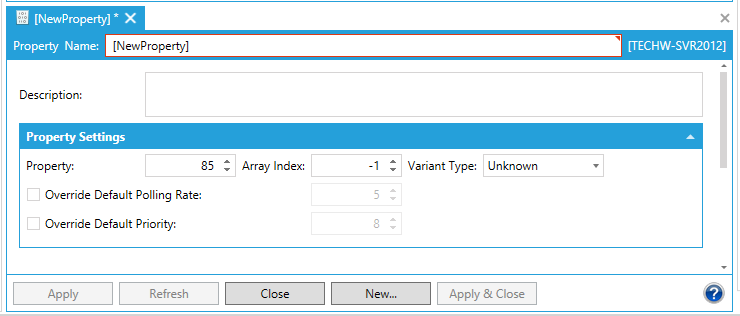
Type a name in the Property Name textbox and a description in the Description textbox (optional).
Type a property number in the Property text box.
Enter an Array Index in the text entry field.
Click the Variant Type pulldown menu to select from Unknown, Long, Float, Double, String, Bool, Dword or Array.
You can leave the Default Polling Rate as it is, unless you want to override it. If so, then select the ‘Override Default Polling Rate(s)’ checkbox and enter the value (in second) in the text entry field. The same goes for 'Override Default Priority'.
Click the Apply button.
The last thing you need to do is Create a Port for your device. Right-click on Ports in the Project Explorer and choose Add Port OR click the Add Port button in the Edit section of the Home ribbon. The Port properties will appear.
BACnet Port
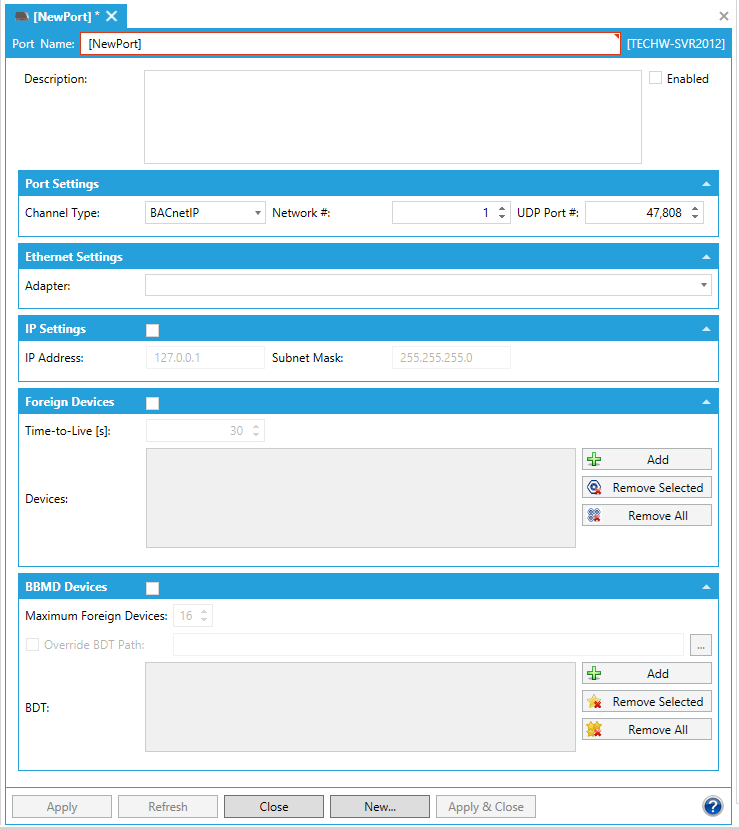
Type a name in the Port Name textbox and provide a Description (optional).
In the Port Settings section, you can then enter the Channel Type, Network #, and UDP Port #.
In the IP Settings section, you can enter an IP Address and Subnet Mask.
In the Foreign Devices tab, you can enter a Time-to-Live [s], and add or remove Devices.
In the BBMD Devices yab, you can enter the Maximum Foreign Devices, and add or remove BDT devices.
Click Apply to confirm.
NOTE: Default BACnet communication is based on IP protocol, where the default port (47808) can be changed (under Ports) if you really need it to be, but, in most cases, you can use the default settings. Also notice that Ports in the Workbench are ICONICS proprietary interfaces created specifically for BACnet communication, where the IP port is not equal to a Workbench port.
See Also:
BACnet Configuration Quick Start
BACnet Client-Server Architecture
BACnet in the Workbench and GraphWorX64