![]()
![]()
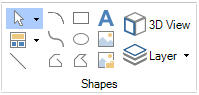
In GraphWorX, the Shapes section on the Home ribbon allows you to select objects in the display, add shapes to the display, add panels and layers, and add 3D views. Shapes are objects that you can add to a GraphWorX display. You can move them, rotate them, group them, hide them, and even transform them from one shape into another. You can assign dynamic properties (such as data display, animation, pick actions, and other forms of user activity) to a shape as well as any object in GraphWorX. Icons that appear in the Shapes section are listed below.
|
|
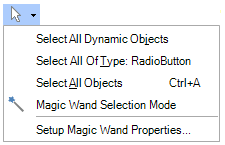
Select |
Selects multiple objects in the display. From the drop-down menu, you can select all objects that have a dynamic, select all objects of the last shape used, or select all objects in the display. |
|
|
Panel |
Adds a panel to the display. There are several types of panels for organizing objects in your display. For more information, refer to Panels. |
|
|
Line |
Draws a straight line. Click and drag on the work surface to draw a line. |
|
|
Arc |
Draws an arc. Click and drag on the work surface to draw an arc. |
|
|
Spline or Path |
Lets you draw a curved and/or twisting line. Click on the work surface to create a starting point, then click to identify the first turn, click to identify the point of the next turn, continuing until the path is complete. To indicate that the path is complete, double-click or press the Esc key. Modifying a Path is the same as modifying a Polygon. |
|
|
Polyline |
Lets you draw a line with angles. Click on the work surface to create a starting point, then click to identify the first turn, click to identify the point of the next turn, continuing until the polyline is complete. To indicate that the polyline is complete, double-click or press the Esc key. Modifying a Polyline is the same as modifying a Polygon. |
|
|
Rectangle |
Draws a four-sided rectangle with right angles. Click and drag the work surface to form the rectangle in the size and shape that you desire. |
|
|
Oval |
Draws a circle or oval. Click and drag the work surface to form the oval in the size and shape that you desire. |
|
|
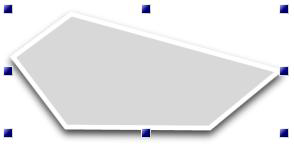
Polygon |
Draws a multi-sided shape with alternate angles. Click on the work surface to identify the first corner of the polygon, then click to identify an adjacent corner, then click to identify the next corner, continuing until the polygon is complete. To indicate that the polygon is complete, double-click the last side or press the Esc key.
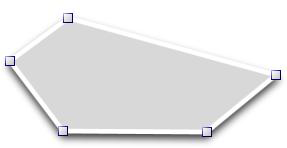
Modifying Paths (Splines), Polylines, and Polygons: To make a polygon bigger or smaller, single-click on it to expose handles around it, then grab the handles and drag the corner or side to the size you desire.
To modify the shape of the polygon, double-click it to expose handles at its corners, then drag a handle to move the corner. To add a new handle for creating a corner, simply click on a line where you want the handle to be added, then drag the handle as needed. To remove a handle, right-click the handle. |
|
|
Label |
Adds a text label to the display. Click the icon, then click and drag the surface to draw the size of the text you are adding. "Label" is the default text; click the text and type the text to be displayed in the label. You can use the options in the Home ribbon's Text section to change the label's appearance. |
|
|
Embedded image |
Adds an embedded image to the display. An embedded image is one that is stored within the GraphWorX64 file. Compared to a referenced image (see below), embedded images provide faster image loading times, but require additional disk space to store and memory to load.
To add an embedded image, click the icon then select the image file; then click and draw the image on the drawing surface at the size you desire or simply click once to place a small image on the work surface. You can re-size the image after placing it on the work surface. An embedded image will display (Embedded Image) as its Source property. |
|
|
Referenced image |
Adds a referenced image to the display. A referenced image is one that is loaded from an external file. Compared to an embedded image (see above), referenced images make almost no demands on file storage, but introduce latency into display loading times.
To add a referenced image, click the icon then select the image file; then click and draw the image on the drawing surface at the size you desire or simply click once to place a small image on the work surface. You can re-size the image after placing it on the work surface. A referenced image will display the path and file name as its Source property. |
|
|
3D view |
Adds a 3D viewport to the display. Click the icon, then click and drag the work surface to create the viewport. The 3D viewport has its own features and ribbons. For more information, refer to Features Of 3D. |
|
|
Layer |
Adds a new layer to the display. For more information, refer to Layers. |