![]()
![]()
New in version 10.96, commands can be triggered in batches. Previously, multiple commands could be triggered at the same time (such as with multiple pick actions on a single button) but they were executed independently from each other. Now, you can configure a chain of commands, be sure they will always trigger in the correct order, and even set up conditional branches and looping.
Batch commands are a script-free way to make your displays and project much more powerful.
Batch commands can be configured anywhere commands can be used (for example, on a pick action in GraphWorX64). Choose the Batch command in the list, then configure the Steps parameter, which is a collection of subsequent commands. The batch configurator window will appear.
Batch Configurator Window
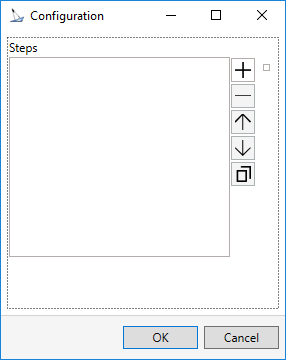
Add new steps to the batch by clicking on the plus sign on the right. If you want to remove a command you can select the command in the list and click on the minus button. The arrow buttons will move the commands in the list up or down. The last button will copy a command.
Before a step is taken, optionally you can have it evaluate a condition and decide whether to execute this step or do something else (such as skip this step or quit out of the batch entirely). In the Step section, select Execute Conditionally, then specify your condition in the Condition field as an expression.
If the condition expression is met, the action will complete as configured. If the condition expression is not met, the On Condition Fail action will take place (configured in the Continue With section).
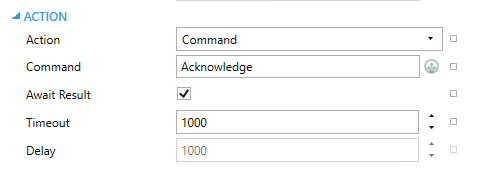
Most steps will be a command. Choose Command as the Action, then configure your specific command in the Command field.
If you would like to be sure your command has completed before the batch moves onto the next step, check Await Result. When Await Result is checked, the step will wait for the command to complete, up to a maximum of the Timeout value (which is specified in milliseconds). If the timeout is met before the result is returned, the batch will perform the On Fail action (specified in the Continue With section).
Command Action
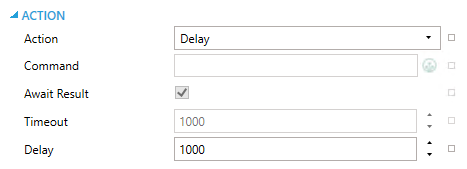
Instead of a command, you can choose Delay as the Action. The duration of the delay (in milliseconds) is configured in the Delay field. The batch will wait for the configured time before moving onto the On Success action (specified in the Continue With section).
Delay Action
You may also choose to take no action by picking None as the Action. This can be useful if you want to make a step that is purely a condition and takes no action by itself. A None step will proceed directly to the On Success action, provided the condition (if any) is met.
Note: The next beta or release will have the On Fail field disabled for Delay and None actions, as that field is not used for those actions.
The Continue With section is where you would choose the next steps after this action finishes, based on whether it succeeded, failed, or the condition (if one is configured in the Step section) fails.
Typically, when a step finishes you will choose Go to next step, but other options include Quit (end the batch) or a specific step. Users are encouraged to use Go to next step whenever possible, and a specific step only when the step is not next, such as when creating loops.
Certain special context variables are available to the condition expression. Select the expression button next to the Condition field (make sure that Execute Conditionally is checked), then select Variables, then go to the Context Variables tab.
This example has multiple tags that are written when this button is pressed with different values for each tag.
Add a button to a GraphWorX64 screen and choose Batch for the Command.
Go into the Steps collection and add a new step.
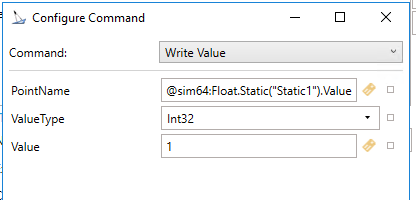
Configure this step to be a Write Value command.
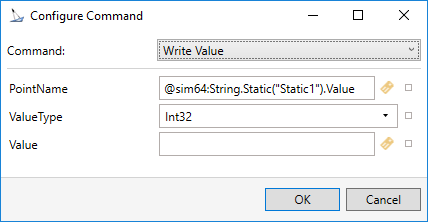
For the Write Value parameters, choose a PointName of @sim64:Float.Static("Static1").Value and a Value of 1.
Select OK.
Write Value for Reset
Select the step and select the duplicate step button. You should now have two identical steps.
Give the new step a unique name and modify the OPC point and the value being written to it so that you write to a new point with a different value.
Copy this step for several more points you want to write to. When you are done, select OK.
Add process points to your display for all the points you’ve configured in the batch command.
Go into runtime and click on the button you created. The points you wrote to should have the values written to them by the batch command.
This example explains how to make a single button export the data from a TrendWorX64 Viewer into a .csv file and then show where the file was saved.
This is a more advanced example, so we will be adding all our steps first, then coming back and setting the Continue With actions later.
1. Add a TrendWorX64 Viewer to the screen. Make sure it has a pen, and set its CommandingName to TWX.
2. Add a process point configured with a DataSource of @sim64:String.Static("Static1").Value.
3. Add a button configured to execute the Batch command, then edit the Steps collection.
4. Add a step, name it, Clear OPC Point and set the command to be Write Value.
5. Configure the Write Value command to write a blank string to @sim64:String.Static("Static1").Value. This tag will store the result of our batch. Click OK when done.
Command Settings to Reset Point
Make sure that Await Result is checked, and the Timeout is 1000 (milliseconds).
In the Continue With section, make sure that On Success is set to Go to the next step and On Fail is set to Quit.
Add a new step and give this step the name, Export Data from Trend.
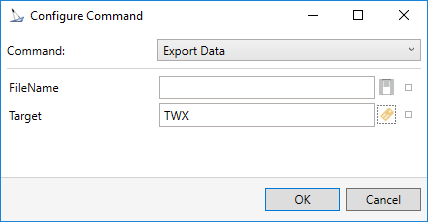
The command for this step is going to be Export Data. Leave the FileName blank, but put the name of our TrendWorX64 Viewer, TWX, as the Target. Click OK.
Export Data Command
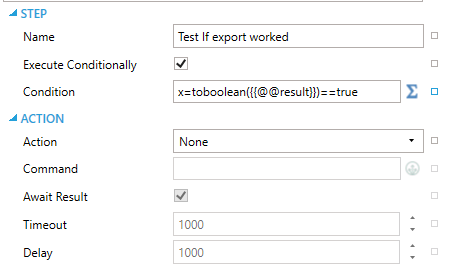
Add a new step called Test if export worked. This step will check the result of the previous step. Configure it with the following settings:
Export Settings
Add a new step called Write Worked. This step will write the name of the file that was chosen by the user when the Export Data command was executed. Set the command to Write Value with the following settings:
|
PointName |
@sim64:String.Static("Static1").Value |
|
ValueType |
String |
|
Value |
{{x={{@@result[filename]}}}} |
Add a final step called Write Failed that writes “Timed Out” to our result tag, with these settings:
|
PointName |
@sim64:String.Static("Static1").Value |
|
ValueType |
String |
|
Value |
Timed Out |
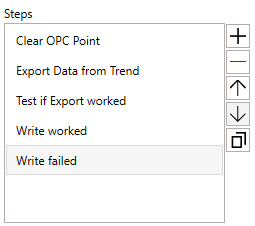
You should now have five commands like this, in this order:
Commands in Order
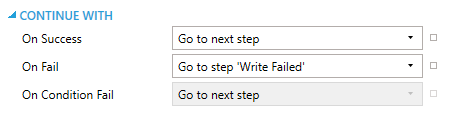
Go back to the Export Data from Trend step. Set On Fail to be Go to Step Write Failed and On Success to Go to next step.
Export Data Continue Settings
Go back to the Test if export worked step. Set On Condition Fail to Go to the step Write Failed, set On Fail to Quit and On Success to Go to next step.
If Export Worked Continue Settings

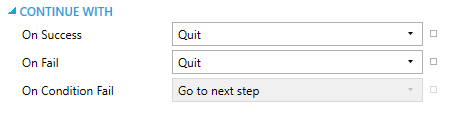
Go back to the Write worked step and set both the success and the fail set to Quit.
Write Worked Continue Settings
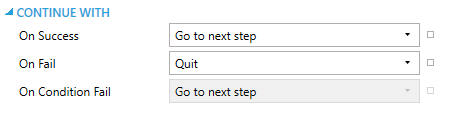
The Write Fail step should have success go to the next step and the fail to quit.
Write Fail Continue Settings
Go into runtime while Hyper Historian is running on the system. Verify that your TrendWorX64 Viewer is displaying data, then click on your button. A prompt should open asking where you want to save the CSV file. Choose where you want to save this on the machine. Our results process point looking at the static tag should update with the path where the file was saved.
See Also:
Enabling Commands Through the Asset Navigator Control