![]()
![]()
The new plugin module for MergeWorX should cover data exported from MELSEC iQ-R series High Speed Data Logger Module (Module number: RD81DL96) as well as from MELSEC Q series High Speed Data Logger Module (Model Number: QD81DL96).
· MELCO has two types of data logger products as their PLC modules.
o MELSEC iQ-R series High Speed Data Logger Module (Model Number: RD81DL96)
o MELSEC Q series High Speed Data Logger Module (Model Number: QD81DL96)
· MELCO data logger modules are shipped about 2,000 units every 6 months.
· Provides several functional features data logger modules have major three features:
o Data logging feature --- logs PLC register values to CSV/Unicode text/binary format files at a specified sampling interval.
o Event logging feature --- monitors PLC register values and logs events that occurred.
o Recipe feature --- performs read/write operations according to the content of recipe files saved in an SD memory card.
· MELCO data logger modules can record PLC register values into log files temporally, and then forward the log files to a PC server.
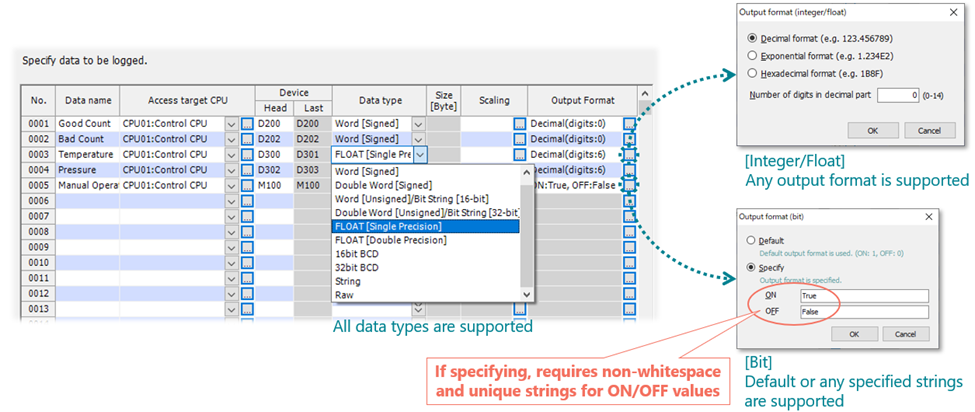
o Supports Boolean, 16-bit signed/unsigned integer, 32-bit signed/unsigned integer, single/double-precision floating-point number, string, raw data (array of bytes).
· Customers like to use MELCO data logger modules for purpose of IT/OT convergence.
o iQ-R/Q series PLC CPU modules also has a simple built-in data logger feature, and control engineers like this feature for the purpose of real-time control tuning and trouble shooting.
o IT engineers like to use data logger modules which can be mounted on PLC backplane separately and has no effects to real-time controls in PLC CPU module.
o MELCO data logger modules are used for the purpose of quality monitoring and recording in high-speed control systems (like processing machine of paper diapers), production recording in traceability systems (like automobile manufacturers), etc.
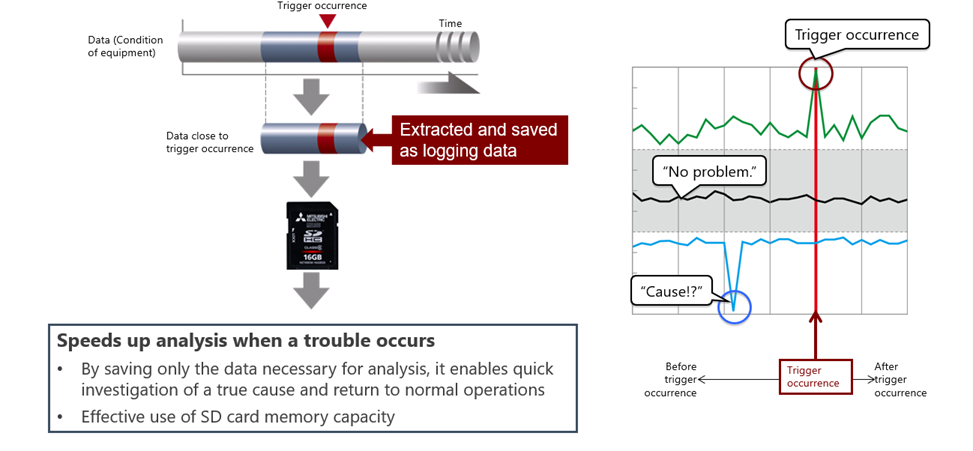
The first key feature of the RD81DL96 and QD81DL96 is High-speed logging.
· Data can be captured in milliseconds for ever program scan in PLC CPU
· Able to log all changes in specified control data

The second important thing is the Trigger logging feature which allows to significantly reduce the amount of data need to be checked/transferred to determine the cause of the problem.
There are the following options to get your data from your PLC CPU Module.
· SD Card - simplest option is just let Data Logger Module to write the log files to SD Card which is then physically moved to processing machine.
· Shared Folder – you can use option to put data to some shared folder, transfer the particular log files via FTP Client for example.
· Email attachment – you can also let the Data Logger Module send the log files via Internet to mailbox.
High Speed Data Logger Module Configuration Tool is used for the following operations: creating various settings that are required for operating a high speed data logger module, writing and reading the settings, diagnosing the operation of a module in operation, and stopping and restarting a module operation. In addition to it, the following operations can also be performed in Configuration Tool.
· Editing the module setting
· Writing the module setting
· Reading the module setting
· Displaying the module information while a module is running
· Operating a module while it is running
There are the following options in the configuration tool to setup
· Data logging setting
· Event logging setting
· Report setting
· Common setting
Only Data logging and common setting features are supported by MergeWorX Plugin. Common setting allows user to set following settings, they are not related with the plugin itself so detailed description is out of scope of this document.
· Network setting
· Time synchronization setting
· Access target CPU setting
· File transfer setting
· Email setting
· Security setting
· Logging operation setting
· SD memory card setting
There are some limitations for the Data logging related to the tabs of Data logging configuration tool.
Logging type/File format – there are no limitations for file format, so you can export to Unicode text file/Binary file and also CSV file. In the same way, you are free to use Continuous logging as well as Trigger logging which is one of key feature of the hardware
module.
Sampling – there are no limitations for sampling. You can use High speed sampling as well as General sampling with any specification.
Data – there is a limitation related to bit Output format. It requires non-white space and unique strings for ON/OFF values.
Period (Continuous logging) – no limitations for continuous logging. You can specify any period.
Trigger + Number of trigger lines (Trigger logging) – no limitations for these sections. You can use single condition or Compound condition according to your needs. In the same way, you can set any number of data before and after the trigger.
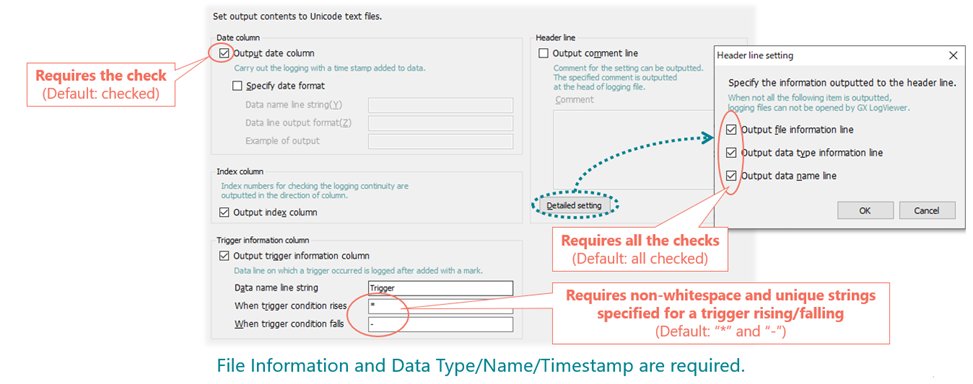
Unicode text / CSV output – here you have some restrictions that you have to keep in mind. You need to let the Output data column to be checked (default value). Trigger raise/fall condition requires unique strings specified for both fields (default values are “*” for trigger rising and “-” for trigger falling). Header line setting requires all following options to be checked which is default value (Output file information line, Output data type information line, Output data name line).
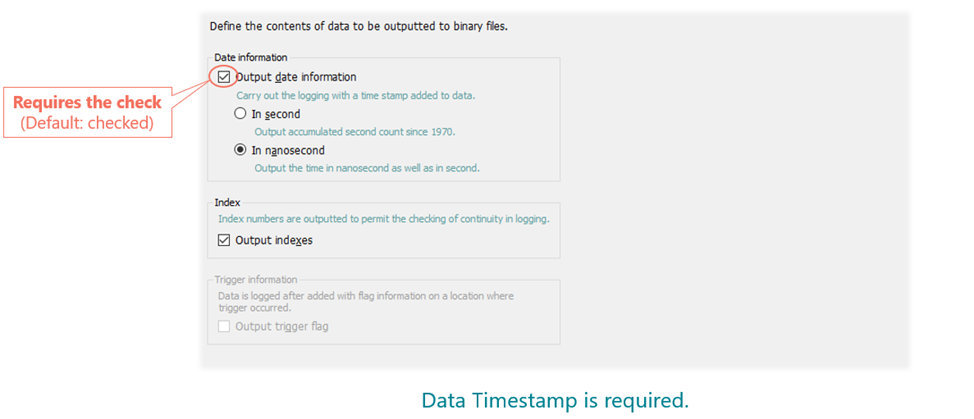
Binary output – it works the same way as for txt and csv. For binary type, you also need to have the "Output data" column to be checked (default value).
Folder & File definitions – there are no constraints related to files and folders. So you can use all the functionality there (like subfolders, various file settings related to file specification etc.).
Finish – there are no limitations. You just need to confirm this.
In the first table, you can see that there is RD81DL96_1 in the file information line – this means that the it’s file with header for iQ-R serues RD81DL96. The next column with value 3 informs you that there will be Data types definition on the third line. The next column with value 4 says that there are Names definition on the fourth line. Following column with 5 decides that the data are starting from line 5. Finally the last column with value 2 means that there is an extra optional line with a file comment and it is the second in the file. Keep in mind that if you have a file defined like this, you could need to self-modify it. If you change some definition, it may happen that the parsing fail and the file will not be processed.
|
[LOGGING] |
RD81DL96_1 |
3 |
4 |
5 |
2 |
<- File Information |
|
PROCESSING TEMPERATURE AND PRESSURE FOR EACH PART |
<- File Comment (Optional) |
|||||
|
DATETIME[YYYY/MM/DD HH:MM:SS] |
INDEX |
STRING[5] |
FLOAT [DEC.1] |
SHORT [DEC.0] |
TRIGGER [on;off] |
<- Data Types |
|
TIME |
INDEX |
Part Number |
Temperature |
Pressure |
Trigger |
<- Data Column Names |
|
2022/02/09 10:12:22 |
1 |
P352 |
12.2 |
1095 |
On |
<- Data Records |
|
2022/02/09 10:12:23 |
2 |
P352 |
30.8 |
2807 |
|
|
|
2022/02/09 10:12:24 |
3 |
P352 |
75.4 |
6582 |
Of |
|
|
2022/02/09 10:12:25 |
4 |
P352 |
81.5 |
7256 |
On |
|
|
… |
… |
… |
… |
… |
… |
|
In the second example, it is practically the same. You can just observe that the file comment line is missing, and therefore all the indexes have to be shifted; otherwise, the processing will fail.
|
[LOGGING] |
QD81DL96_1 |
2 |
3 |
4 |
|
<- File Information |
|
DATETIME[YYYY/MM/DD HH:MM:SS] |
INDEX |
STRING[5] |
FLOAT [DEC.1] |
SHORT [DEC.0] |
TRIGGER [on;off] |
<- Data Types |
|
TIME |
INDEX |
Part Number |
Temperature |
Pressure |
Trigger |
<- Data Column Names |
|
2022/02/09 10:12:22 |
1 |
P352 |
12.2 |
1095 |
on |
<- Data Records |
|
… |
… |
… |
… |
… |
… |
Earlier, there was an old EdgeCross output plugin with a similar structure, but there are some key differences mentioned in the table below.
|
|
Edgecross Output File |
Q series / iQ-R series Data Logger Output File |
|
File Format |
CSV file format (*.csv – Comma delimiter) |
CSV file format (*.csv – Comma delimiter) UNICODE Text file format (*.txt – TAB delimiter) *Should better support both formats. |
|
Encoding |
CSV: ASCII (default) *A user has to select a proper encoding. |
CSV: Shift-JIS (codepage: 932) UNICODE Text: UTF-16 little endian *Should better automatically switch a proper encoding. |
|
Header rows in file |
*There is 1 header row only. Row 1: data item names |
*There are 3 or 4 header rows – depends on Data Logger setting. Row 1: file format identifier Row 2: file comment (optional) Row 3: data types Row 4: data item names |
|
Data type of field values |
Date & time, Real number |
Date & time, Decimal integer, Hexadecimal integer, Real number, String, Boolean |
|
Timestamp format |
Always try to interpret implicitly by a current culture |
Should interpret exactly by a user explicitly specified format in the data type row (Row 3) |
|
Time zone for timestamp |
A user can choose UTC (default) or local time zone for timestamp interpretation |
A user should choose local time zone (default) or user specified time zone for timestamp interpretation. *Should take care of a situation of different time zones in between data logging site and hyper historian site. |
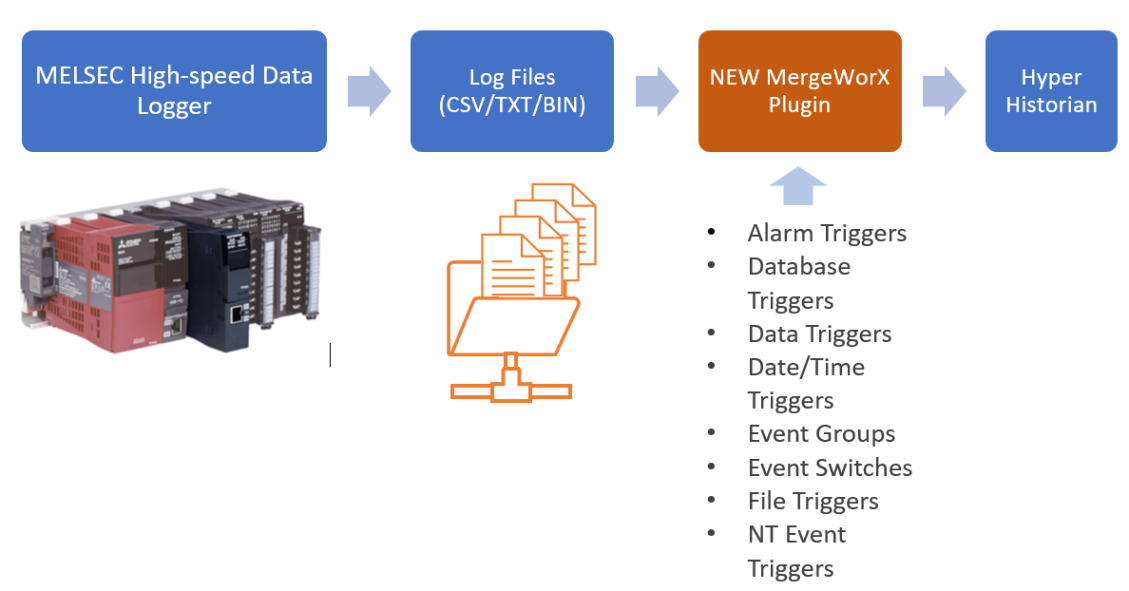
MergeWorX™ is a tool used for automatic or manual insertion of data into the Hyper Historian (or any OPC UA history write capable server). It uses a plugin technology, so we wrote a new plugin to consume all the source data that are created by the Configuration tool from the module. As always, it allows you to configure and store your plugin configuration in the MergeWorX configuration database, using a standard ICONICS configuration tool (Workbench) to configure it. You do not need to write your own, separate configuration tool. MergeWorX uses the ICONICS FrameWorX server for communication. It can be remote to the Hyper Historian. Depending on your plugin implementation, it may be possible to be remote from your data source as well. MergeWorX is an event driven tool and it uses ICONICS Triggers for this purpose. There is a variety of types of triggers available including: alarm, database, date/time, data, file, and NT event. This allows you to make fully automatic data merges as well as manually driven data merges triggered, for example by a button press in a GraphWorX64 display. Triggering is done at the level of the plugin. Consequently, you can have multiple instances of the same plugin, each trigged by its own trigger, each processing data from a different IO/factory floor device.
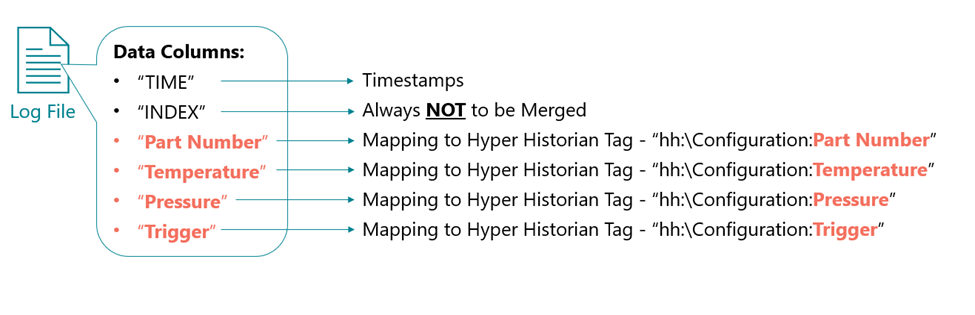
MergeWorX can be configured to process the device data that is being merged in a similar way to how OPC servers processes data. This includes name mapping, data conversion, scaling, and clamping. When the MergeWorX engine receives the data, it tries to process it. If the point identification does not match any of the MergeWorX configured Tag’s input names, it simply leaves out the processing when it sends the output. The plugin configuration also includes a setting called output node. The idea is that you can specify the Hyper Historian (HH) node name and then omit, in the Tag configuration, the node name part of browse path. The MergeWorX engine will join the two (Hyper Historian node name and Tag name) during the processing. This allows you to easily switch to a different HH node (with the same configuration) by changing a single setting. Note: the output node name also plays a role for non-configured tags. This means that the output node name will be added also to all non-configured points returned by plugins. It means that all the following points have to be considered:
- The MergeWorX tag is just a mapping item - it says the Sensor1 from the csv is hh:\Configuration:Sensor1.
- If there is a HH tag specified in the column, you do not need the MGX tag at all.
- You can combine the Output Node Prefix settings (in MGX provider under Plugin type selector) with the the csv column like this:
Output Node prefix = hh:\Configuration: and text in csv Sensor1 it will go together as hh:\Configuration:Sensor1 and you are ok as well.
- You can have even more complex tree structure defined like this, just to put in csv hall1\plc1 before your csv column.
The following screenshot demonstrates how the tag names from 4.4 could be processed and mapped to Hyper Historian tags.
For each plugin, you need to specify the name property. Required is also selecting the Plugin Type from the combo box and setting the Trigger Point. In the general properties, it is also possible to specify the Output Node Prefix. All these 3 settings are explained below. All the next settings are possible to set after the selecting the Plugin Type and they are specific to the MELSEC Data Logger plugin.
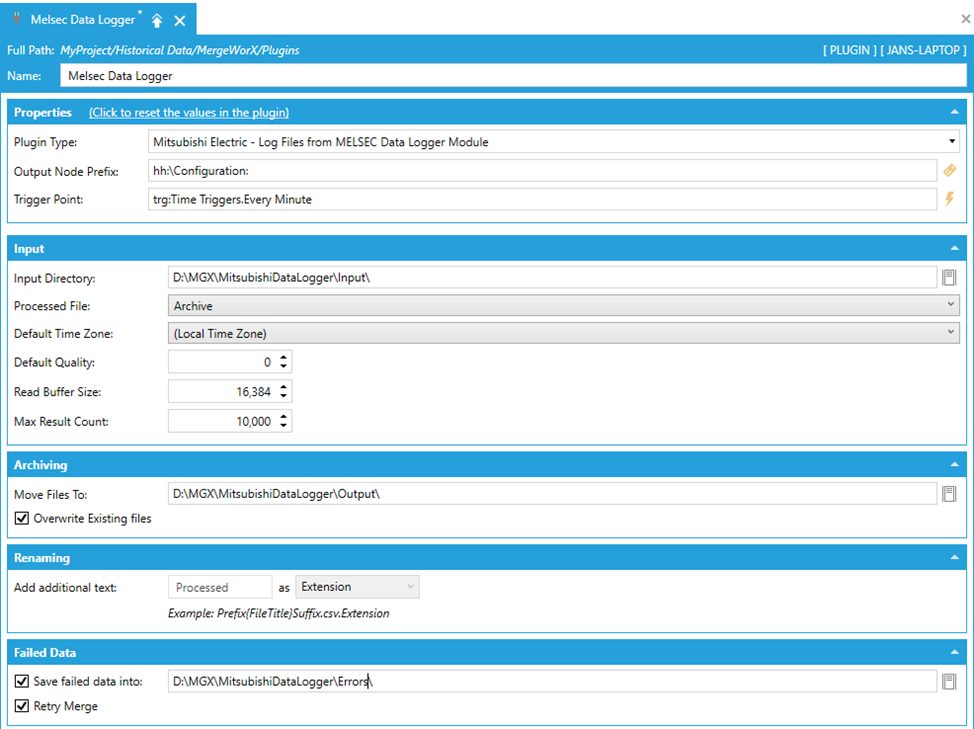
Name – the name of plugin. Take a note that if you want temporarily disable the plugin, you can put (disabled) at the end of the name and your plugin will not be hit by the next trigger.
Plugin Type – here you have to select the Mitsubishi Electric - Log Files from MELSEC Data Logger Module from the combo box.
Output Node Prefix – this option together with name of the tags used in the input file is being combined in the final Hyper Historian point. It is described in 5.1.
Trigger Point – the triggering mechanism uses GENESIS64 Triggers. The user needs to configure and associate MergeWorX plugins with triggers that will trigger a merging action. There are a variety of types of triggers available, including: alarm, database, date/time,
data, file, and NT event.
Input Directory – the folder where the input files should be put. Once the trigger is being hit, the folder is scanned and all the CSV/TXT/BIN files are added to the processing queue.
Processed File – this option decides what will be done with processed item. There is an option to Archive/Rename/Delete processed file.
Default Time Zone – with this option, the user can specify the time zone of timestamps in log files to be imported. This should address a use case where a user receives and imports files which were logged in a different time zone.
Default Quality – defined by class Ico.Fwx.Communication.Core.StatusCodes (Assembly FwxAsyncCore.dll). The quality has to be specified by a numeric value. Default value is 0, which means Good.
Read Buffer Size – it is just a Chunk size to read from the file. Its default value is 16 Kbytes, minimum value is 4 Kbytes and maximum value is 16 Mbytes. This and next property are bit of “try to improve your experience” settings for users who already have some experience with MGX and definitely are trying to merge bigger amounts of records to HH. Obviously, setting a bigger numbers can improve the speed of the process, but you also need to consider the environment circumstances (available system resources, using some remote disk, affecting other processes, etc.). It it meant by this that the user has to optimize it for his situation and that’s the reason why it is in advanced section and there is no clear advice how to set them “the best way”.
Max Result Count - which is a max amount of items returned for one TryGetData call. Minimum is 1 and maximum value is 32784 with default equal to 10000.
Move Files To – this and the following option are available only if Archive is selected as Processed File option. It is the directory where the processed files from Input Directory are moved. This folder cannot be empty and also cannot be the same as Input Directory
from obvious reasons.
Overwrite Existing files – if checked, the file in the processed directory is replaced by the same one replaced lately.
Add additional text – this enables user to add custom string as a Prefix/Suffix/Extension. Take a note that this field is enabled only if Rename is selected as Processed file option. Also there are obvious restrictions - the string value specified as Add additional text cannot contain special characters which are prohibited in Windows File System.
Save failed data into – this is the folder where all the data that failed during processing goes. The failed data are serialized to a .json file and put there. Take a note that if retry merge is checked, the data from this folder are automatically processed (but once the deserializing and processing of the .json file is deleted, even the second attempt will not work). This folder cannot be empty.
Retry Merge – if this option is enabled, the data from the Failed data folder are automatically processed (but once the deserializing and processing of the .json file is deleted, even the second attempt will not work). The default value is false.
You can also optionally define the MergeWorX tag that will help you to map the tag name from your input file (CSV/TXT/BIN) to a real Hyper Historian tag in the configuration. Just take a note that this is not necessary at all and you can map with just using the Output Node Prefix property combined with proper tag names as specified in 5.1. The MergeWorX tag can still be useful in case you want to use some advanced functionality, such as specifying the data type, scaling and clamping.
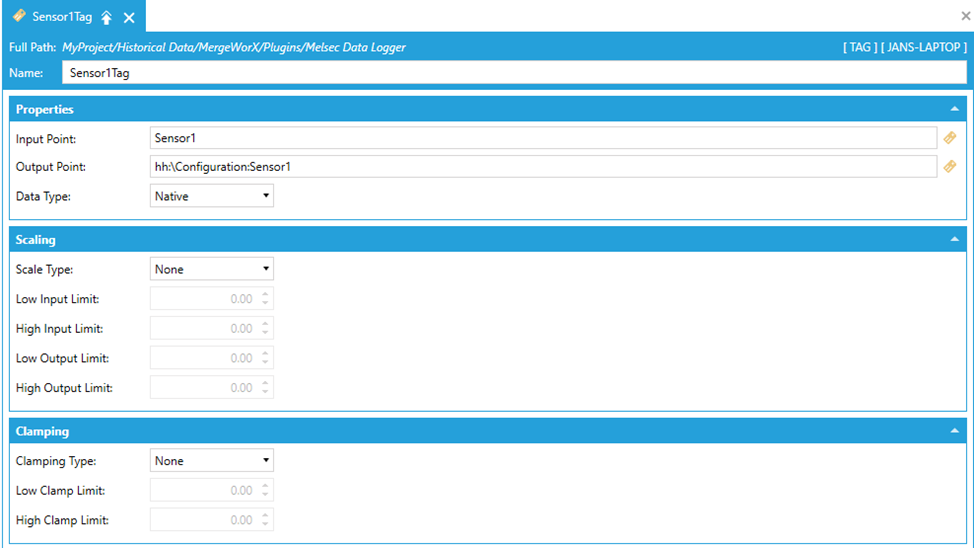
Name – the name of a tag. It is not necessary that it corresponds with a real history tag name or the tag used in the input file.
Input Point – here you have to specify the tag name from the input file. So it means that if there is Sensor1 in your file, it needs to be specified here.
Output Point – this is the target Hyper Historian tag. So if you want to merge values specified for Sensor1 into hh:\Configuration:Sensor1, the full path must be there. Take a note that it can be browsed, but only if HH is running; otherwise, it is not exposing the
namespace.
Data Type – using this setting you can override the data type from your input file or let it be if you chose Native. You can do same thing also in HH tag. Setting the data type in HH has always the precedence so the data will be tried to parse first in type specified in HH tag or let it as it come if you choose native.
Scale Type – you can use different scaling by this setting. If you don’t want to use it, let this option be None. Otherwise, there are options "Exponential/Linear/Logarithmic/Square Root".
Low Input Limit – select Input Low Range value here. Default value is 0.
High Input Limit – select Input High Range value here. Default value is 0.
Low Output Limit – select Output/Scaled Low Range value here. Default value is 0.
High Output Limit – select Output/Scaled High Range value here. Default value is 0.
Clamping Type – you can use different clamping by this setting. If you don’t want to use it, let this option be None. Otherwise, there are options "Low/High/Low and High".
Low Clamp Limit – select Clamp Low Range limit value here. It is only available if you select Low or Low and High clamping type. Default value is 0.
High Clamp Limit – select Clamp High Range limit value here. It is only available if you select High or Low and High clamping type. Default value is 0.
Plugin does not appear in WB
If the Plugin for some reason didn’t appear in your MergeWorX provider, it should be built-in. Please check the following entry.
Since the introduction of WBD, it is necessary to specify your new plugin in 2 different xml files. Previously the WinForm(that was used in Workbench classic) was directly part of the runtime dll. The runtime related dll has to be available and also listed in MGXPluginsLocation.xml file. This file is located in the Components folder (usually \Program Files\...\Components). Check this file if the path to your runtime plugin is correct. [path to your plugin with .dll] The path can be relative or absolute and there needs to be a .dll extension at the end. You will have to restart MergeWorX for the changes to take effect.
Contents of file: MGXSamplePlugin.dll
<?xml version="1.0" encoding="utf-8" ?>
<!--
*********************************************************************
MergeWorX Plugin Configuration Settings
Copyright (c) 1986-2013 ICONICS, Inc.
*********************************************************************
-->
<Plugins>
<Plugin>MGXPlugin.MelsecDataLogger.dll</Plugin>
<Plugin>MGXCSVPlugin.dll</Plugin>
<Plugin>MgxMcEcoWebSvrPlugin.dll</Plugin>
<Plugin>MgxMcEco3DemandDataPlugin.dll</Plugin>
<Plugin>MgxMcPlcPlugin.dll</Plugin>
<Plugin>MxCSVPlugin.dll</Plugin>
<Plugin>JCIDatabasePlugin.dll</Plugin>
<!--<Plugin>MgxMcGotPlugin.dll</Plugin>-->
</Plugins>
Failed to create instance of the plugin error in trace
The second step is to add the Workbench Desktop Configuration plugin definition to the IcoMgxPluginDefinition.xml, which is available at the same location as the previous file. Again you have to check the file if the new entry for the plugin was added and also the dll is available in the components folder. If the entry is not there or if it is not correct, you will get an error like Failed to create instance of plugin ME (E8C671EA-3FF8-45D7-98A1-862FB927EC4D). The file should look like this:
<?xml version="1.0" encoding="utf-8" ?>
<!--
*********************************************************************
MergeWorX Plugins Configuration File
Copyright (c) 1986-2010 ICONICS, Inc.
*********************************************************************
-->
<Plugins>
<Plugin Type="Ico.Workbench.Mgx.Plugins.CsvPlugin" Assembly="IcoMgxCsvPlugin" />
<Plugin Type="Ico.Workbench.Mgx.Plugins.McEcoWebSvrPlugin" Assembly="McEcoPlugin" />
<Plugin Type="Ico.Workbench.Mgx.Plugins.McEcoWebSvr3DemandDataPlugin" Assembly="McEco3DemandDataPlugin" />
<Plugin Type="Ico.Workbench.Mgx.Plugins.McCsvPlugin" Assembly="McCsvPlugin" />
<Plugin Type="Ico.Workbench.Mgx.Plugins.JCIDatabasePluginWPF" Assembly="JCIDatabasePluginWPF" />
<Plugin Type="Ico.Workbench.Mgx.Plugins.MelsecMgxPlugin" Assembly="IcoMgxPluginMelsecDataLogger" />
</Plugins>
File failed to be processed: (State: Invalid) appears in traces
There is an issue with formatting of the file. The file generated from the configuration tool should always be well formatted, but it is possible that during the manual edit, some issue can occur. There can be some incorrect indexes, invalid formatting of something or just some parsing issue. In this case, the file is just skipped (it is Archived/Deleted/Renamed according to your Processed file setting, but obviously no data are sent). In order to fix this, you need to review and fix the file whose name is mentioned in the trace - see Examples of Log Files generated by Data Logger for some formatting examples. Take a note that no failed data are created in this case, because the data are skipped and not sent to process. Only for the data that were sent and returned with an error are failed data created.
Failed to write data for. FwxClient - Callback code: Bad - Invalid Point Name. HistoryServer - UpdateResult code: Not Available.
There is an issue with the specification of the point name. Check if the tag that is specified in the error exists in the Hyper Historian configuration. If you have a problem with constructing the proper tag name, please navigate to Plugin General for more information.
Callback code status: Good, but no values seems to be written.
There is a setting in Hyper Historian logger which is says that the data older than a specified date (default value is 2 weeks) are not accepted. So please check the setting in Hyper Historian and confront it with your data in the files. If you try to merge the older data, you have to set the HH setting to some earlier date.