![]()
![]()
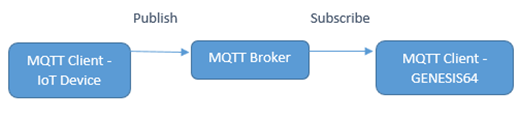
MQTT is a publish/subscribe messaging protocol and can be used as a data source to the ICONICS platform. The IoT device can publish data to the MQTT broker in a JSON (JavaScript Object Notation) lightweight data-interchange format or binary format (also there is Gzip compression format option for both of these). Other MQTT client(s), such as the GENESIS64 application, can subscribe to the broker and consume the data being received.
MQTT Publish/Subscribe
A topic is a string which is used by the broker to filter messages for the connected client. A topic consists of one or more topic levels. Each topic level is separated by a forward slash.
The base topic in our example is: home/garden/fountain
The topic string should also contain the device location. For example, if our DeviceID is Device1 then our topic string should be: home/garden/fountain/Device1
1. First, we need to browse our MQTT Broker configuration, which can be found in Workbench under Internet of Things > MQTT Brokers.
2. Right-click on it and select Add MQTT Broker.
3. Name your broker accordingly (it can be same as name of your MQTT server, for example, “MQTTBroker1”).
4. Fill your Server Address (the address can be in URL format).
5. If you are using credentials please check use Security Credentials and fill Username and Password.
Now we will create new publisher that will send our data to our MQTT broker:
1. Right click on Publisher Connections and select Add MQTT Publisher Connection. Give it a name.
2. For the sake of this example, select “ICONICS JSON” as the Encoder. (When you are configuring your own publisher you can select whatever encoder is most appropriate.)
3. Enter a Device ID (for example, “Device1”).
4. For MQTT Broker, choose the broker you created in the previous section.
5. Enter a Base Topic.
6. In the Publish Lists section, click on the ![]() button (“Create new default publish list”) to create the publish list for this MQTT publisher.
button (“Create new default publish list”) to create the publish list for this MQTT publisher.
7. Apply changes and then in Project Explorer go to Internet of Things > Publish Lists and open the Publish List you created (should be named “Publish List 1” by default).
8. Set Publish Rate to 5 seconds.
9. Set Refresh Hold Off Time to 0 seconds.
10. Go to the Published Real Time Points tab and under Point Name enter “svrsim:sine” or browse one of your tags.
11. Set Publish Name to “Simulated - Sine” (or an appropriate name for your tag).
12. Apply changes and then in Project Explorer go to Internet of Things > Collection Groups and open it.
13. Click on the default collection group “Collection Group 1” and set the Collection Rate to 5 seconds.
14. Apply changes and use the stoplight in the Home ribbon start the Publisher.
1. In Workbench, browse for Internet of Things > Subscriber Connections.
Right-click and select Add MQTT Subscriber Connection. Give it a name.
2. Set Default Decoder to ICONICS JSON (or the same as your publisher’s encoder, if it was different).
3. Set Keep Alive Timeout to 0.
NOTE: If Keep Alive Timeout is set to 1 minute, for example, and you didn’t get any data in the span of 1 minute, the tag would return “Bad – Timeout” in GraphWorX64. Selecting 0 ensures that tags will never show “Bad – Timeout”.
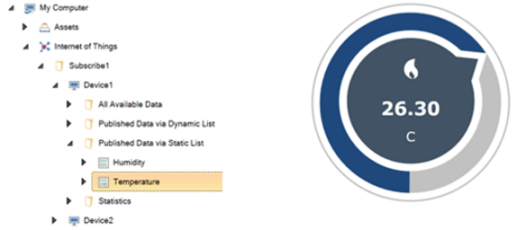
Data under Device1
As you may have noticed in our previous example, we have always had ICONICS JSON encoder or decoder. This means that our data would be sent with ICONICS standard format.
For some use cases you would need to configure it to publish or subscribe to custom data; in these cases, you would need to select or create a new Custom Encoder.
The default custom JSON Encoder looks like this:
{
"id": "%PUBLISHNAME%",
"v": "%VALUE%",
"q": "%STATUS.GOOD%",
"t": "%NOWUTC.UNIX%"
}
The variables are defined as:
Multiple values can be sent in one update. The following is an example of how multiple values in the “Values” array of the message may look like:
{
"timestamp":1526988600000,
"values":
[
{
"id":"Temperature",
"v":21.2,
"q":true,
"t":1526988600000
},
{
"id":"Humidity",
"v":23.0,
"q":true,
"t":1526988600000
}
]
}
For more information about Custom Encoders please check applications note entitled, IoTWorX - Custom JSON Encoders and Publish Groups.
It is important to have the same Encoder and Decoder on Publisher and Subscriber. If you need to receive data via MQTT in some non-JSON format, contact your sales representative to learn more about custom development opportunities.
What if I don’t know JSON format of my messages?
First, make sure that your third-party component is sending data in JSON format. Use your third-party software (MQTT Client) to subscribe to your base topic with /# at the end (example: home/#). You can also contact ICONICS Technical Support, who can read out a few messages from your topic and forward them to you so you can view the format.
See Also: