![]()
![]()
Hyper Alarm logger logs alarm messages in the proprietary data format stored in SQLite database tables. However, in some cases, it can be useful to have alarm data accessible in different data formats (textual files, databases). The initial version of Data Exporter supports two target storages. Additional storages will be implemented in the future releases:
SQL Server/Azure SQL databases
CSV files stored on local data storages
Data exporter starts data exports based on global trigger events. Then exporter reads the stored alarm messages from the logger’s internal storage, using time range where start time is an end time from the previous synchronization batch. The first synchronization batch uses “Starting At” settings in the exporter task configuration. The end time is determined as “time now” subtracted by synchronization offset. The last data synchronization time is persistently stored on the alarm logger’s host machine. Thus, even after alarm logger restarts, the data export continues synchronization after the last synchronized interval.
The data read from the logger’s storage can be optionally filtered based on the available input alarm fields. The output dataset can reorganize input fields, optionally create new ones, based on expression evaluation.
Failures to target storage access are handled by the retry mechanism. The retry storage configuration (# of retries and retry delay) can be found in the storage configuration form.
Besides automatic data exports, manual data resynchronization is supported. User can specify a time domain and simple data export task filters to resynchronize exported data. Resynchronization task can either run immediately or can be scheduled for later processing. Resynchronization tasks can be created in Workbench configuration tool or entered manually into input task folder.
In redundant scenario, only active server synchronizes export data, including situations when resynchronization tasks are entered for processing on an inactive server.
Hyper Alarm Logger configuration tree

Three areas must be configured to export data: where to store exported data, what should be stored and when data exports should run. All three parts of the data exporter configuration are located under the main data exporter folder:
Storages – where to store exported data
Datasets – what should be exported
Tasks – interconnects datasets and storages, defines export triggers to specify when synchronization should start
Storages represent export targets. The initial version supports two storage types: SQL/Azure SQL server and CSV files created on a local disk or NAS. Cloud-based storages are planned for future releases.
New Storage

This section configures general connection parameters – connection type and storage connection properties. Connection string edit box is context specific – for SQL server type, it contains database connection string, but for CSV exports, this connection string represents the target file directory.
Textual aliases can be used as a part of a connection string. Aliases are delimited by << and >> delimiters. These aliases are resolved separately for each exporter task.
Batch Size - maximum amount of dataset rows read and written in a single batch (each operation can be split into multiple batches).
Retry Count – maximum number of retries to write export batches. When it exceeds the maximum number of retries, the export for this time domain is marked as done and the only way to export data for the same time domain is to use “Data Exporter Tasks”.
Retry Delay – the time to wait between two consecutive retries.
Copy Timeout – this setting is storage specific; SQL server uses it as a timeout for batch operations.
This storage type creates one or multiple CSV files directly in the root directory specified.
The CSV format uses standard reserved characters, which means a comma for separating cells, a system defined new-line delimiter (CR+LF on Window), and double quotes to escape any reserved characters inside cell values. Double quotes in cell values are doubled.
When creating a new file, the first line will be a header line containing all the column names. This header line is never modified, and new data is only ever appended to the end of the file.
It means that if the Dataset configuration changes and columns are added, removed, modified or reordered, the existing header in the CSV file may no longer match the data that is appended after the configuration change. It is necessary to manually reexport the data to fix it. See elsewhere in this documentation.
As the CSV file is a purely textual file, all data types supported by the Hyper Alarm Logger are the first converted to the text before exporting. In most cases, the conversion is straightforward, the following table only lists cases that require some explanation. The exported format is the same whether the ‘Target Data Type’ on the Dataset Column definition is set to ‘Native’, ‘String’, or the actual data type of the exported value.
|
Type |
Notes |
|
Boolean |
Exported as true/false |
|
Float32, Float64 |
Always using the dot (.) as the floating-point character, regardless of culture settings. |
|
Date Time |
Using the ISO 8601 extended format (.NET formatting string is yyyy-MM-ddTHH:mm:ss.FFFFFFF) |
|
Date Time Offset |
Using the ISO 8601 extended format with offset (.NET formatting string is yyyy-MM-ddTHH:mm:ss.FFFFFFFzzz) |
|
Duration |
Formatted as [-][d.]hh:mm:ss[.fffffff]. Elements in the square brackets are optional, fractional positions are used only as required. |
|
Guid |
Formatted as xxxxxxxx-xxxx-xxxx-xxxx-xxxxxxxxxxxx. |
|
Status Code |
The numerical value of the status code is exported. |
Hyper Alarm Logger can export one dimensional arrays of any of the supported data types by formatting the value as JSON. The individual elements of the JSON array will be formatted the same way as single (non-array) values are.
The only exception is the array of UInt8, which will get converted to Base64.
For CSV, the ‘Data Type Length’ setting on the Dataset’s column definitions limits the number of text characters that is exported per cell value. If the textual representation of the value is longer, it gets truncated. Leaving the ‘Data Type Length’ at zero disables the length limit.
This storage type creates one or multiple database tables in the database specified by the connection string.
New tables are created from the current Dataset configuration. If the Dataset configuration changes later, the missing columns are added to the database table, but the existing columns are never removed. The settings (data type) of existing columns are never changed.
That means that if the Dataset configuration changes and columns are modified, it may no longer be possible to export data to the existing database table because of type mismatches. These errors will show in traces and in the event viewer.
It is necessary to manually delete the existing database tables and reexport the data to fix it. The Hyper Alarm Logger is not programmed with the capability of deleting the database tables.
The following table lists all the simple (non-array) column data types supported by Hyper Alarm Logger and describes how they map to SQL data types. Column data types are specified on the Dataset configuration.
|
Type |
SQL Type |
Notes |
|
Native |
sql_variant |
Please see a next section how data is exported into the sql variant type. |
|
Boolean |
bit |
|
|
String |
nvarchar |
This data type accepts the ‘Data Type Length’ setting from the Dataset Column. A value of 0 on this setting or anything bigger than 4000 will create a SQL column with a maximum length, nvarchar(max). Any value longer than the column allows will be truncated. |
|
Float32 |
real |
|
|
Float64 |
float |
|
|
Int8 |
smallint |
|
|
Int16 |
smallint |
|
|
Int32 |
int |
|
|
Int64 |
bigint |
|
|
UInt8 |
tinyint |
|
|
UInt16 |
int |
|
|
UInt32 |
bigint |
|
|
UInt64 |
numeric(20) |
|
|
Date Time |
datetime2(7) |
|
|
Date Time Offset |
datetimeoffset(7) |
|
|
Duration |
numeric(19,7) |
Duration in seconds. The precision of the Hyper Alarm Logger on Date Time and Duration types is 7 decimal places. |
|
Decimal |
varchar(31) |
The Decimal is a 128bit floating point value with some floating limitations (please consult the .NET manual if details are required). Unfortunately, this data type is not natively supported by SQL, and is hence stored as a text value. |
|
Guid |
uniqueidentifier |
|
|
Character |
nchar(1) |
|
|
Status Code |
bigint |
The numerical value of the status code is exported. |
Hyper Alarm Logger can export one dimensional arrays of any of the supported data types. It will do so by creating a nvarchar(n) column and then exporting the value formatted as JSON. The only exception is the array of UInt8, which will get exported straight into a varbinary(n) column.
In both cases, the “Data Type Length’ setting from the Dataset Column is accepted when creating the SQL column. A value 0 on this setting or anything bigger than 4000 for nvarchar, or 8000 for varbinary will create a SQL column with a maximum length.
The individual elements of the JSON array will be formatted the same way as single (non-array) values of the CSV file are. Please consult the CSV section for formatting details.
When a Dataset Column’s type is set to ‘Native’, the exporter will create a sql_variant column in the target table. The ‘Is Array’ check box is ignored for the ‘Native’ data type.
Hype Alarm Logger will export data into the sql_variant column in the same format as it would into the strongly typed column. That means that arrays of values will be exported as JSON text for example.
Be aware though that the maximum length of the text stored in the sql_variant column is 4000 character (using the nvarchar type) and any longer text is truncated. The maximum length for varbinary byte arrays is 8000 bytes. The ‘Data Type Length’ setting does not apply to the sql_variant type.
Dataset configuration defines output columns for export dataset. Dataset can be created as a combination of data coming from different logger collections. It combines columns from all collections into single dataset, rows can be optionally filtered by expression-based condition.
To start with a new dataset definition, fill-in dataset name.
General Page in Datasets

Description - can contain any text and its purpose is to describe the dataset specifics. The description is not used by runtime.
Search Condition - expression-based filter condition. If its evaluation return is true (non-zero value), this record is exported. To be able to browse available variables, at least one collection must be associated with this dataset. Textual aliases can be used as a part of each variable name. Aliases are delimited by << and >> delimiters. These aliases are resolved separately for each exporter task.
Collections Page in Datasets

“Columns” page is the most complex configuration form in the dataset’s configuration. Columns can be manipulated in a similar fashion as data collection association. The “Add” and “Remove” buttons are used to add or remove columns. Each column is defined as an expression; thus, the column value is not necessarily mapped to a single collection column. Instead, it can be created from multiple dataset columns and optionally formatted using expression functions. Each column can be formatted into “Target Data Type”, or it may keep data type returned from an expression evaluation.
Columns Page in Datasets
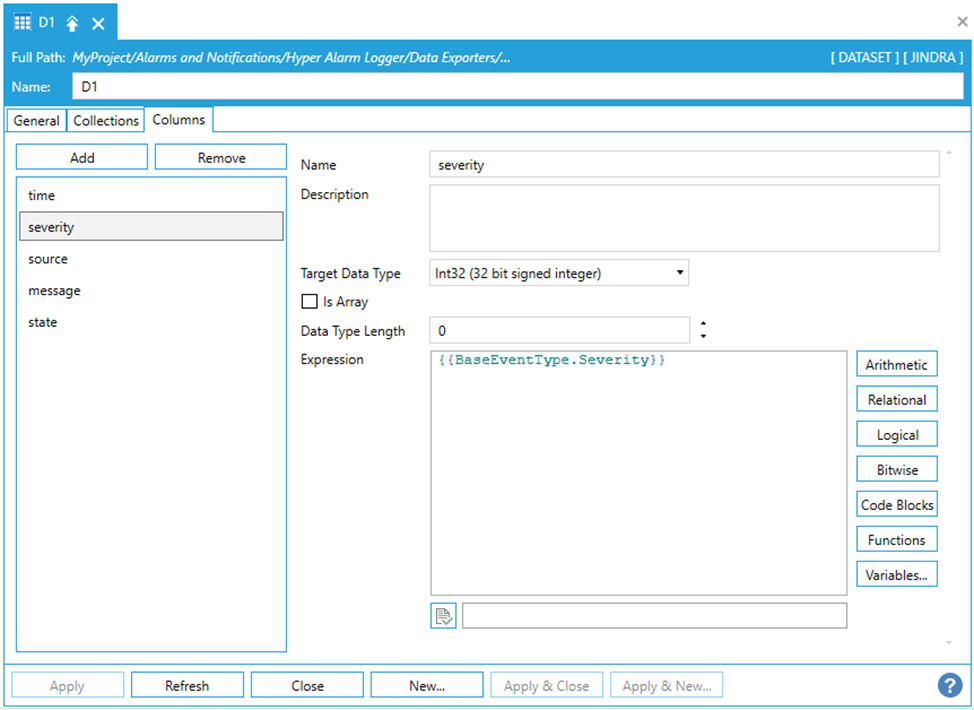
Name – column name, used to identify column in target storage entity.
Description – optional, human readable description. It is not used by runtime.
Target Data Type – used as a target storage data type for the given dataset column.
Is Array – part of target data type definition, specifies whether the column value is an array of simple data types.
Data Type Length – some of the data types can specify their maximum length – e.g., textual data type.
Expression – an expression to create the output column value. Textual aliases can be used as a part of each variable name. Aliases are delimited by << and >> delimiters. These aliases are resolved separately for each exporter task.
Tasks represent the topmost entities which link “Storages”, “Datasets” and define when an export should run by utilizing a global triggering system.
Tasks

Enabled – When checked then this task can export data from Hyper Alarm Logger.
Description - can contain any text and its purpose is to describe dataset specifics. Description field is not used by runtime.
Synchronization Offset – Minimal time distance from synchronization time to determine end of synchronization time domain. E.g., when task is triggered at 12:01:00 and “Synchronization offset” is set to 1 minute then end synchronization time will be 12:00:00.
Storage – select one of the configured storages.
Dataset – select one of the configured datasets.
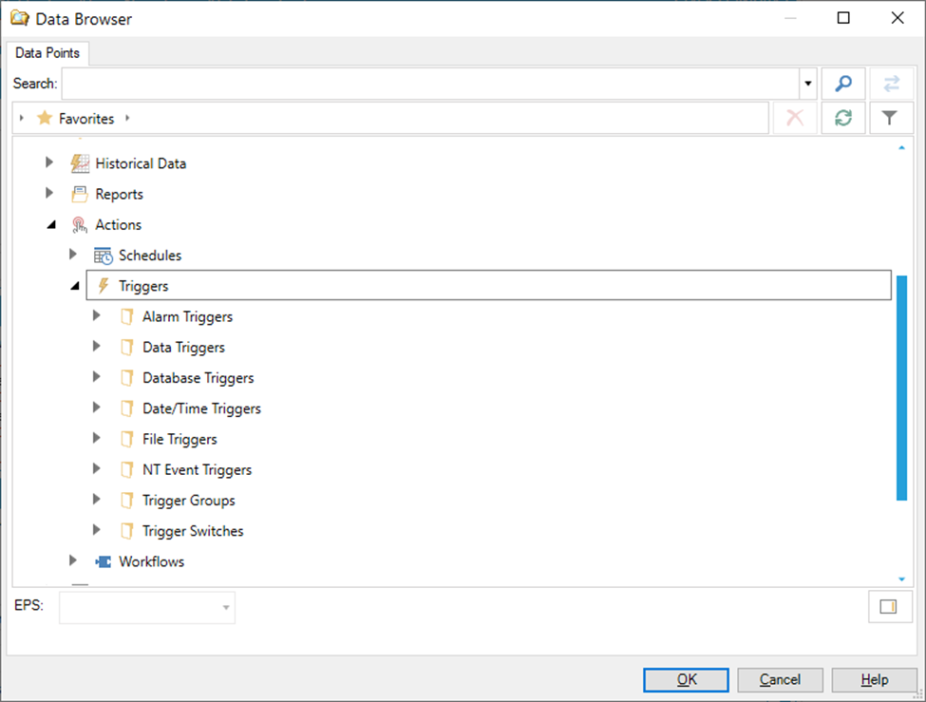
Trigger – select global trigger, must be configured under Actions – Triggers workbench section. Trigger name can be either typed in manually or selected in the following browser.
Triggers in Data Browser
This section specifies when to create a new storage entity (that is a database table or export file). It allows to use either one storage entity to export all of the data, or to split data into multiple entities based on their time stamp, for example to split data into daily or monthly files/tables.
Whether exporting into CSV or into a database table, the name of the entity follows the same pattern. When exporting all data into a single entity, the name of the entity will be simply the name of the Task, with a file extension applied in case of the CSV file. That means that the file will be named for example NewTask.csv, and the table will be named NewTask.
When splitting data into multiple entities, the name of the entity will be <TaskName>_<StartTime>--<EndTime>[.extension]. The StartTime and EndTime are in the ISO 8601 extended format and are separated by two hyphens (also according to ISO 8601).
Enable schedule settings – when checked, then target storage entities will be created based on configured schedule. Schedule uses standard time calculation dialog which is used in many places within Genesis64 system. When disabled, all data is exported into a single storage entity.
Starting at UTC – valid when schedule is disabled, when checked, then “Starting at” is specified in UTC.
Starting at - valid when schedule is disabled, defines a start time for the first data export synchronization.
Time Zone – time zone used for calculating of scheduled times. Can be local (host OS time zone) or UTC.
Recurrence type – the type of recurrence calculation. It can be “Time interval” or “Specific dates and times”. The configuration form is changing based on the selected recurrence type.
Starting at – initial time for data export synchronization and schedule calculations.
Recur every – recurrence period for “Time Interval” recurrence type or base recurrence period for “Specific dates and times” recurrence type.
All remaining configuration components are valid for “Specific dates and times” recurrence type and dynamically changes based on “Recur every” setting.

Min File Time Extent – used when scheduled storage entities are used. It specifies shortest time domain for created storage entities (files or database tables).
Aliases – alias settings, gives meaning to all aliases used in either storage’s connection string or dataset’s search condition and columns. Alias names and their values are codded in a simple key-value text, delimited by equal sign (=) and semicolon (;).
First_alias_name=first_alias_value;Second_alias_name=second_alias_value; …
A browse alias dialog can be used to setup aliases – click on the icon next to “Aliases” edit box.
Aliases Browser

General data exporter settings can be found under the “Product Configuration” folder in the “System Settings” configuration form. The last section in this form is dedicated to “Data Exporter”.
"System Settings" configuration form - Data Export

The maximum concurrently running exporter tasks should prevent the system overload when too many exports are triggered at the same time. The exporter infrastructure begins the data export for specified maximum exporter tasks and waits until some of them completes. After that, pending exporter task can begin the data export.
The Export state file persistently stores information about last exported times for each configured exporter task. This setting specifies a folder on the local disk where state storage file should be created. When this setting is empty, it uses the “ProgramData\ICONICS\HyperAlarmLogger\DataExport” folder. When default location is modified, make sure that logger service has the "read/write/create access" permissions to the newly configured folder.
This is a period in which the logger stores the modified data export state. If it is “too fast”, it may consume unnecessary host system resources. If it is “too slow”, the system is in risk of loosing synchronization end times in case of system failure.
Synchronization tasks are used to re-synchronize the exported data. The data exporter uses textual files to describe data resynchronization parameters. Running data exporter accepts such files from the file directory configured in this setting. When empty, the logger uses the “ProgramData\ICONICS\HyperAlarmLogger\DataExportTasks” folder.
Sometimes is necessary to re-synchronize exported data. This functionality is available using data exporter tasks. These tasks are represented by textual files, where task values are encoded as set of key-value pairs structures. Task files can be created either using workbench configuration form or created manually and placed into specific file directory, configured in system settings. See Synchronization Tasks Directory).
Task management GUI can be found under “Hyper Alarm Logger” - the “Product Configuration” folder in the Workbench’s project explorer tree.
Data Exporter Tasks Management

To create new a new synchronization task, click on the “+” button. This shows the following configuration dialog:
A new Synchronization task
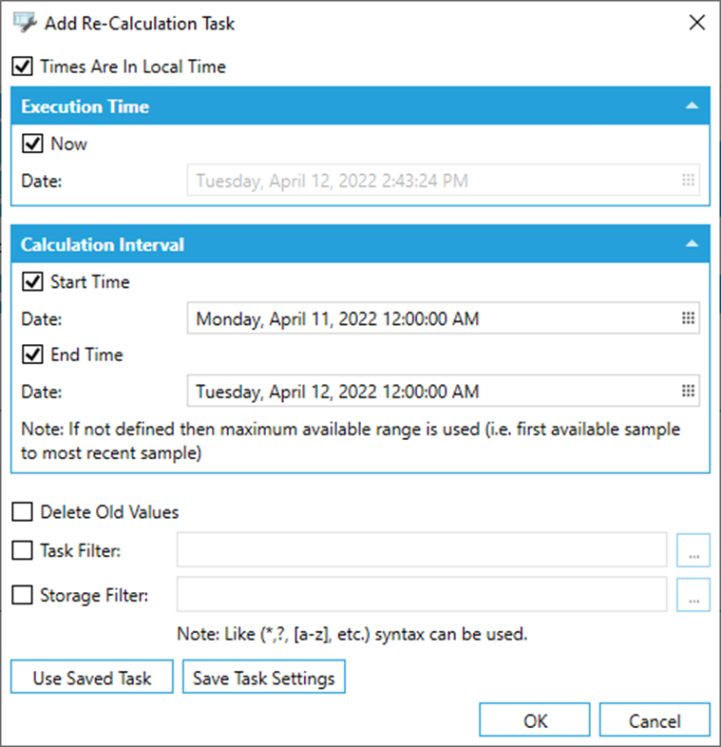
Times are in Local Time – when checked, all times shown in this dialog are in the host system time zone. However, the created task file has all times always in UTC.
Execution time specifies when new synchronization should be started, either now, or at some specific time (e.g., at midnight). This time is used to specify the synchronization task file name.
Calculation interval defines the synchronization time domain. The end time is always limited to the max. latest synchronized time. The start time is either a configured start time or a specified time.
Delete Old Values – if checked, the old values in re-synchronization interval are deleted, but this setting may also change the re-synchronization interval for the scheduled entities in the target storage. If the old values must be deleted in a file-based storage, the export files are overwritten completely from their starting time. If the old values must be deleted from a database storage, the rows in the time range specified are simply deleted from the database tables.
Task Filter – an optional filter to specify tasks which should be re-synchronized.
Storage Filter – an option filter to specify storages which should be re-synchronized. Both filters must be true for tasks re-synchronization.
Once user clicks on the “Ok” button, a new task appears in the list in the "Main task management" form. However, a new task is not created until the “Apply” button in the "Main configuration" form is activated. The same concept is used for editing or deleting of the existing re-synchronization tasks. First, delete or modify task, then click on the “Apply” button.
As was mentioned in the previous sections, a text file is used to describe a re-synchronization task. This allows users to create such file using the 3rd party tools and just place it to the correct folder to activate it. The format of this file is relatively simple – a set of key-value pairs where the key-value is delimited by the equals sign and value pairs are delimited by a semicolon.
Begin=20220403T22-00-00;End=20220404T22-00-00;DeleteOldValues=False;DataStorageNameFilter="";TaskNameFilter="";
Once a file is created, it can be stored in the Synchronization tasks directory. The name of a file must follow the following format which codes the task execution time:
"yyyy''MM''dd'T'HH'-'mm'-'ss".txt
An example of a created task file name:
20220406T13-04-53.txt