Configuring SPC Tags
|

|
Note: The following information is applicable only to users who have installed a Quality AnalytiX package from the AnalytiX suite. For more information about installing Quality AnalytiX, see the Installing Quality AnalytiX topic.
|
You can use Hyper Historian to create SPC tags, which apply a set of distribution rules and collect statistical summary data to monitor the performance of your process. Each of these tags creates a new configuration -- complete with a new set of triggers, folders, and methods -- in Hyper Historian. More importantly, each SPC tag also creates a set of calculated tags, which are stored in a historical database. You can access these calculated tags when creating trends or configuring alarms.
To Configure an SPC Tag within Hyper Historian:
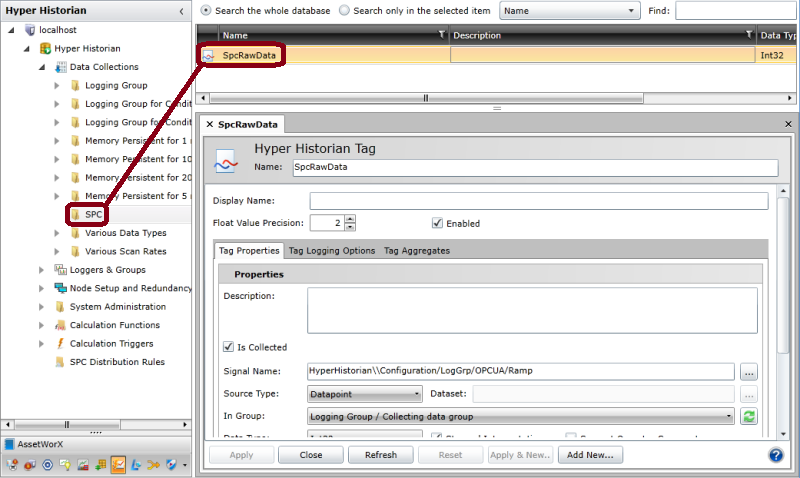
- Create a new folder called SPC (or something similar) within the Data Collectors folder inside the active database within Hyper Historian. This folder helps you organize your SPC tags. For guidelines on creating folders within Hyper Historian, see the Hyper Historian Folders topic.
- Within this new folder, create a new tag. This tag represents the raw data that the SPC tag summarizes. The Hyper Historian Tags topic presents information about adding and configuring tags representing raw data. At this point, your active Hyper Historian database should look similar to the one shown in the image below:
Sample SPC Folder and Raw Data Tag Configuration
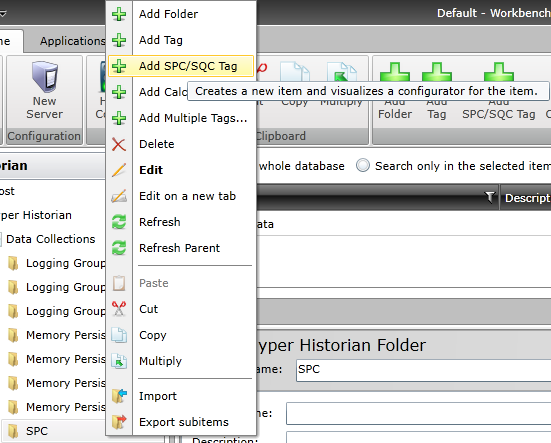
- Right-click the folder that you created in step 1 and select the Add SPC Tag option. You can also select the folder, then go to the Edit tab of the Home ribbon and select Add SPC Tag. The Hyper Historian SPC tag configuration dialog appears on the right-hand side of the screen (with the Properties tab visible), as shown below:
SPC Tag Configuration Dialog in Hyper Historian -- Properties Tab
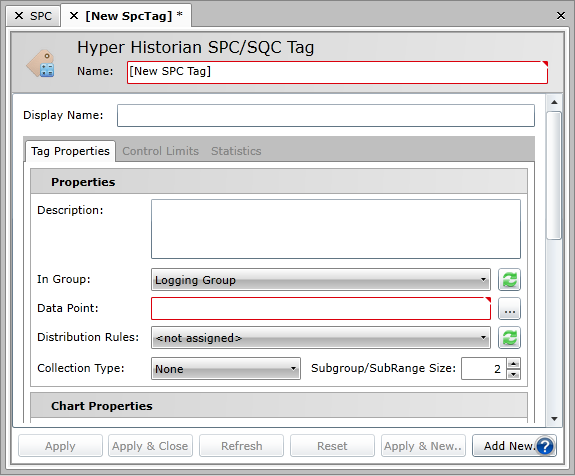
- At the top of the dialog, enter a Name for the tag. Hyper Historian uses this name to identify the tag.
- Optionally, you can enter a Display Name for the tag. Hyper Historian uses this name when showing the tag within the navigation tree. If you leave the display name field blank, Hyper Historian shows the Name of the tag in the Project Explorer instead.
- Edit the properties, control limits, and statistics associated with the new SPC tag using the steps described in the SPC Tag Configuration Dialog topic.
- When you are satisfied with the settings you have configured on this dialog, click the Apply button to save your changes, click the Apply & Close button to save your changes and close the dialog, or click the Apply & New... button to save your changes and create a new SPC tag.
You can also discard the changes you have made on this dialog since you last saved by clicking the Refresh button or retrieve the most up-to-date settings stored in the project database by clicking the Reset button.
If you wish to create a new SPC tag without saving or discarding the changes to this SPC tag, click the Add New... button.
SPC Tag Associated Values
After you finish configuring an SPC tag, Quality AnalytiX creates several folders and values, which you can access whenever you add an OPC DA tag or an OPC HDA historical request to your project. You can access these additional elements in the Data Browser by navigating to Historical Data, then to Hyper Historian, then to the folder that contains your SPC tags. These elements include:
- Two counter variables called Group Counter, which contains the number of groups associated with an SPC tag, and Sample Counter, which contains the number of samples associated with the tag.
- Two folders with names based on the Collection Type of an SPC tag, which you can set in the Properties tab of the SPC Tag Configuration dialog. Each folder includes the following variables:
-
- Center Line: The expected mean value of this SPC tag collection.
- Group Counter: The number of subgroups associated with this calculation for the tag collection.
- Lower Control Limit: The expected minimum value of the tag collection.
- Pattern Rules: The set of distribution rules associated with this tag collection. To edit these rules or create new ones, use the SPC Distribution Rule Set dialog.
- Upper Control Limit: The expected maximum value of the tag collection.
- Value: The most recent value from this calculation.
- A folder named Statistics, which includes the variables that you enabled in the Statistics tab of the SPC Tag Configuration dialog.
See also:
SPC Distribution Rule Sets
SPC Tag Configuration Dialog
Collector Groups and Hyper Historian Tags