![]()
![]()
Hyper Historian is a powerful, 64-bit historian that uses a high compression logging engine to decrease database size. The Hyper Historian logging database is optimized for space usage and does not require any third-party database to store historical data.
You can add new historical data from a third-party logger (or data that was collected manually) to a Hyper Historian database, however, by using the BridgeWorX Text File Parser transaction block. Data added to Hyper Historian in this way is available as native Hyper Historian data and OPC HDA data, and you can query it using the Hyper Historian OLE DB interface.
The figure below shows you how to use the BridgeWorX Text File Parser transaction block to move data from a CSV or text file into the Hyper Historian database.
System Architecture

|
|
Note: Another method for importing historical data from CSV files is ICONICS' MergeWorX. MergeWorX, a tool for automatically or manually inserting data into Hyper Historian, uses a plug-in technology to import from various formats of CSV files. It can be used to import historical or log data from databases, other historians, intermittently-connected field devices and other equipment such as PLCs, providing high-resolution recording from these devices and greatly increased reliability of capturing all data, even when network outages occur. |
In order to transfer data from CSV file into a Hyper Historian database, follow these general steps:
First, you will need to make sure that the tags you want to import data for are configured and available in Hyper Historian.
For Hyper Historian Configuration instructions, refer to the Introduction to Hyper Historian topic.
Next, you will need to create a stored procedure in the SQL Server where the configuration database for Hyper Historian resides.
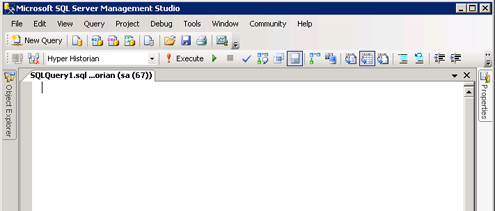
SQL Server Management Studio
CREATE PROCEDURE InsertCSVDataToHH
@TimeStamp nvarchar(50),
@Value float
AS
SELECT * FROM
OPENQUERY(HH2, 'INSERT INTO
Test.TestCollectorGroup.RawData
(TagName, [TIMESTAMP], VALUE)
VALUES (''TestTag'',''2010-06-15 10:00:00'',
''5'')')
|
|
Note: Make sure you change the Tag Name to the one actually used. If you are not sure of the tag’s name, you can run a query against the LoggingGroup.CollectorGroup.Tags table. In addition, the table name is made up of LoggingGroup.CollectorGroup.RawData. You can find your logging group and collector group name in your Hyper Historian Configuration. |
Last, you will create a BridgeWorX transaction that will read the data from the CSV file and write it into the Hyper Historian logging database. If you would like to learn more about BridgeWorX, please refer to the application note titled "BridgeWorX – Quick Start" and the associated help files.
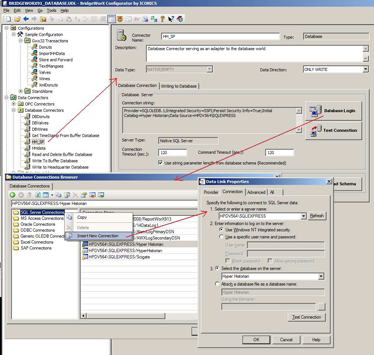
Database Connector
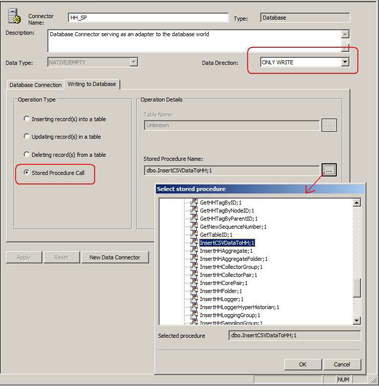
Database Connector: Choosing Stored Procedure
|
|
Note: The name of that stored procedure was InsertCSVDataToHH if you copied it exactly as shown in the previous section. |
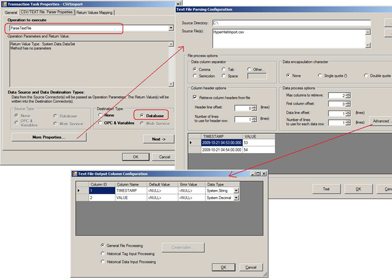
Figure 5 - Choosing the CSV File to Parse
|
|
Note: The CSV file should have date and time in YYYY-MM-DD hh:mm:ss.000 format. If the data is in any other format, it needs to be converted into this format or the stored procedure needs to be updated to accommodate conversion to YYYY-MM-DD hh:mm:ss.000 format. |
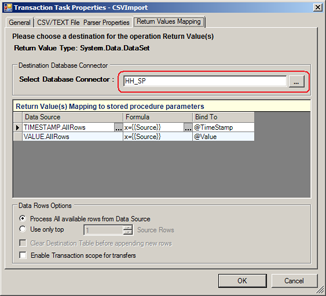
Figure 6 - Data Connector Parameter Binding
Now that you have configured everything, you are ready to import the data. Importing the data is as easy as running the BridgeWorX transaction you created in the previous section.
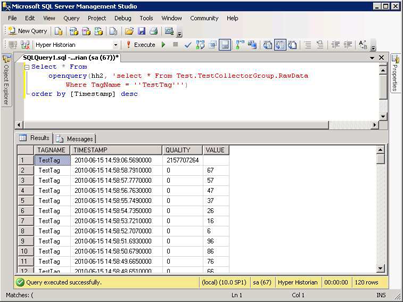
To view the inserted data, you can run the SQL Query below:
SELECT *
FROM
OPENQUERY (HH2, 'select * From
Test.TestCollectorGroup.RawData Where TagName
= ''TestTag''')
ORDER BY [timestamp] DESC
Figure 7 - SQL Query to View Data in Hyper Historian Database
For more information on how to use the Hyper Historian SQL Query engine, please refer to the SQL Query Engine Quick Start topic.
See also:
Importing and Exporting Hyper Historian Configurations