|
|
The features on this page require an add-on to work with GENESIS64 Basic SCADA. |

![]()
|
|
The features on this page require an add-on to work with GENESIS64 Basic SCADA. |
![]()
Because the BACnet application pool is generated in runtime and it can be browsed only remotely (it is assumed that your BACnet device is placed on the network), it is not possible to browse for local ICONICS BACnet Simulation data. Therefore, you need another machine running ICONICS Simulator or a real BACnet device, which will provide the application pool for you to browse. This topic describes how to browse for the data on the network and how to read the data, both within Workbench and with ICONICS' GraphWorX64 client.
NOTE: BACnet specification (135-2004) supports the following objects: Binary Input, Binary Output, Binary Value, Analog Input, Analog Output, Analog Value, Averaging, Life Safety Zone, Multi-state Input, Multi-state Output, Multi-state value, Loop, Calendar, Notification Class, Command, LifeSafetyPoint, File, Program, Schedule, Trend Log, Group, Event Enrollment, and Device. From ICONICS point of view, these types are part of known specification. But operations only read and write properties. That means, you cannot read the whole buffer for a Trend Log, we cannot evaluate Events, etc. But, you can read how many events are there, how many samples for trend are there, and so on.
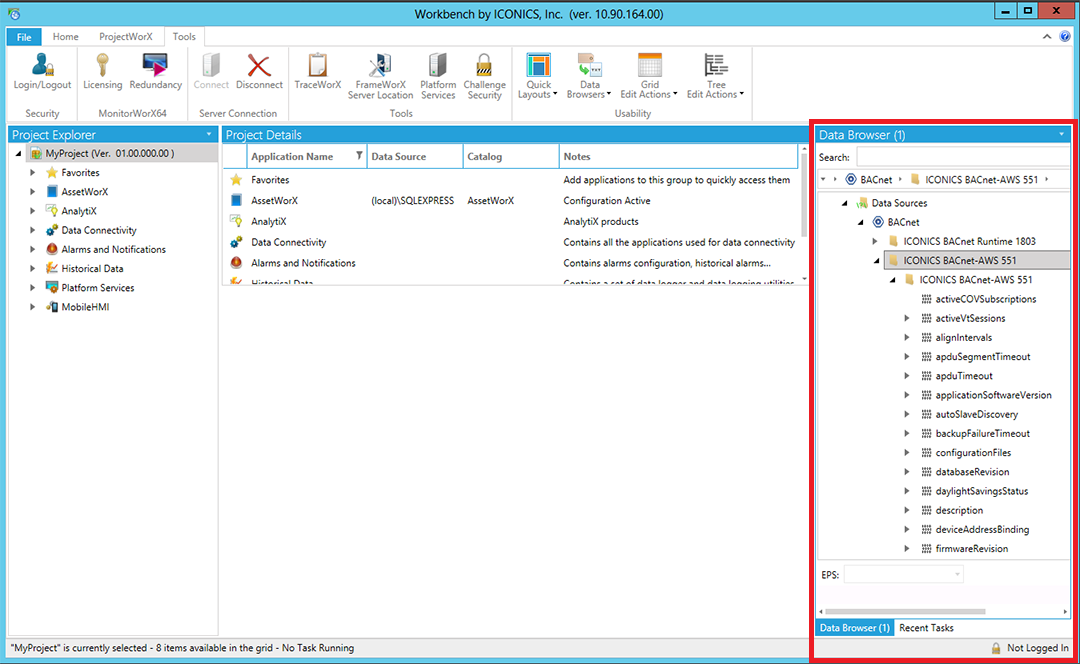
You can view BACnet data within the Workbench by viewing it within the Data Browser/Recent Tasks section (right-hand side pane) of the window, as shown below. Be sure to click on the Data Browser tab at the bottom of the pane.
Once you have the Data Browser selected, you can navigate to the machine containing your BACnet configuration. The example below was found through:
/My Computer/Data Sources/BACnet/ICONICS BACnet-AWS 551. Expanding the ICONICS BACnet-AWS 551 node within the Data Browser exposed multiple properties that can be viewed or even dragged where needed in any applicable Workbench configuration.
Browsing BACnet Data in the Workbench
Follow the steps below to read the data from BACnet device:
Start GraphWorX64 from Start > Programs > ICONICS > GENESIS64 > GraphWorX64 > GraphWorX64.
Create a new process point on your GraphWorX64 display by selecting Dynamics from the menu bar and then select Process Point. Left-click it anywhere on the display to insert a process point.
When the Unified Data Browser is opened, you need to click on the OPC UA tab and select the BACnet folder. Select an appropriate input as shown below.
Browsing BACnet Devices
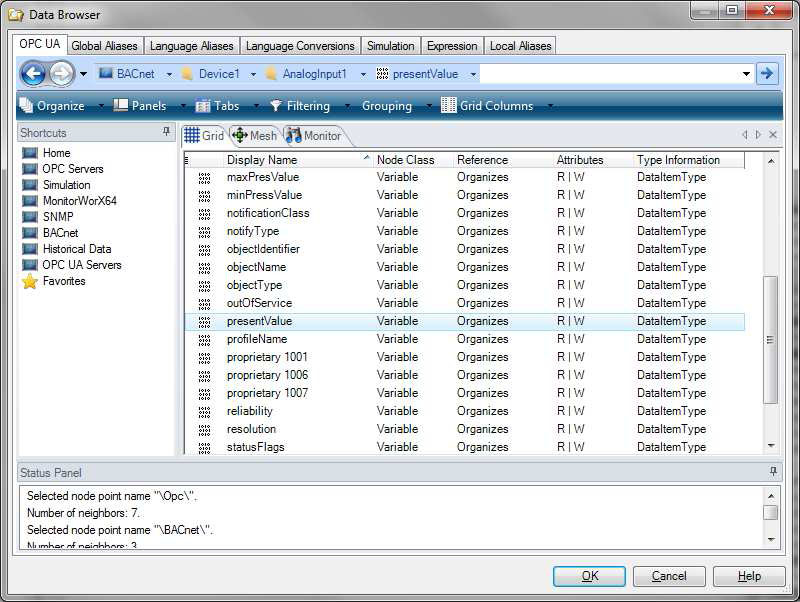
NOTE: Usually, there is a “presentValue” which provides the current value from that device.
Click on OK to confirm the selection.
Take note of the process point data source syntax for BACnet and click OK.
Switch to Runtime and you should see the data tag value.
Understanding BACnet Application Pool
BACnet application pool contains the objects below and it is very important to understand how it is designed. Here is an example:
bacnet:ICONICS BACnet Device Simulator 498\AnalogInput:1\presentValue.Value
In the above tag syntax:
bacnet: – indicates that it is a BACnet Process Point
ICONICS BACnet Device Simulator 498 – is the Device name with the unique ID 498
AnalogInput:1 – is the <ObjectType>:<Instance ID>
presentValue – us the <Property name> (by default ID=85).
Another example uses the Genbroker plug-in:
@BACnet64:ICONICS BACnet Device Simulator 498\AnalogInput:1\presentValue.Value
In the above tag syntax:
@ – specifies that the tag is using a legacy OPC server (namely OPC DA)
BACnet64: – indicates the Genbroker plug-in prefix, which means that it is a BACnet Process Point
ICONICS BACnet Device Simulator 498 – is the Device name with the unique ID 498
AnalogInput:1 – is the <ObjectType>:<Instance ID>
presentValue – us the <Property name> (by default ID=85).
See also:
Exploring the Network with BACnet