![]()
![]()
What is the FrameWorX Server?
At the center of GENESIS64 is the FrameWorX64 application. FrameWorX64 manages licensing, aliasing, security, data exchange between GENESIS64 applications, and more.
The ICONICS FrameWorX64 service is configured to start automatically by default.
Server Configuration
If you will be getting your license from a remote server, you’ll want to check to be sure you have at least one free Client Station license on that machine. If you have no available Client Station licenses then a remote client will not be able to connect successfully.
On the license server, go to Start -> Programs -> ICONICS GENESIS64 -> MonitorWorX Viewer to see your current license.
On the Overview tab for the Client Stations item at the bottom, verify that you do not have a 0 in the Remaining column.
Figure 1 - Client Stations Remaining

Client Configuration
Follow these steps to configure the client to look at your server’s FrameWorX server.
Open the Workbench by going to Start -> Programs -> ICONICS GENESIS64 -> Workbench.
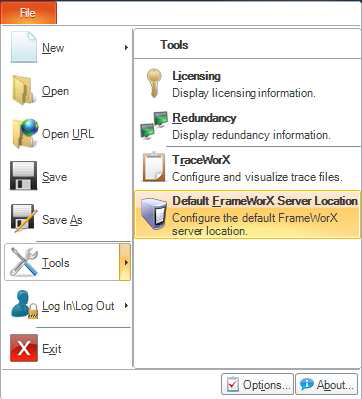
Click the File menu and go to Tools -> Default FrameWorX Server Location.
Figure 2 - Default FrameWorX Server Location
NOTE: If you cannot access Workbench for any reason and you need to change the FrameWorX server location, you can go to C:\Program Files\ICONICS\GENESIS64\Components and run IcoServerLocationSetup.exe.
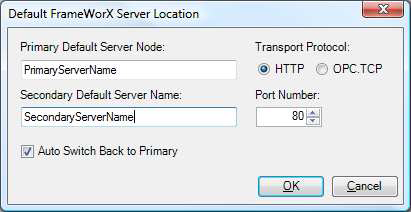
Change the Primary Default Server Node from “localhost” to the name of your primary FrameWorX server. If you have a secondary FrameWorX server enter that name into the Secondary Default Server Name.
Change the Transport Protocol and Port Number if these options have been changed on the server. (If no changes were made on the server then the default values can be left on the client.) Click OK when you are done.
Figure 3 - Setting the default FrameWorX location
Close and re-open Workbench to refresh the FrameWorX information.
Click on the FrameWorX Server provider. If the change was successful you should see your remote FrameWorX machine listed in the tree here.
Open MonitorWorX Viewer from Start -> Programs -> ICONICS GENESIS64 -> MonitorWorX Viewer. The License Server Node Name should be your remote server.
Separate Licensing
If you want your licensing to come from a machine that’s separate from the FrameWorX server, follow these steps:
Browse to \Program Files\ICONICS\GENESIS64\Components (this path may be slightly different if you did not install to the default location).
Make a backup of IcoLicenseService.exe.config.
Open IcoLicenseService.exe.config with Notepad or another text editor.
Look for this line:
<add baseAddress="net.tcp://localhost:8002"/>
On that line, change “localhost” to the name of your remote licensing server.
Save and close the file.
Open MonitorWorX Viewer from Start -> Programs -> ICONICS GENESIS64 -> MonitorWorX Viewer. The License Server Node Name should be your remote server.
NOTE: You might need to restart the ICONICS FrameWorX service from Control Panel Administrative Tools Services before you see these changes take effect.